Treelist
Version 4.3
Introduction
- Price : £2.99
- Purchase : Treelist
- Software Name : Treelist · Create a Hierarchical Treelist with Collapsible & Expandable Nodes
- Download Demos : Demo Workbooks
- Software Version : v 4.3
- Author : Mark Kubiszyn
- Website : Kubiszyn.co.uk/
- License : MIT License (MIT)
If you have already purchased this Software, let me take a moment to thank you for being a loyal customer
You are entitled to free lifetime updates for ALL future builds
This documentation is to help you understand the Software and to give you a more meaningful insight into what it can do. Please go through the documentation and read it carefully · Basic to Moderate skills are required - knowledge of VBA would be advantageous if you wish to develop the Software
Requirements
You will need the following Excel Version & Prerequisite to use this Software
- Excel 2010, 2013 & 2016 (32bit or 64bit) - this Product has been specifically designed for Excel 2013. Please Note: the Code works with Excel 2010, however there is a flicker when selecting Nodes - please download the Demo Workbooks and test all of the examples before purchasing if you are using Excel 2010
- Basic to Moderate Excel skills - knowledge of VBA would be advantageous if you wish to develop the Software
- Windows PC · NOT a Mac!
No support is provided for customization or development of this Software
About Treelist #back to top
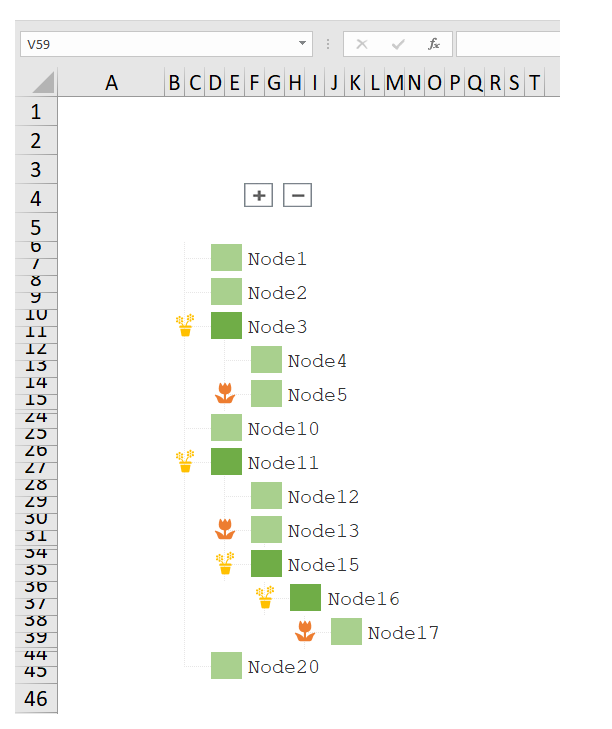
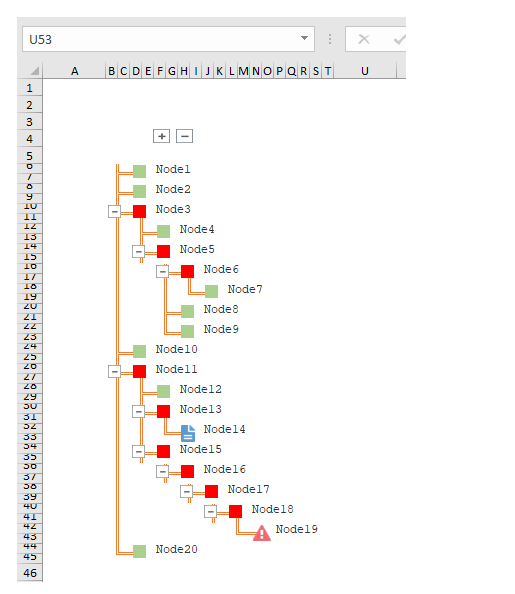
Tree List uses hierarchical data to create lists of Items in an Excel Worksheet that can expanded and collapsed at Parent Nodes. When the Nodes are expanded or collapsed any descendants that are already expanded or collapsed persist. The finished list can be copied into a new Workbook or an existing Project - all of the Code is generated in a self-contained "Template" Worksheet Code Module - just Copy out the Worksheet to use the new Treelist. Treelist also supports Office 365 Subscription Icons
Tree List can be used to create many kinds of lists, including a Hyperlink Index to other Worksheets or Web Pages, a T.O.C. or an Options / Settings list. Tree List is highly configurable. You can change the position of the Tree List, change the Node Type and Colours, choose whether or not to draw the Node hairlines, choose whether or not to add the Buttons and Code to expand or collapse all of the Items at once and much more... Check out the features below or download some of the Demo Workbooks that have been created using Tree List

Features include:
- * Create an expandable and collapsible Tree List in an Excel Worksheet with associated VBA Code from a list of Items
- * The Tree List "Template" Worksheet can be renamed and copied into a new or existing Workbook
- * Use Text, Dates, Numbers, Hyperlinks or Styles to format the Tree List Items
- * Change Standard Node Icons to different Icons ie. Warning, Magnify, Setup etc.
- * Use SVG/Graphics Icons with Standard Nodes for Toggling
- * Use Office 365 Icons as Toggle Nodes
- * Use SVG Icons, having both Fill Colour & Outline Colour for Toggle Nodes and ExpandAll/CollapseAll Nodes
- * Change the Width and Height of the Icons for Toggle Nodes and Standard Nodes
- * Create the Tree output to start at any Row or Column
- * Set the Tree List Column & Row Widths
- * Set the Tree List Background Colour - the Icons are transparent
- * Choose the Node Hairline Colour or whether or not to draw the Node Hairlines
- * Choose the Node Hairline Line Style and Border Weight
- * Choose the Expandable & Collapsable Node Types, either Folders, Squares or Triangles
- * Change the Horizontal & Vertical Toggle Node and Standard Node positioning
- * Run a DeleteEveryOtherRow() Macro after a Treelist Build to create a Single Line Treelist
- * Choose Row Banding and set the Banding Colour
- * Tree Node &lder Icons visually indicate collapsed or expanded Item
- * Options are included to write out the VBA Code to collapse and expand all of the items at once
- * Add a subtle Click Effect Animation to the Treelist Nodes when they are clicked
- * Protect Nodes from Selection but still allow Worksheet editing
- * Choose whether or not to link Standard Nodes to the Toggle Code Macro
- * Move a Treelist after a Build either down or up through Worksheet Rows or left and right across Worksheet Columns
- * Choose whether or not to Merge Cells for Treelist Node Text
- * Adjust the Height & Width of Standard, Toggle Nodes and ExpandAll/CollapseAll Nodes
- * Run Macro after Build allows you to add you own Code to perform some formatting following a Treelist Build
- * Use one of the Quick Styles to change the style of the Treelist rendered including new Professional Light Theme
- * Use alternate Row Colours for Toggle Nodes and Standard Nodes
- * Skeleton - an Options Sheet Theme Creator to build 2-tier Menus in two Colours, dark and light
- * Load a 2 Column list that can be maintained and Sorted on a TreeStructure Sheet directly into the TreeList Sheet
Please Note:
When using Treelist for larger sets of data you may have to turn off 'Draw Node Hairlines' (Treelist version 3.6 onwards has improved speed and will complete a 500 Row x 5 level list with Node Hairlines in 5 seconds and a 1000 Row x 10 level list with Node Hairlines < 15 seconds). You can see examples of larger lists in the Demo Workbooks
Getting Started #back to top
The download File
Right-click and extract the Zip Archive. You will see a number of new Example Files, 8 Skeleton Files, 2 BMP Files, 4 PNG Files (2 without transparency), 2 SVG Files, 2 EMF Files and the Treelist_v4.xlsm File as per the image below (Please Note: many more example Files may accompany Version 4.2 that are not in the Screen Shot below):

Getting Started
Open the 'Treelist_4.xlsm' File. Click on the 'TreeList' Worksheet and examine the example layout. 1. Enter or Paste your Treelist data into Cell F11 (or leave the Example data). 2. Press the Create Treelist Button to create the example Treelist built from the data. The new Treelist will be created on the 'Template' Worksheet. Test the collapsing and expanding of all of the Tree Nodes. Now create your own Treelist by using your own list of data and by changing any of the Options on the 'Options' Worksheet. From version 3.8 you can use some of the Quick Styles to build Treelists - see the Options Worksheet
Quick Steps
Clear the data in the 'Treelist' Worksheet and enter new data. Press the 'Create Tree' Button. Copy out the 'Template' Worksheet. Save the Worksheet. Rename the Worksheet Tab if you want to (use any kind of Alphanumeric Text, but don't use single digits as the Worksheet Name like '1')
Remember to check out the Quick Styles that come with Version 3.8 onwards - they allow you to quickly swap between different settings in the Options Worksheet to create all kinds of Treelist styles
Configuration - the Options Worksheet #back to top
Configuring Treelist is straightforward. All of the Options for Treelist reside in the 'Options' Worksheet - expand the different settings by clicking on the 'Toggle' bars
Here are the Treelist Settings:
Treelist Row Number Output	                                     6	        sets the Row position where the first Tree List Item is rendered in the "Template" Worksheet, default = 6.  Please Note: this setting is reliant on the number of levels ie. If you have 5 levels then the minimum Treelist Row Number Output = 5
Treelist Column Number Output		                             6	        sets the Column position where the first Tree List Item is rendered in the "Template" Worksheet, default = 6.  Please Note: this setting is reliant on the number of levels ie. If you have 5 levels then the minimum Treelist Column Number Output = 5
Treelist Column Width			                             1.43	sets the Tree List Column Width - Tip: it is better to keep this small & increase the Nodes->Merge Columns Width, must be between 1.00 and 9.99, default = 1.43.  Please Note: if your system uses a different Radix point ie. ',' comma, change this setting accordingly
Treelist Row Height			                             7.75	sets the Tree List Row Height - Tip: remember this is half of a normal Column Width (making this too large will move the hairlines aways from the Node Icons), must be between 7.5 and 8.5, default = 7.75.  Please Note: if your system uses a different Radix point ie. ',' comma, change this setting accordingly
Template Row Height                                                  13.00      sets the Template Row Height - Treelist Row Height will still take precedent, default = 13
Template Column Width                                                8.29       sets the Template Column Width - Treelist Column Width will still take precedent, default = 8.29

Treelist Background Colour			                                sets the Tree List Background Colour whilst still allowing Styles to be used, default is White, Tip: highlight the Tree post-creation when using Styles if you want the Background Colour to persist
Create ExpandAll() Code Subroutine	                             TRUE	creates an additional Code Subroutine to exapnd all of the Tree List Items, default TRUE
Create CollapseAll() Code Suroutine	                             TRUE	creates an additional Code Subroutine to collapse all of the Tree List Items, default TRUE
Create Buttons for Code Subroutines	                             TRUE	creates the Buttons with Macro links to the additional ExpandAll() and CollapseAll() Code Subroutines, default TRUE
CollapseAll/ExpandAll Button Type (Default, SVG)                     Default    sets the Type of Buttons used for the ExpandAll/CollapseAll Buttons, SVG will use the SVG Icons, default = SVG
Create Click Effect Code Subroutine                                  FALSE      create Click Effect Code Subroutine to add a subtle circle click animation to all Treelist Nodes whenever they are toggled, default = FALSE
- Click Effect Size                                                  20         the Click Effect Size Parameter, default = 20

- Click Effect Colour                                                           the Click Effect Colour Parameter, default = Light Green, 9359529 (use right-click, Format Cells and pick a new Fill Colour)
- Click Effect Speed                                                 0.06       the Click Effect Speed Parameter, default = 0.06
- Click Effect Growth                                                5.00       the Click Effect Growth Parameter, default = 5.00
Run DeleteEveryOtherRow() Macro upon build                           FALSE      runs a Macro upon a Treelist build to delete every other Row in the Treelist to create a Single Line Treelist, default = FALSE
Zoom Treelist                                                        100        will set the Zoom on the Template to render the Treelist larger or small than 100%, default 100%
Here are the Tree Nodes Settings:
Toggle Node Width                                                   0.49        the Toggle Node Width, default = 0.49 cm
Toggle Node Height                                                  0.41        the Toggle Node Height, default = 0.41 cm
Standard Node Width (Square, Folder or Triangle)                    0.49        the Standard Node Width, default = 0.49 cm (Standard defaults, Triangle, 0.48 cm, Square/Folder, 0.49 cm)
Standard Node Height (Square, Folder or Triangle)                   0.41        the Standard Node Height, default = 0.41 cm (Standard defaults, Triangle, 0.40 cm, Square/Folder, 0.41 cm)
Collapse All Node Width                                             0.45        the Collapse All Node Width, default = 0.45 cm
Collapse All Node Height                                            0.38        the Collapse All Node Height, default = 0.38 cm

Collapse/Expand SVG Foreground Colour                                           set the Collapse/Expand SVG Foreground Colour, default = 3506772 (Dark Green)
Draw Single Standard Node Icons                                     TRUE        set to FALSE to prevent the Single Standard Node Icons from being drawn, default = TRUE
Draw Standard Node Icons		                            TRUE	set to FALSE to prevent the Standard Node Icons from being drawn, default = TRUE
Draw Node Hairlines			                            TRUE	set to TRUE to draw the hairlines that connect Nodes in the Tree List or set to False to leave the Nodes unconnected (if using Triangles, set this to FALSE), default = TRUE

Node Hairline Colour				                                set the Node Hairline Colour, default = Medium Grey
Node HairlineStyle                                                  xlContinuous set the Node Hairline Style, default = xlContinuous.  Please Note: you cannot set the thickness of a Dot or DotDash etc. - use xlContinuous and then set the Weight
Node HairlineWeight                                                 xlHairline set the Node Hairline Weight, default = xlHairline.  Please Note: depending on the Node Hairline Style, some of these settings have no effect
Toggle Node Type				                    Square	set the Node Type to 'Square' for square Colour Nodes, 'Triangle' for Triangle Colour Nodes or to 'Folder' for Folder Nodes, default = Square

Toggle Node SVG Foreground Colour                                               set the Toggle Node SVG Foreground Colour, default = 3506772 (Dark Green)
Toggle Node Horizontal Adjustment                                               set the Toggle Node Horizontal Adjustment, the greater the number the more right it is (ie. -3 is bigger than -5.5), the lower the number the more left it is (ie. -10 is less than -5.5), default = -5.5
Toggle Node Vertical Adjustment                                                 set the Toggle Node Horizontal Adjustment, the greater the number the more down it is (ie. 5.0 is bigger than 1.5), the lower the number the more up it is (ie. -5.0 is less than 1.5), default = 1.5
Toggle Node Placement                                                           set this to specify the way that a Toggle Node Icon is attached to its underlying cells (set to xlMove when resizing Nodes Height & Width), Default = xlMoveAndSize
Standard Node Horizontal Adjustment                                             set the Standard Node Horizontal Adjustment, the greater the number the more right it is (ie. -3 is bigger than -5.5), the lower the number the more left it is (ie. -10 is less than -5.5), default = -5.5
Standard Node Vertical Adjustment                                               set the Toggle Node Vertical Adjustment, the greater the number the more down it is (ie. 5.0 is bigger than 1.5), the lower the number the more up it is (ie. -5.0 is less than 1.5), default = 1.5

Expanded Node Colour				                                set the Square or Triangle Node Colour for Expanded Nodes, default = Blue (use right-click, Format Cells and pick a new Fill Colour)
Collapsed Node Colour				                                set the Square or Triangle Node Colour for Collapsed Nodes, default = Orange (use right-click, Format Cells and pick a new Fill Colour)
Use Row banding				                            FALSE	set the Use Row Banding, default = FALSE
Use Alternate Toggle/Standard Node Banding                          FALSE       set the Use Alternate Toggle/Standard Node Banding, default = FALSE

Alternate Colour (Toggle Node)                                                  set the Alternate Toggle Row Colour, default = 14348258
Alternate Colour (Standard Node)                                                set the Alternate Standard Row Colour, default = 11854022

Row Banding Colour                                                              set the Row Banding Colour to Colour alternate Rows, default = 15921906 (Lighter Grey)

Merge Columns Width			                            4	        sets the number of Columns used to merge Node Items, must be between 1 and 99 Columns, default = 4
Font Size					                                sets the Node Font Size - this overrides any Cell Style formatting if a value is entered - Tip: leave blank to ignore, must be between 1 and 409 points, default = blank
HorizontalAlignment			                            xlLeft	sets the Node Text Horizontal Alignment - this overrides any Cell Style formatting if a value is selected, must be xlLeft, xlRight, xlCenter or xlJustify, default = xlLeft
VerticalAlignment			                            xlCenter    sets           the Node Text Vertical Alignment - this overrides any Cell Style formatting if a value is selected, must be xlCenter, xlTop or xlBottom, default = xlCenter
WrapText				                            FALSE	sets the Node Text Wrap, must be either TRUE or FALSE, you will probably need to raise the 'Merge Column Width' setting and / or reduce the 'Font Size' setting if set to TRUE, default = FALSE
Orientation				                            0	        sets the Node Text Orientation, must be between -90 and 90, default = 0
AddIndent				                            FALSE	sets the Node Text Indent, meaning that the Node Text will be indented, default FALSE
IndentLevel				                            0	        sets the Node Text Indent Level, should only be used if the 'AddIndent' setting is TRUE, default 0
ShrinkToFit				                            FALSE	sets the Node Text Shrink to fit, will force Excel to render the Node Text to fit the merged Cells), default FALSE
Merge Cells                                                         TRUE        sets the Cells to Merge based upon the settings above, default TRUE.  If this is set to FALSE the Node Text will be added to the first Cell adjacent to the Standard Nodes
Node Text Column Offset                                             0           sets the Column where the Node Text will be rendered as an Offset - only applicable when Merge Cells is set to FALSE, default = 0 (set to -1 to move Text 1 Column to the left)
Protect Tree Node Icons from Selection                              FALSE       sets Protection for all Tree Nodes to disable any Selection of the Icon Objects, default = FALSE
Link Standard Nodes to Macro Code                                   TRUE        sets the Standard Tree Nodes to run the same Macro Code as the Expand & Collapse Nodes, default = TRUE
Here are the System & Node Style Settings:
Node 1						                                a simple Tree List Node Style that you can use to create a Tree List
☑						                                a checkbox Style, uses the Marlett Font with the character 'a' for a tick and the character 'r' for a cross
Run Macro after Build                                               None        select a Macro to run after a Treelist Build (caution these may cause undesirable effects, ie. The TableOfContents1 Macro is used after applying the 'Make T.O.C (2 Levels) Treelist Quick Style), Default = None
Here are the Treelist Quick Style Builder (double-click a Style to apply & then Create a Treelist) Settings:
Restore Defaults		                                                restores all defaults
Single Line Treelist		                                                creates a single line Treelist with Column Width 0.7 & Row Height 13
Single Line Treelist w/o Nodes, Move Text		                        creates a single line Treelist similar to the above, but without any Tree Nodes
Single Line Options Toggle Treelist (use with 2 Levels of Nodes)		creates a stylish Options Toggle Treelist using Green SVG Icons - use with only 2 Columns or 2 Levels of Nodes for best effect
Single Line Yellow Nodes with Double Hairlines		                        creates a nice Treelist with Yellow Nodes, Double Hairlines and Yellow Standard Nodes
Single Line Treelist using EMF Icons with Drop Shadow		                creates a single line Treelist with Column Width 0.7 & Row Height 13 using EMF Icons with Drop Shadow
Make T.O.C. (2 Levels)		                                                create a T.O.C.  USE ONLY 2 NODE LEVELS (if you want to use links, then you need to add the Worksheets and the appropriate Hyperlinks to your Treelist Nodes).  Tip: use the 'TableOfContents1' Macro after applying this Style to build the T.O.C Treelist
Make Dark T.O.C. (2 Levels)		                                        create a T.O.C. as above but in a Dark Style.  This also renders Single Nodes so that you can specify alternate Icons
Click Effect with Icon Protection		                                create a Click Effect for the Toggle Nodes
How the Code Works #back to top
The Icon that is being Toggled is passed into a small Subroutine which then Hides or Unhides Rows pertaining to the Nodes' Address String containing a Range of all of the attached Rows. The different Node Shapes are also set, as to is the Node Status for the Nodes Defined Name
Parent Icons are attached to the Code having the 'Template.TreeUI' Subroutine as their Macro. The Standard Node Shapes are attached to the Code routine but no Code will fire (in fact you can turn of any links to Code for Standard and Single Nodes in the Options Worksheet). An example of the Code I use is shown below, but you can download any of the examples and take a peek behind the scenes. The Code also uses multiple 'IIf' routines to toggle visiblity settings and Defined Names values on or off accordingly. The use of Defined Names for the Node status allows me to persist Icons in whatever state they have been before a higher branch is expanded or collapsed. A routine in the Code loops these settings to expand or collapse all of the Nodes. Here is a snippet of the Code that is generated whenever you create a new Treelist:
On Error GoTo Catch
Application.ScreenUpdating = False
Application.EnableEvents = False

' // vars
Dim objName As Name
Dim X As Variant: X = Application.Caller
Dim strNode As String

' // pass the Node into the UI Subroutine to toggle the Nodes
UI IIf(Mid(X, Len(X), 1) = "X", Mid(X, 6, Len(X) - 6), Mid(X, 6, Len(X) - 5))

' // check the Defined Names - this ensures that any Rows remain hidden for Node heirarchy's
For Each objName In Template.Names
If objName.Name Like "*NODE*_STATUS" Then
strNode = Mid(objName.Name, 1, InStr(1, objName.Name, "_STATUS", vbTextCompare) - 1)
If Right(objName.Value, 1) = True And Rows(Template.Range(strNode).Address).EntireRow.Hidden = False Then
Rows(Template.Range(strNode).Address).EntireRow.Hidden = True
End If
End If
Next objName

Catch:
Application.EnableEvents = True
Application.ScreenUpdating = True
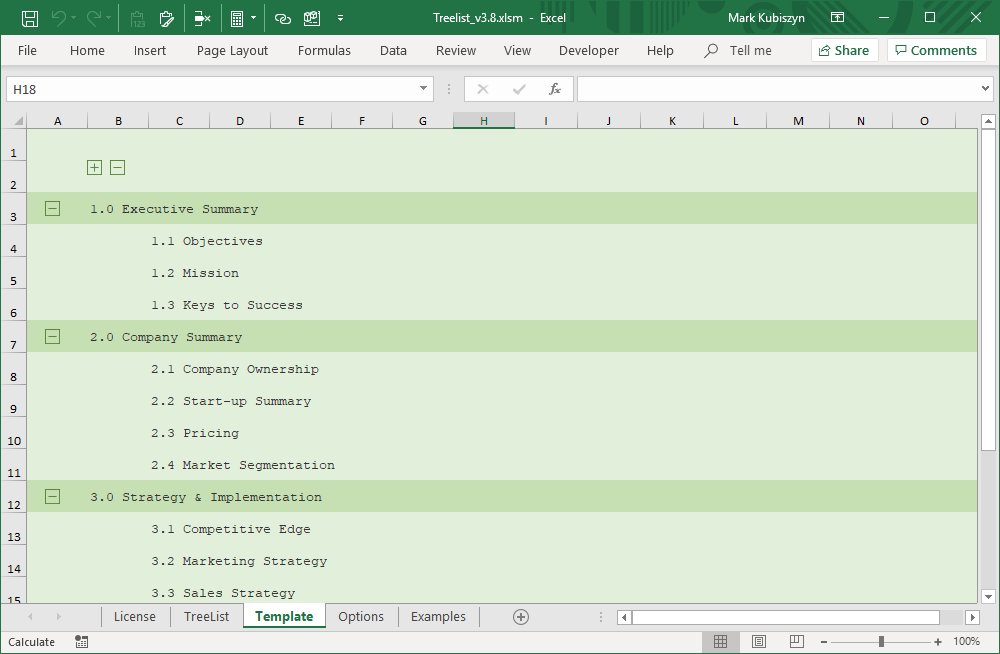
The Treelist Worksheet #back to top
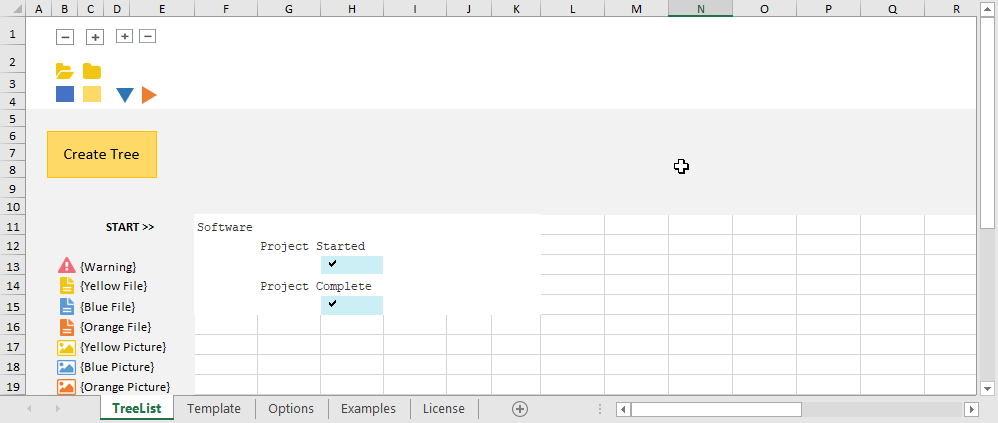
The 'TreeList' Worksheet is used to design the Tree List. Enter your own data or Copy and Paste one of the examples from the 'Examples' Worksheet into Cell "F11" in the 'TreeList' Worksheet. Press the '2. Create Treelist' Button to generate the Tree List in the 'Template' Worksheet. You must enter at least 2 Items to generate a Tree List. You must also enter the data in a hierarchal format, for example each Node must be either directly below the current Node or one Row and one Column below the current Node. You can change the Icons for the Standard Nodes by adding a Tag into the Item Name ie. 'Node1 {Blue File}' - this will use the 'Blue File' Icon. The Tag '{Blue File}' will be removed from the Item Text when the Tree is generated
The Icons at the top of the Worksheet are used by the system. You can change the Folder Icons to your own Icons ie. an open Icon and a closed Icon. You can modify the Shape of the other Icons. It is advised that you back up Tree List before you mess about changing the Icons in case you wish to revert back to the original Software Icon setup. It is also best practice to actually change the Icons using another image rather than deleting them and then loading new Icons which are then renamed
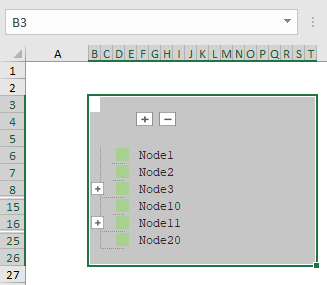
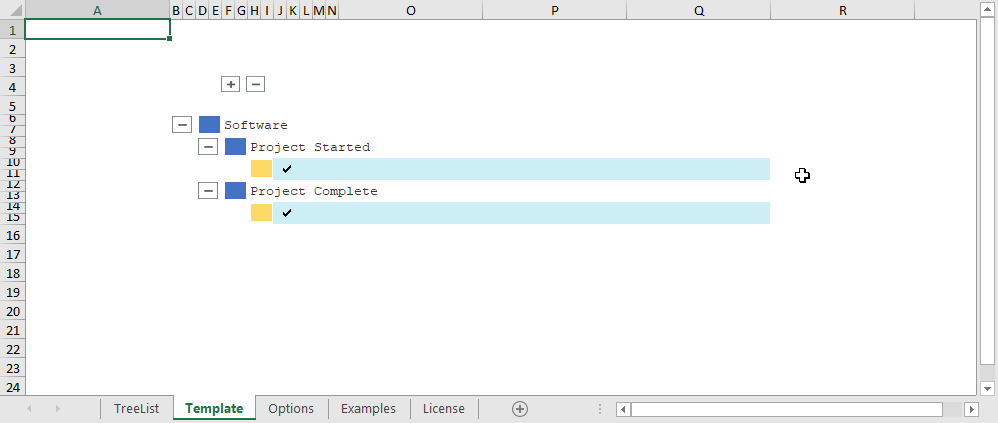
The Created Treelist #back to top
The 'Template' Worksheet is used to output and view/test the finished Tree List. You can adjust the Row and Column that you want the Tree List to be output in the 'Options' Worksheet. Once the Tree List has been created the Worksheet Code Module contains all of the Code neccessary to enable the Node Items to be expanded and collapsed. You can Copy the Worksheet out to a new Workbook or into an existing Workbook. All of the examples above were simply copied out of the TreeList File. Once you have copied out the 'Template' Worksheet, you can rename the Worksheet itself to any valid Name and the Code will continue to work to Expand and Collapse the Treelist
You need to Save the 'Template' as an 'XLSM' (Macro-enabled) File in order for the VBA Code to toggle the Treelist Nodes. Remember you can also then change the Background Colour of the Worksheet, toggle Gridlines and / or Headings etc.
Example Demo Workbooks #back to top
In order to see if Tree List can do what you would want it to, I have created some Demo Workbooks for you to download and play about with. Remember you can adjust the output of the tree List to fit your own needs but you can only create new Treelists by purchasing the Software. If you like what you see, please Purchase the Software from Fastspring
Please Note: when you purchase Treelist you will also receive multiple demo Worksbooks with working Treelists - these are not included in the Free Download Demo Workbooks above
Tree Node Click Effect #back to top
From Version 3.6 you have the ability to add my Click Effect Code to the Tree Nodes, so that whenever a Tree Node is clicked a beautiful little circle is animated like a pulse. You can use this effect with Icon Protection to produce a really great looking Treelist. Here is a Video of the Click Effect:
Protecting the Icons #back to top
From Version 3.6 you have the ability to Protect the Tree Node Icons if a user tries to right-click on them for Selection. The Code still allows Text to be modified and Cells to be Selected whilst maintaining the integrity of the Icons. The Option can be found in the 'Tree Nodes' section on the 'Options' Worksheet - set the Protect Tree Node Icons from Selection Parameter to TRUE
Prevent the Standard Nodes Running Code #back to top
From Version 3.6 you have the ability to Unlink the Standards Nodes from accepting a Mouse Click to trigger the same Macro as the Expand & Collapse Toggle Nodes. The Option can be found in the 'Tree Nodes' section on the 'Options' Worksheet - set the Link Standard Nodes to Macro Code Parameter to FALSE. Used in conjunction with the 'Protect Tree Node Icons' Parameter, this can build a really nice Treelist where a user can interact with the Treelist, use the Click Effect, even Edit Node Text, whilst at the same time not allowing the user to right-click on any of the Icons and indeed the Mouse will not change shape to a Hand either, so that they are aware there is no Macro Action to run
Creating a Single Line Treelist #back to top
Treelist uses double line spacing so that the Icons and Nodes sit perfectly together with the Node Hairlines as they are drawn. However you can also create a Single line Treelist. In the Options Worksheet, set the 'Merge Cells' Parameter to either TRUE or FALSE. Set the 'Treelist Row Height' Parameter to 13. Set the 'Treelist Column Width' Parameter to 1. Set the 'Run DeleteEveryOtherRow() Macro upon build' Parameter to TRUE. Create a Treelist. The result will be a Single Line Treelist with either merged Text or non-merged Text. Alternatively, you can run the Macro 'DeleteEveryOtherRow()' manually after a Treelist build to remove any duplicate Rows. Run the Macro and then select the entire Range of the Treelist in the InputBox making sure you highlight the Blank Row before the Treelist down to the last Row or last Row +1 of the Treelist. Press OK. The result will be a Single Line Treelist with either merged Text or non-merged Text

Please Note: from Version 3.8 you can now easily create Single Line Treelists by using the Quick Styles in the Options Worksheet - simply double-click the Option to apply the Style. Tip: you can write your own Styles and then add the Macro or Subroutine Name into the spare Cells below the existing Styles. If any of the inbuilt Styles uses the 'Run Macro after Build' setting to run Code following a Treelist build, then you will receive a Warning Message when you attempt to create a Treelist informing you that as you do so, Code may run afterwards
Moving a Treelist #back to top
After building a Treelist, you may want to move the Treelist to a different location within the Worksheet. You can do this both up and down through Worksheet Rows or left and right across Worksheet Columns
Move Up or Down Rows
To Move a Treelist (Expanded or Collapsed) Select the Row before the (Collapse/Expand Buttons) or first Tree Node until the Row after the last Tree Node. Move close to the Selection until you see the Crosshairs and then drag the entire Treelist down or up through the Worksheet Row Range to place the Treelist at another position
Move Right or Left across Columns
To Move a Treelist (Expanded or Collapsed) Select the Cell in the first Column before the (Collapse/Expand Buttons) or first Tree Node until the Cell in the Row after the last Tree Node. Move close to the Selection until you see the Crosshairs and then drag the entire Treelist right or left through the Worksheet Row Range to place the Treelist at another position. Whenever you move a Treelist right or left across Columns you will need to resize the Column Width accordingly
Make a T.O.C (Table of Contents) #back to top
To make a T.O.C (Table of Contents) you can use some new features developed for Version 3.8. On the Options Worksheet, scroll down to the 'Treelist Quick Styles Builder' section and double click the Make T.O.C (2 Levels) Style. Scroll up and select the 'TableOfContents1' Macro for the 'Run Macro after Build' System & Nodes Styles Option. Go to the Examples Worksheet and scroll to the righ. Select all of the data for the Make T.O.C. Example. Copy the data and Paste it into Cell "F11" on the TreeList Worksheet. Create the Treelist - you should see a T.O.C. as per the image below
- Download the Treelist T.O.C. Example
The Quick Styles #back to top
Quick Styles can be found on the Options Worksheet. Expand the Toggle Bar 'Treelist Quick Style Builder (double-click a Style to apply & then Create a Treelist)' and double-click one of the Styles below:
Restore Defaults                                                            restores all defaults
Single Line Treelist                                                        creates a single line Treelist with Column Width 0.7 & Row Height 13
Single Line Treelist w/o Nodes, Move Text                                   creates a single line Treelist similar to the above, but without any Tree Nodes
Single Line Options Toggle Treelist (use with 2 Levels of Nodes)            creates a stylish Options Toggle Treelist using Green SVG Icons - use with only 2 Columns or 2 Levels of Nodes for best effect
Single Line Yellow Nodes with Double Hairlines                              creates a nice Treelist with Yellow Nodes, Double Hairlines and Yellow Standard Nodes
Single Line Treelist using EMF Icons with Drop Shadow                       creates a single line Treelist with Column Width 0.7 & Row Height 13 using EMF Icons with Drop Shadow
Make T.O.C. (2 Levels)                                                      create a T.O.C.  USE ONLY 2 NODE LEVELS (if you want to use links, then you need to add the Worksheets and the appropriate Hyperlinks to your Treelist Nodes).  Tip: use the 'TableOfContents1' Macro after applying this Style to build the T.O.C Treelist
Make Dark T.O.C. (2 Levels)                                                 create a T.O.C. as above but in a Dark Style.  This also renders Single Nodes so that you can specify alternate Icons
Click Effect with Icon Protection                                           create a Click Effect for the Toggle Nodes
Now create your Treelist on the TreeList Worksheet - when the Treelist has been created the Style that you selected on the Options Worksheet will be applied
Running Macros after Build #back to top
Running Macros after the Build allows you the to write or record Macros to do 'something' after a Treelist build. For example you may wish to Move the Treelist, Delete Rows or Columns, apply some kind of formatting etc. Once you have written the Code or recorded a Macro, you can simply turn on the setting 'Run Macro after Build' by adding the Name of the Subroutine to the Data Validation Drop-down (the Default is None). Once you have added the Name of your Subroutine, then the Code will be run after each Treelist Build. A caution Message will be displayed to inform you that this option has been turned on. Here is the Code for the 'Table of Contents1' Macro that is set using the Quick Style 'Make T.O.C. (2 Levels)'. Please Note: Macros should be stored in the 'mdlSubroutines' or likewise Code Module, not a Worksheet Code Module
Public Sub TableOfContents1()

   Template.Range("1:2,5:6").Delete Shift:=xlUp
   Template.Columns("A:C").Delete Shift:=xlToLeft
   Template.Columns("C").Delete Shift:=xlToLeft

End Sub
Adding Checkboxes #back to top
In order to add Checkboxes to a Treelist you need to do the Following:
1. Create a Treelist using bespoke settings
2. Perform some Formatting
3. Set a Defined Name 'Tree.Checkboxes' and then add Code to the finished Template
Create a Treelist using Bespoke Settings
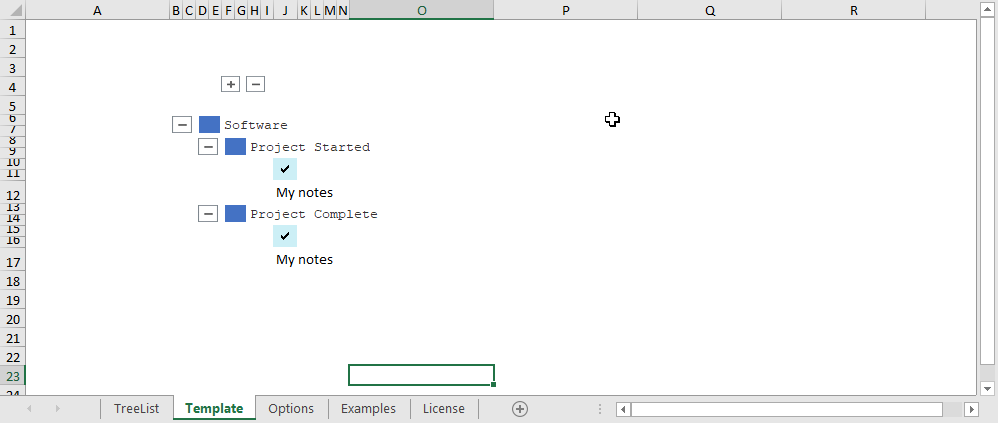
Add the following to the Treelist Worksheet (the Text Placeholders are used to create a Blank Space for the Checkboxes and or more Rows for Notes)
Software
	Project Started
		Checkbox
	Project Complete
		Checkbox
Change the following settings in the Options Worksheet
Draw Node Hairlines                         False
Merge Columns Width                         8
Now, Copy & Paste the Checkbox from the Options Worksheet underneath the 'System & Node Styles' Header into the Cells containing the Text Checkbox or Open my legacy Checkbox File and Copy Cell "C13" into the Cells containing the Text Checkbox. Create the Treelist
Perform some Formatting
Delete the Yellow Sub-Node Shapes (right-click Cut) if preffered. Select Rows "10:11" and UnMerge the Rows. Do the same for Ros "14:15". Insert any extra Rows here if you need them for Notes by clicking on Row 11 and then Insert - repeat for the other Checkbox by selecting the last Row and then using Insert. This will maintain the Code to allow the Rows to Collapse. Select Cells "J10:J11" and then Merge the Cells. Adjust the Width of Column "J" as required and Format the rest of the unused Cells still marked in Blue with a White Fill
Here is the Template with the Checkboxes I added:
Set a Defined Name 'Tree.Checkboxes' (Click on each Cell containing a Checkbox in the Template Worksheet for the Range Reference)
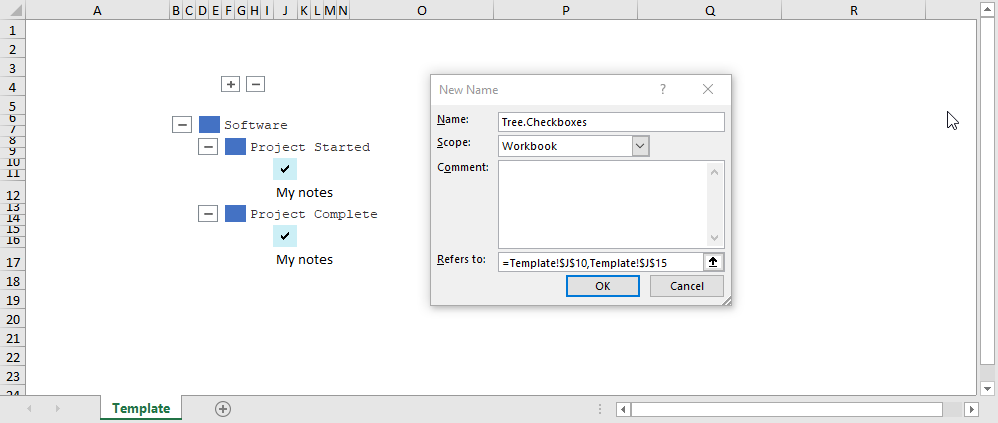
Copy out the Template Worksheet and then add the Code below to the top of the Worksheet Code Module above the other Code
' Worksheet_BeforeDoubleClick, used to toggle Option checkboxes on/off (the font used is Marlett)
Private Sub Worksheet_BeforeDoubleClick(ByVal Target As Range, Cancel As Boolean)

    ' // Checkbox Range, use any Range or a Defined Name for the Range
    '    here I used the Defined Name "Tree.Checkboxes".  notice how we refer to the
    '    first Cell in the Merged Cell Range
    If Not Intersect(Target, Range("Tree.Checkboxes")) Is Nothing Then
        ' // set to "a" := On (Tick)
        '    - Cell was blank prior to a double-click
        If Target(1, 1).Value <> "a" Then
            Target(1, 1).Value = "a"
            Cancel = True
            Exit Sub
        End If

        ' // set to "" := Off (Blank)
        '    - Cell was "a" prior to a double-click
        If Target(1, 1).Value = "a" Then
            ' // use the entire Target Range when clearing otherwise you will get an error
            Target.ClearContents
            Cancel = True
            Exit Sub
        End If
    End If

End Sub
That's it - here is my finished Example
Screen Shots: #back to top
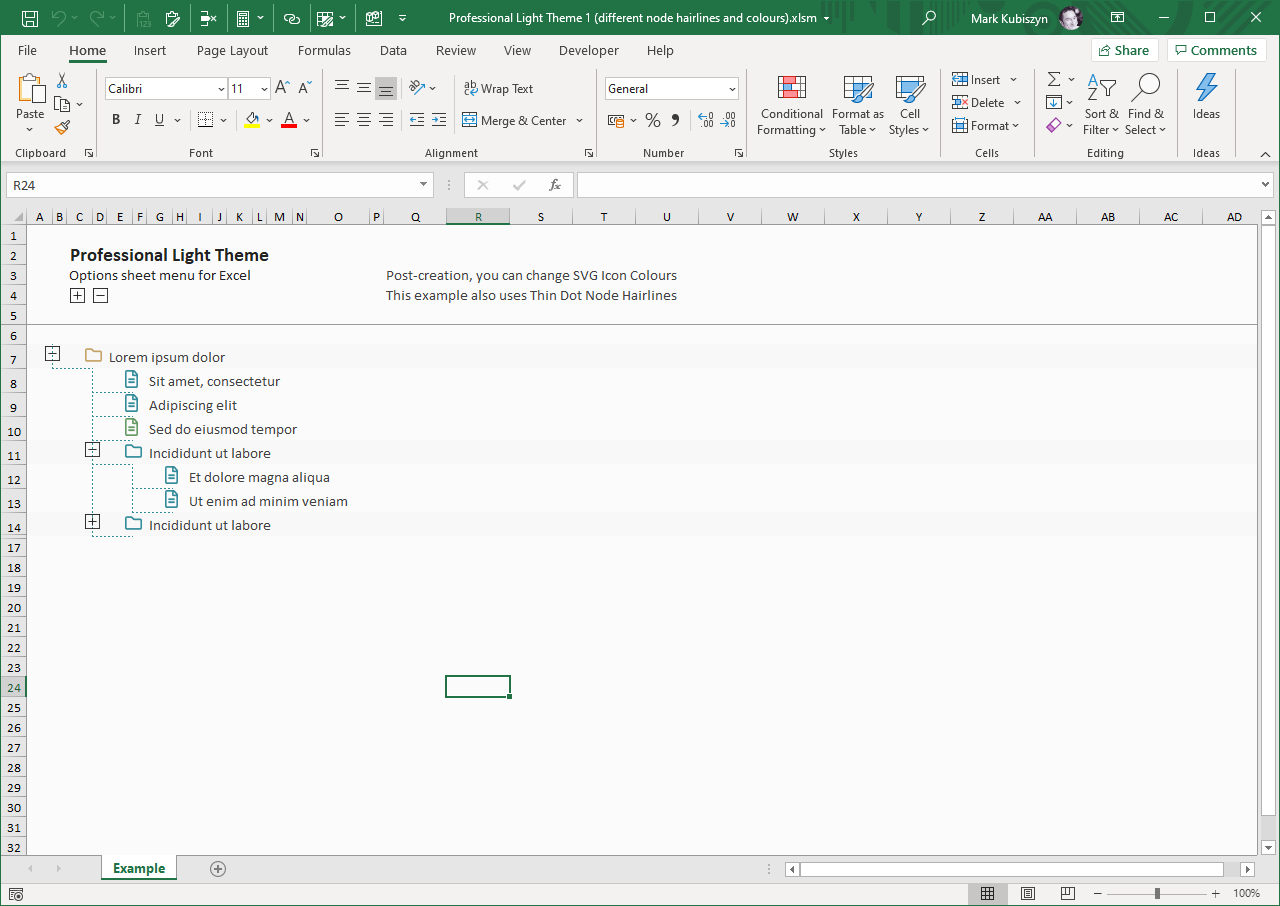
Treelist 4.1 Professional Light Theme for normal Treelists

Treelist 4.1 Professional Light Theme in Blue (a new Quick Click theme for Treelist)

Treelist 4.1 Professional Light Theme with additional Rows for Text

Treelist 4.1 Professional Light Theme with different Node Hairlines and Icon Colours
Treelist 4.1 Professional Light Theme in Excel Green

Treelist 3.8 Single Line with Blue SVG Nodes
Treelist 3.7 improved Banding & Node/Text Positioning

Treelist 3.8 with Green EMF Toggle Nodes
Treelist 3.7 with Green SVG Toggle Nodes
Treelist 3.8 with Sharp Icons (BMP or PNG)
Treelist 3.7 Single Line Treelist with Yellow SVG Toggle Nodes, Yellow Standard Nodes, Thin Double Line Hairlines & Yellow Expand/Collapse Nodes
Treelist using the Quick Style Make Dark T.O.C.
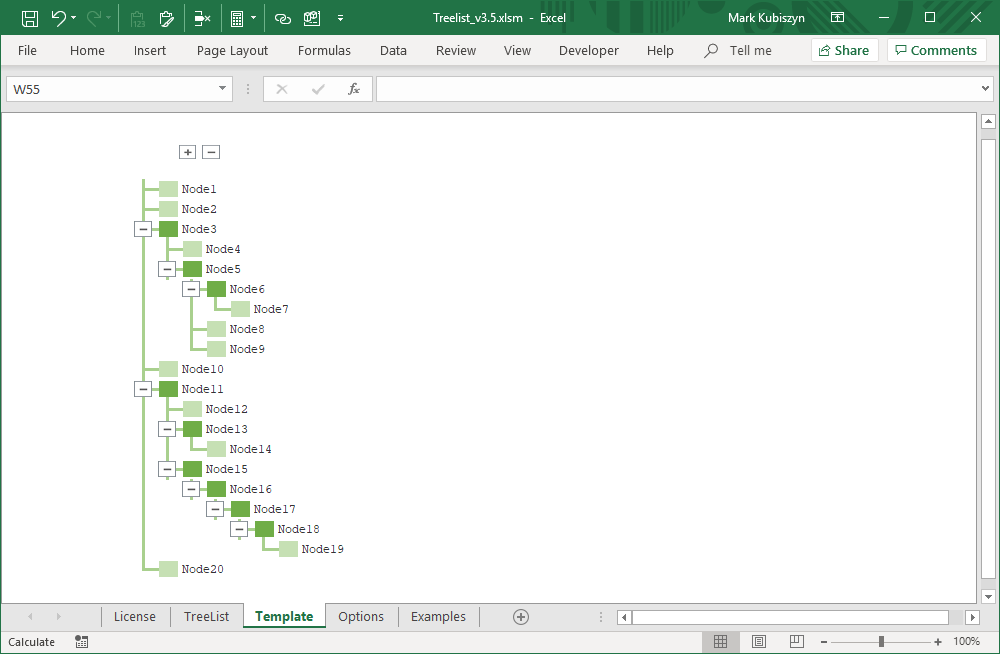
1. Treelist Green Nodes & Hairlines (Version 3.5)
2. Treelist Green Dot Dash Nodes & Hairlines (Version 3.5)

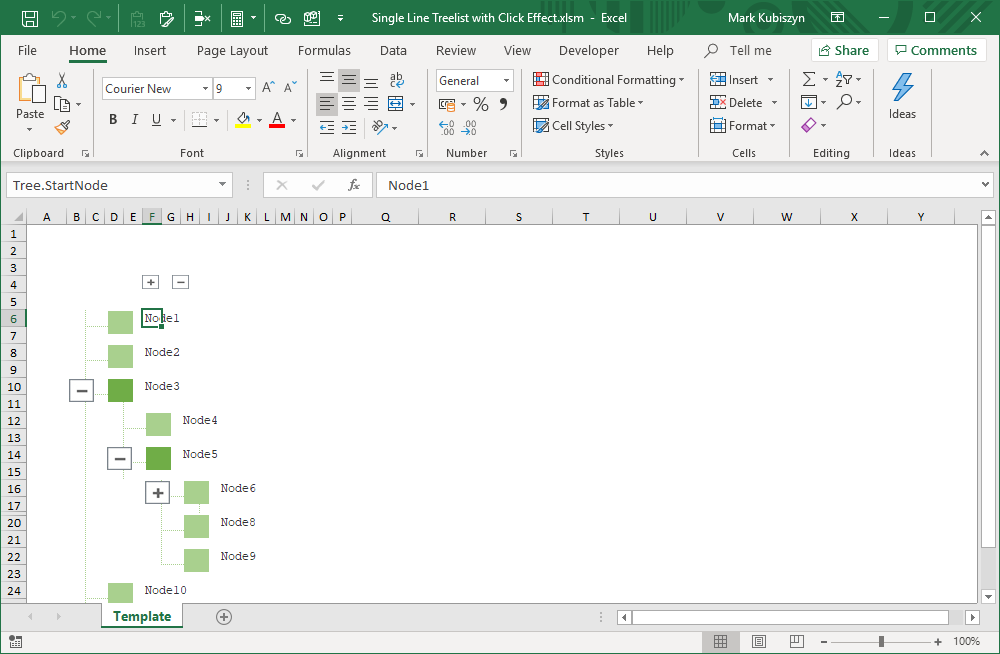
3. Treelist Single Line (Version 3.6 MergeCells set to FALSE)
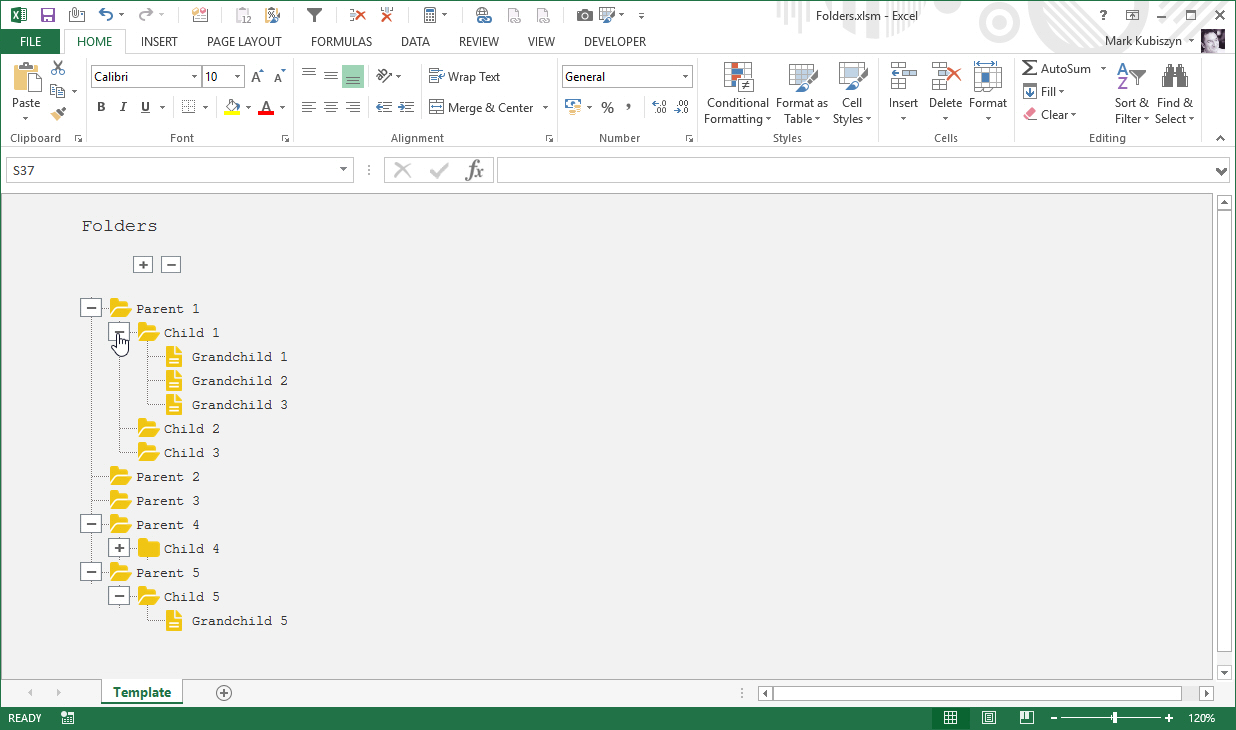
4. Treelist Folders
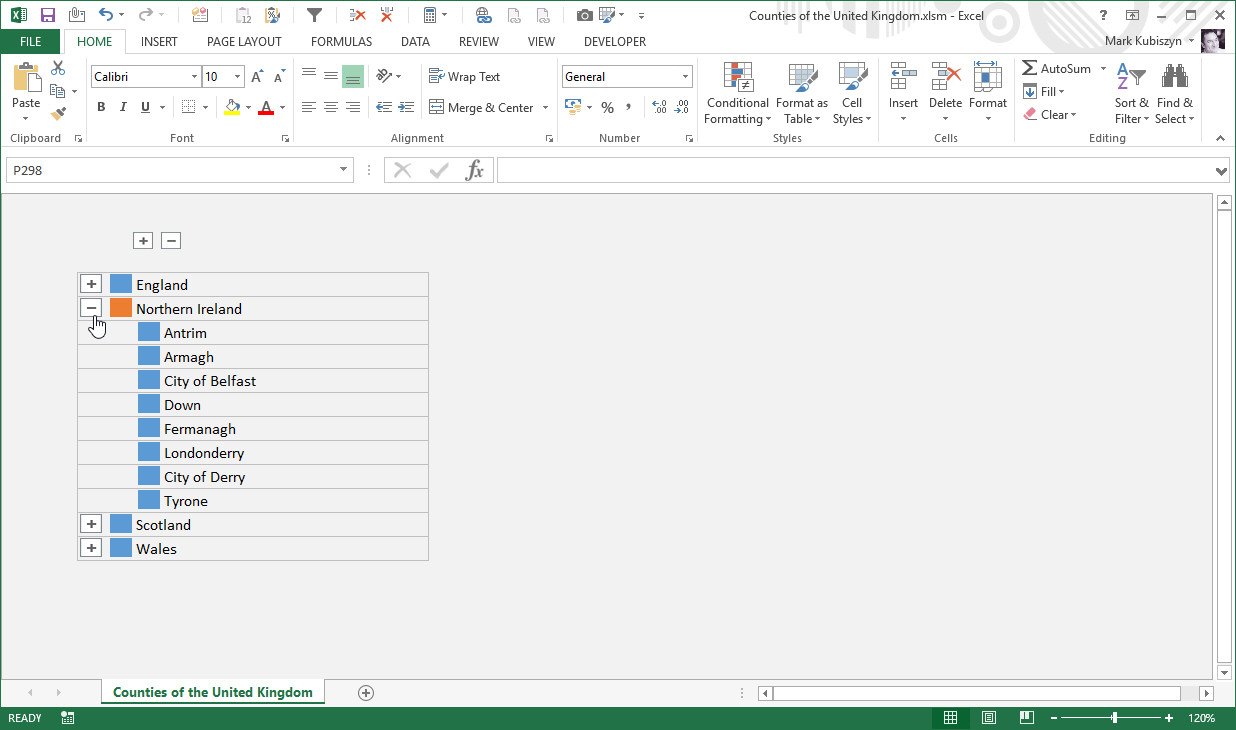
5. Treelist Countries
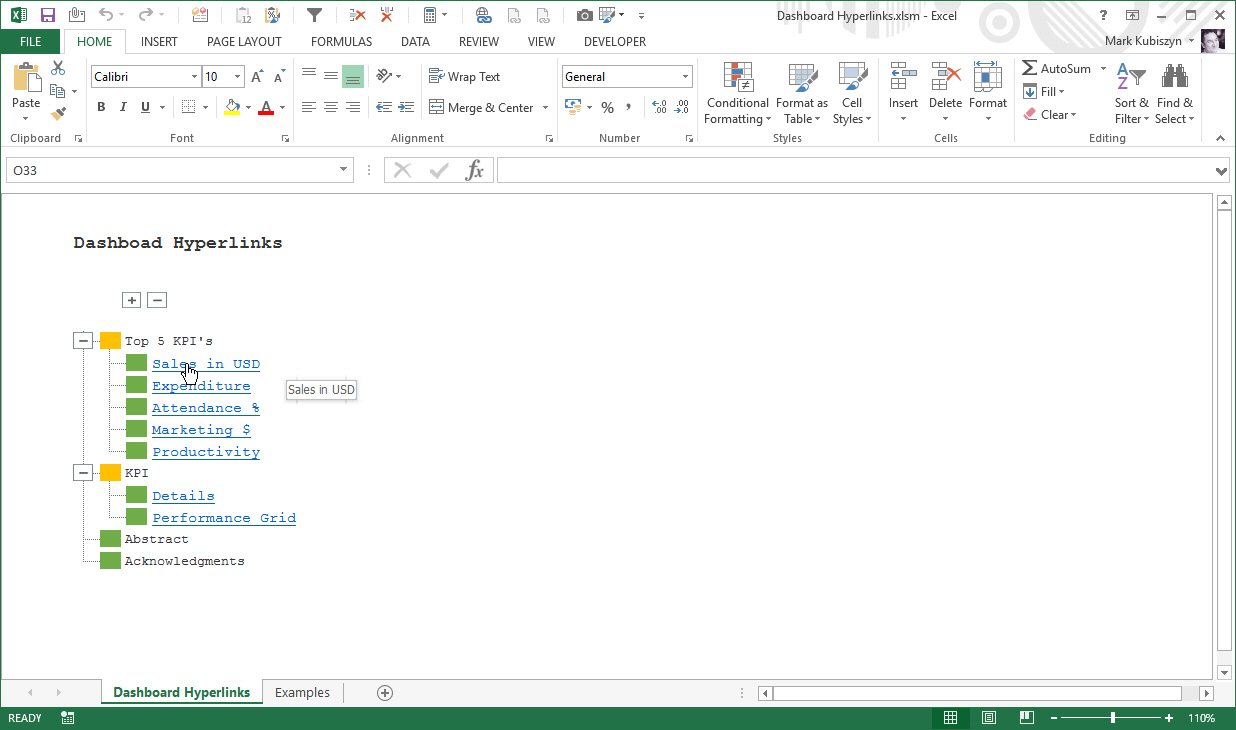
6. Treelist Hyperlinks
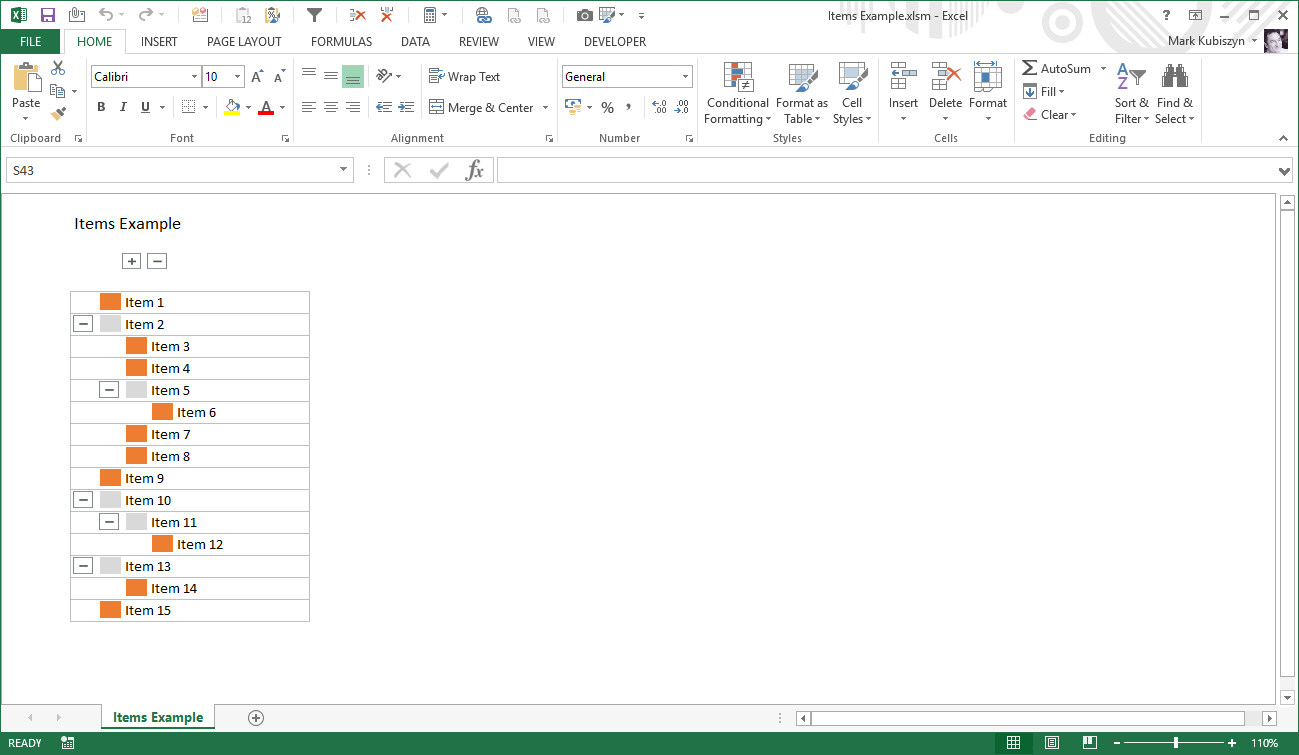
7. Treelist items
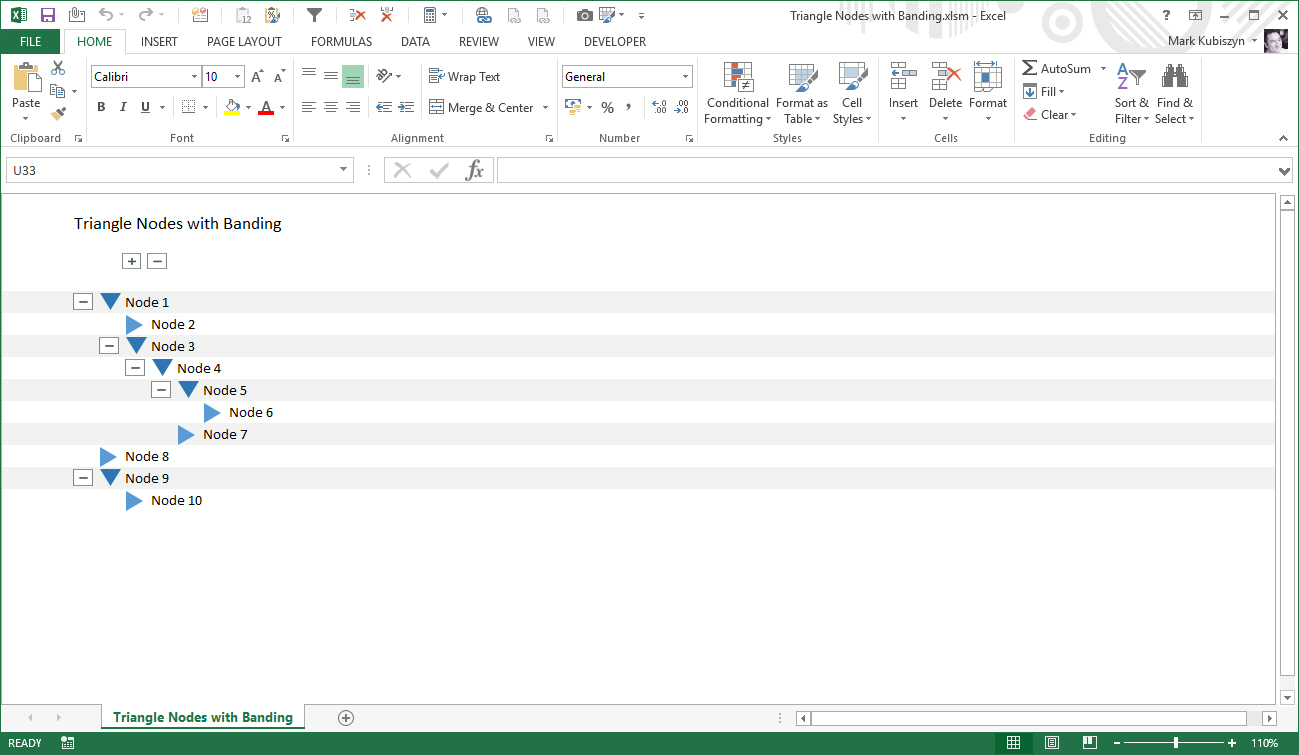
8. Treelist Triangles using Row Banding
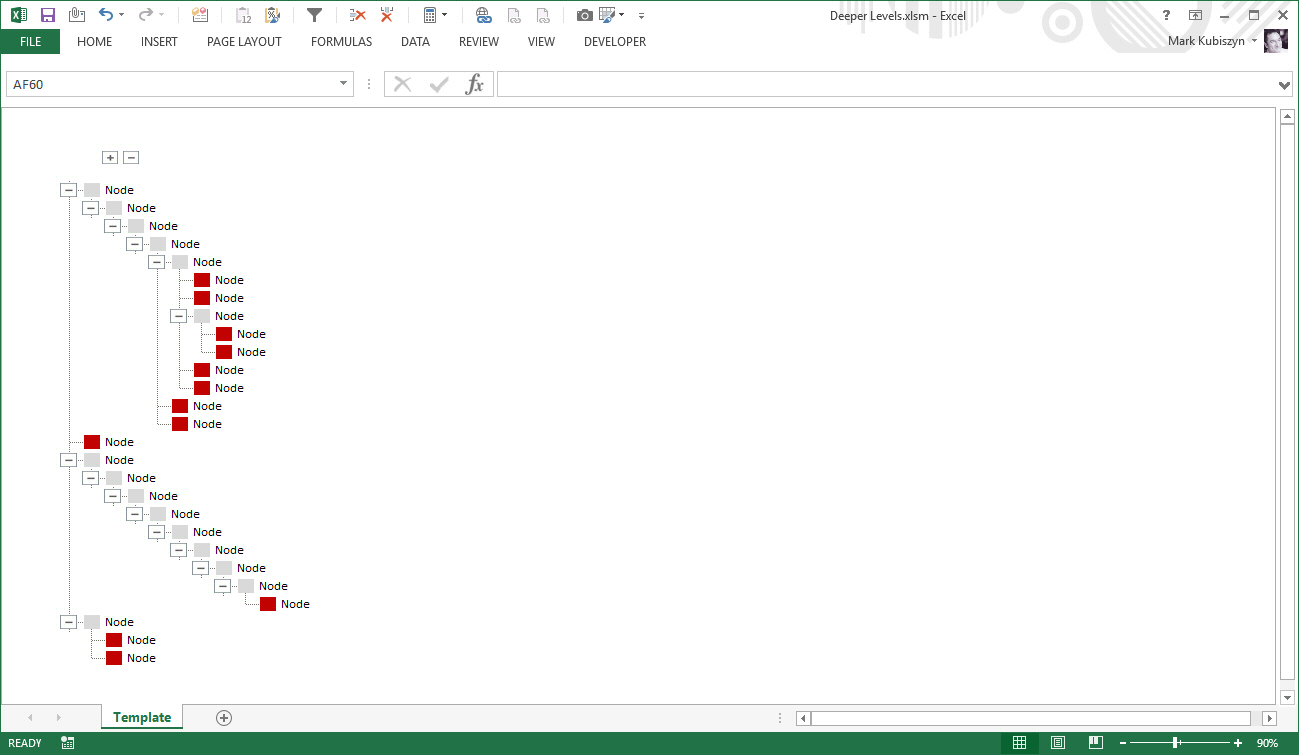
9. Treelist Deeper Levels
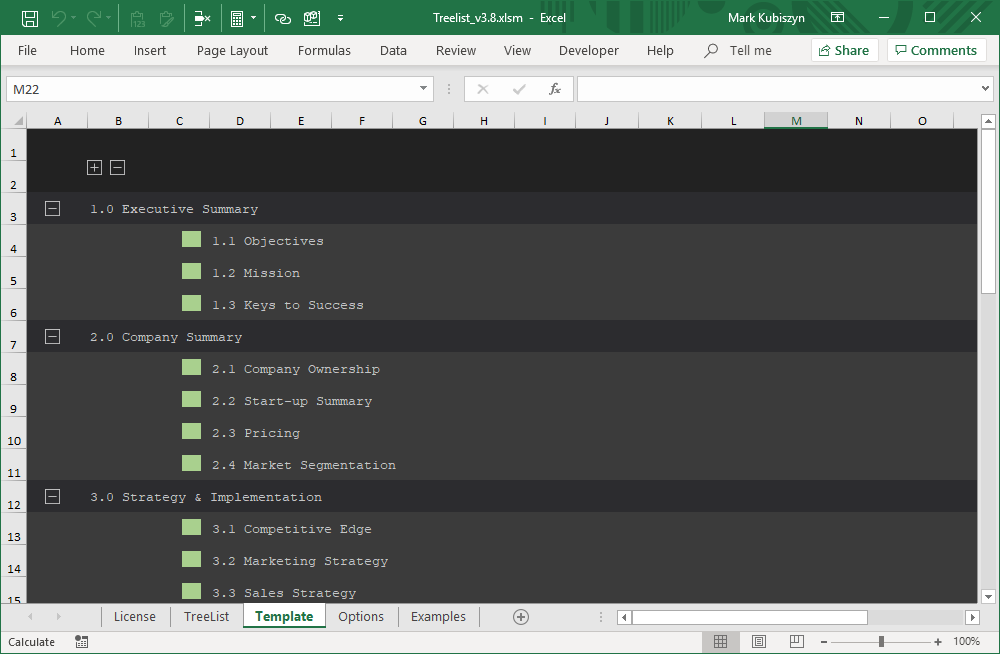
10. Treelist Complex

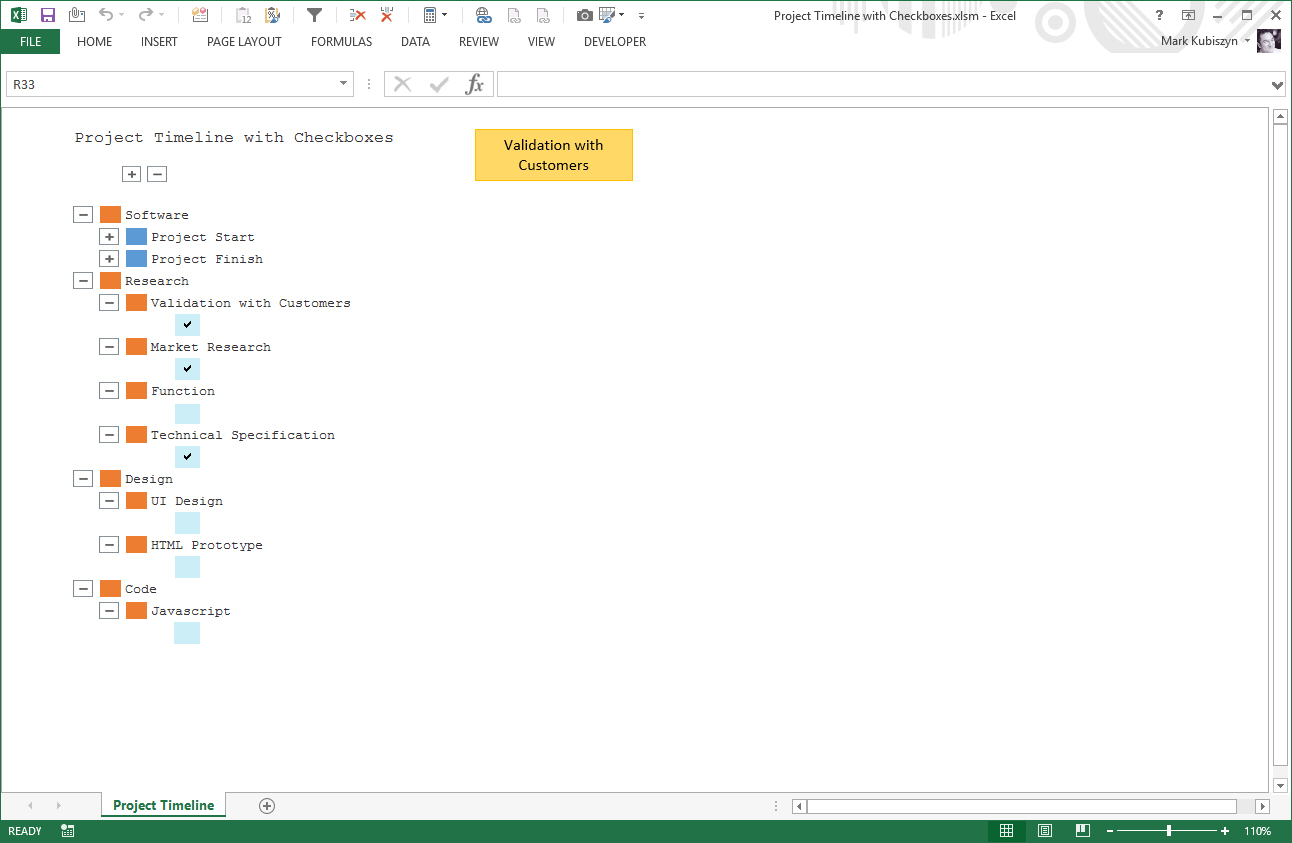
11. Treelist Project Checkboxes
Videos: #back to top
FAQ #back to top
What is the maximum amount of Rows that work with Treelist?
Lists with Rows of less than 1000 work best. Due to the number of image objects created and the nature of the iteration to design the Treelist, lists with Rows exceeding 1,000 are not recommended. I have created Treelists with over 6,000 Rows, but these can take a very long time to create. Remember to 'turn off' Node Hairlines when creating large Treelists. Update: in Version 3.5 I have speeded up the Treelist generation
I resized my Toggle Icons but when I create a Treelist the Icons overlap - how can I fix this?
They overlap because the Row Size is too small. Increase the 'Treelist Row Height' to take account of your new Toggle Node resizing. YOu can also change the 'Template Row Height' which will ensure all of the Rows in the Template Worksheet are the same height
I want to expand and collapse Grouped data using Treelist - can I do this?
Yes, here is an example of using Treelist with Grouped data Expand, Collapse Groups.xlsm
I want to create a Treelist with say multiple Columns of data that is nested but not as new Nodes, so I want 3 expandable Nodes with the third one containing 8 Columns of data that expands and collapses with the third Nodes - can I do this?
Yes, here is an example of using Treelist with 4 levels of expandable Nodes with the fourth Node containing multiple Columns of data thereafter. It invloves a 'workaround' by creating the Heirarchy Nodes first and then copying in the Columns of Nodes after the initial Treelist has been created Multiple Columns with Four Node Levels.xlsm
Support #back to top
Please remember you have purchased very affordable Software and you have not paid for a full-time Software design agency - I am but one man. Occasionally I may help with small tweaks, but these requests will be put on a much lower priority due to their nature. You have not PAID for Support, Support is 100% optional and I provide it for your convenience, so please be patient, polite and respectful
Support (limited) for my Software includes:
* Responding to questions or problems regarding the Software and its features* Fixing valid (replicated) bugs and reported issues for the VERSION I HAVE WRITTEN
Software support does not include:
* Customization and installation services* Support for third party software or ANY kind of development whatsoever
Before seeking support, please...
* Make sure your question is a valid Software Issue and not a customization request* Make sure you have read through the documentation and any related video guides before asking support on how to accomplish a task
* Make sure to double check the Software FAQs or online documentation
* Ensure that you access to the VBOM is allowed and that Macros can run in Excel
* Make sure to provide 'proof of purchase' and state the name / version of the Software that you are having issues with when requesting support by Email or via Facebook
How to get Support
Contact Mark Kubiszyn on the Email address provided when you purchased the Software, including the Order NumberContact Kubiszyn.co.uk via our Facebook Page - remember to be patient, if there has been an issue with your download, I will always respond within 48 hours and will Email you the File directly if neccessary or via Messanger. For other issues the response time may be considerably longer and I may choose to respond to specific questions only (as is my right), depending on what has been asked
Known / Fixed Bugs #back to top
04.04.2019 - Some of the Node Hairlines are not drawn for Single Line Treelists This occurs when creating a Single Line Treelist
- this was identified 01.04.2019 and Fixed for Version 3.8
29.03.2019 - "Flicker when using the Click Effect with SVG Icons or Office 365 Icons" Message This occurs when using SVG Icons for Toggle Nodes or ExpandAll/CollapseAll Nodes. Workaround is to use the Default Nodes with the Click Effect
- this was identified 28.03.2019 and Fixed for Version 3.8
28.03.2018 - "Column Width must be between 1.0 and 9.99." Message This may occur for one of 2 reasons. Reason 1 - your PC may use the comma ',' character instead of the period (full stop) '.' character as the Radix Point or separator for numbers so change the '.' to a ',' for the Option and the Code should work. Reason 2 - please ensure that you have "Trust access to the VBA project model" ticked in the Trust Center Settings
- this was identified 26.03.2018
Version History (Changelog) #back to top
You can find the version history in the Code Module for any Macro-enabled Software or read more information below. The latest Version is always shown first
Changelog
' 18.06.2020 - (Version 4.3)
' Added the ability for all Standard Nodes, whether they are Parent or Children to have their Icons specified using Brackets {}
' - This enables you to use the Icon Suffix to create a Treelist of SVG Icons
' - An example has been added to the Examples Sheet
' - A Template has been added to the Zip Archive 'Use Icon Suffix to create a Treelist of SVG Icons.xlsm' to demonstrate its usage
'
' 30.05.2020 - (Version 4.2)
' Added the ability to load a 2 Column list that can be maintained and Sorted on a TreeStructure Sheet directly into the TreeList Sheet, allowing you to be able to modify/add new Items/Nodes and quickly build the Treelist to any depth (users request).  The Code to do this has been modified from VBA written by JBeaucaire 10/25/2011 - create a flow tree from a two-column accountability table
'
' 23.05.2020 - (Version 4.1)
' Fix to make a comparison check on the Icons to make them Case Insensitive ie. {Blue file}, {orange file} can now be used to pull the Icons through to the Template
' Added a Professional Light Theme (Quick Click) that creates a Menu that looks best with a single Base Node
' Added the ability to change the Standard Node Type to Bespoke which allows you to use 2 SVG Icons named Bespoke1 and Bespoke2 (you can load SVG's into these Graphics or have a number of Images and just swap their names)
' Created some demo Files to show how the Professional Light Theme can be used to produce some nice looking Treelists
'
' 16.04.2020 - (Version 4)
' Fix to allow both Icon Protection and the Click Effect to work
' Featuring Skeleton, a Bare-bones Options Sheet Theme Creator for Treelist - see the Options Sheet and any of the Skeleton Option Sheet Theme Examples in the Zip Archive
'
' 14.04.2020 - (Version 3.9.2)
' Minor amend to add Code so that users can use a Template Sheet alongside other Code to prevent repeated Calls to any of the Subroutines (Events are disabled)
'
' 18.03.2020 - (Version 3.9.1)
' Minor amend to some of the Default Settings
'
' 16.03.2020 - (Version 3.9)
' Amend Code to allow SVG/Graphic Icons to be copied in and used as Standard Nodes, so that they Collapse/Expand when clicked
' Add Indent to the Template Code.  Changed the Restore Defaults to use Folder and a Zoom level of 150
' Code Inspections updated using RubberDuck version 2.5.0.5244.  Renamed some very 'spurious' variables ;)
'
' 04.04.2019 - (Version 3.8)
- Fix Code Quality Issues using Rubberduck
- Fix the Flickering when using SVG Icons
- Remove the line of Code that was causing Treelist to crash intermittently!  Code is much more robust...
- Tidy up TreeList Worksheet, add Icons underneath their respective Headers
- Add LockAspectRatio = msoFalse to the Code before resizing the Height and Width of the Nodes
- Add the 'Tree Nodes' Option, Toggle Node SVG Foreground Colour, set the Toggle Node SVG Foreground Colour, default = 3506772 (Dark Green)
- Add the 'Tree Nodes' Option, Collapse/Expand SVG Foreground Colour, set the Collapse/Expand SVG Foreground Colour, default = 3506772 (Dark Green)
- this allows the Quick Style for the Yellow Graphics Icons and Tree to be built
-
- Amend the 'Tree Nodes' Option, Toggle Node Type, set the Toggle Node Type to either Default, SVG (Fill & Outline Colour), EMF (Colour), Shape (Fill, Outline & Text) or Textbox (Fill, Outline & Text), default = SVG
- Amend the 'Treelist' Option, Zoom Treelist, will set the Zoom on the Template to render the Treelist larger or small than 100%, default 100%
- Add the 'Treelist' Option, Template Row Height, sets the Template Row Height - Treelist Row Height will still take precedent, default = 13
- Add the 'Treelist' Option, Template Column Width, sets the Template Column Width - Treelist Column Height will still take precedent, default = 8.29
- Add the 'System & Node Styles' Option, Run Macro after Build, select a Macro to run after a Treelist Build ie. The TableOfContents1 Macro is used after applying the 'Make T.O.C (2 Levels) Treelist Quick Style, Default = None
- Code needs to inform a user before creating a Treelist if this Option is chosen as unforeseen circumstances may otherwise occur
- this also allows the user to write and maintain their own Macros - simply adding them to the Data Validation Drop-down
-
- Add the 'Tree Nodes' Option, Toggle Node Placement, set this to specify the way that a Toggle Node Icon is attached to its underlying cells (set to xlMove when resizing Nodes Height & Width), Default = xlMoveAndSize
01.04.2019 - (Version 3.7)
- Version 3.7 now supports Office 365 Subscription Icons!
- Add the 'Treelist' Option,CollapseAll/ExpandAll Button Type, sets the Type of Buttons used for the ExpandAll/CollapseAll Buttons, SVG will use the SVG Icons, default = SVG
- Add the 'Tree Nodes' Option, Toggle Node Type to include SVG Icons.  this allows both Fill & Outline Colour to be applied for any SVG Icon loaded into the Graphic1/Graphic2 Shape, default = SVG
- it also allow the resizing of the Toggle Nodes & ExpandAll/CollapseAll Nodes to much larger Icons without any loss of clarity ;)
- Resize the Toggle Nodes & ExpandAll/CollapseAll Nodes on the TreeList Worksheet to be 0.40 x 0.40
- Add the 'Tree Nodes' Option, Toggle Node Horizontal Adjustment, set the Toggle Node Horizontal Adjustment, default = -5.5
- Add the 'Tree Nodes' Option, Toggle Node Vertical Adjustment, set the Toggle Node Vertical Adjustment, default = 1.5
- Add the 'Tree Nodes' Option, Standard Node Horizontal Adjustment, set the Toggle Node Horizontal Adjustment, default = -5.5
- Add the 'Tree Nodes' Option, Standard Node Vertical Adjustment, set the Toggle Node Vertical Adjustment, default = 1.5
- Code FIX for Toggle Nodes (not Standard Nodes) to maintain correctly both Node1/Node2 Icons '.ShapeRange.Fill.Visible = msoFalse/msoTrue' states need changing to '.ShapeRange.Visible = msoFalse/msoTrue'
- this is a long running issue, identified back in Version 3.2 upon attempting to use SVG Icons or Icons that are fundamentally different looking for +/- (Expand/Collapse Toggle Nodes)
- the above fix is substantial in that both internal Code and dynamically created Template Code have been changed
- Close/Empty/Open Clipboard API's, added in order to maintain a Clear Clipboard before and after running Code
- On Error Resume Next, added to PARSE 1 due to an intermittent Copy/Paste Error.  in combination with the above change should STOP any Copy/Paste issues for users
'- Modify the Subroutine 'DeleteEveryOtherRow()' to accept Cancel and to inform the user to select 1 Row more than the last Treelist Node
'- Add the 'Treelist' Option, Run DeleteEveryOtherRow() Macro upon build, runs a Macro upon a Treelist build to delete every other Row in the Treelist to create a Single Line Treelist, default = FALSE
- Modify Options to allow more control over Single Line Treelists building, a feature asked for by a few users
-  Add the 'Tree Nodes' Option, Toggle Node Width, the Toggle Node Width, default = 0.40 cm
- Add the 'Tree Nodes' Option, Toggle Node Height, the Toggle Node Height, default = 0.40 cm
- Add the 'Tree Nodes' Option, Standard Node Width (Square, Folder or Triangle), the Standard Node Width, default = 0.40 cm (Standard defaults, Triangle, 0.48 cm, Square/Folder, 0.49 cm)
- Add the 'Tree Nodes' Option, Standard Node Height (Square, Folder or Triangle), the Standard Node Height, default = 0.40 cm (Standard defaults, Triangle, 0.40 cm, Square/Folder, 0.41 cm)
- Add the 'Tree Nodes' Option, Collapse All Node Width, the Collapse All Node Width, default = 0.40 cm
- Add the 'Tree Nodes' Option, Collapse All Node Height, the Collapse All Node Height, default = 0.40 cm
- Add the 'Tree Nodes' Option, Expand All Node Width, the Expand All Node Width, default = 0.40 cm
- Add the 'Tree Nodes' Option, Expand All Node Height, the Expand All Node Height, default = 0.40 cm
- Add the 'Tree Nodes' Option, Draw Standard Node Icons,set to FALSE to prevent ALL OF THE Standard Node Icons from being drawn, default = TRUE
- Amend the 'Tree Nodes' Option, Draw Standard Node Icons to Draw Single Standard Node Icons, set to FALSE to prevent the Single Standard Node Icons from being drawn, default = TRUE
- Add the 'Tree Nodes' Option, Node Text Column Offset, sets the Column where the Node Text will be rendered as an Offset - only applicable when Merge Cells is set to FALSE, default = -1
- Add the 'Tree Nodes' Option, Use Alternate Toggle/Standard Node Banding, set the Use Alternate Toggle/Standard Node Banding, default = FALSE
- Add the 'Tree Nodes' Option, Alternate Colour (Toggle Node), set the Alternate Toggle Row Colour, default = 14348258
- Add the 'Tree Nodes' Option, Alternate Colour (Standard Node), set the Alternate Standard Row Colour, default = 11854022
- Create Treelist Quick Options to apply settings to replicate a number of different Treelists without going through all of the Options ;)
25.03.2019 - (Version 3.6)
- Change the default Colours of the Square Nodes, Triangles and the Node Hairlines to Dark Green & Light Green
- Add the 'Treelist' Option, Create Click Effect Code Subroutine to add a subtle circle click animation to all Treelist Nodes whenever they are toggled
- Add the 'Treelist' Option, Click Effect Size Parameter, default = 20
- Add the 'Treelist' Option, Click Effect Colour Parameter, default = Light Green, 9359529
- Add the 'Treelist' Option, Click Effect Speed Parameter, default = 0.08
- Add the 'Treelist' Option, Click Effect Growth Parameter, default = 5.00
- Add the 'Tree Nodes' Option, Protect Tree Node Icons from Selection, sets Protection for all Tree Nodes to disable any Selection of the Icon Objects, default = FALSE
- Add the 'Tree Nodes' Option, Link Standard Nodes to Macro Code, sets the Standard Tree Nodes to run the same Macro Code as the Expand & Collapse Nodes, default = TRUE
- Add Code to fix the ColumnWidth on the Template to 8.29 as a default prior to creating a new Treelist
- Add Code in the Options Worksheet to use a Dialog Colour Picker for the Cell Colour options
- Change the Code to store the Long Colour Value to use due to issues around referencing .Interior.Color directly, where Treelist crashes intermittently
- Add the Subroutine 'DeleteEveryOtherRow()' and instructions to the online help documentation to create a single line Treelist
18.03.2019 - (Version 3.5)
- Tidy up the Code
- Fix the Square & Triangle Node Colours Bug to allow the Shape Colours to be changed
- Speed up the drawing of the Node Hairlines
- Change the look & feel of the main Treelist Worksheet
- Remove all RegEx for the Options Worksheet
- Remove the HASH Routines for the Nodes (Named Ranges) and use the Row x Column Coordinates instead
- Add the 'Tree Nodes' Option to use Merge Cells or not
- Add the 'Tree Nodes' Option to use one of 4 different Node Hairline Weights, xlMedium, xlThick, xlThin & xlHairline
- Add the 'Tree Nodes' Option to use one of 6 different Node Hairline Line Styles, xlContinuous, xlDot, xlDashDot, xlDash, xlSlantDashDot & xlDouble
- Remove the Completed Message in the Options as it is not really required
28.08.2017 - (Version 3.2) Amend the Treelist "Template" Code to minimise the amount of Code required
and to speed up toggling of Nodes. Tweaks to the Parse 1 & Parse 2 Subroutines to speed up the Code
when writing the Treelists
25.03.2017 - (Version 3.1) Shorten the Code output created by Treelist in the 'Template' Worksheet by
passing a single Node String into a Subroutine - this prevents a 'procedure too large' error. Turn
off Events & Screen Drawing to speed up the Code when creating Treelists
08.04.2016 - (Version 3) General Release, supersedes all previous Tree List Versions