Yogi Booking System
Version 10
Introduction
- Purchase : Yogi
- Software Name : Yogi Booking System · An Excel-based, 1-7 Day filterable Calendar Booking & Reporting System for Excel
- Software Version : v 10
- Store : airportal.sellfy.store
If you have already purchased this Software, let me take a moment to thank you for being a loyal customer
You are entitled to free lifetime updates for ALL future builds
This documentation is to help you understand the Software and to give you a more meaningful insight into what it can do. Please go through the documentation and read it carefully · Basic to Moderate skills are required
Requirements
You will need the following Excel Version & Prerequisite to use this Software
- Excel 2013 & 2016 (32bit or 64bit)
- Basic to Moderate Excel skills. VBA Skills if you wish to expand on and develop the Software much further
- Windows PC · NOT a Mac!
Please Note: No support is provided for customization or development of this Software! Feedback is appreciated and may be acted upon in future builds
About Yogi #back to top
An Excel-based booking system featuring a rollover Calendar, a 1-7 Day filterable Calendar Booking Grid (use Checkboxes or Slicers to Filter) and Language-specific Dates ie. French, Korean, Romanian etc. The Yogi Booking System allows you to Book Slots for 'Something' and 'Someone' at 'Some place' on a specific Date and Time, over a series of Days. It boasts a flexible Calendar Day Grid on which you can plot your own Break/Blocked Slots and a configurable Booking Form. The Calendar Grid allows you to filter the Bookings for the 3 main Property Attributes. The Booking Form features multiple Drop-down Combo Boxes for 5 Property's, 5 Free Text Boxes, 3 Checkboxes, 2 Groups of Radiobuttons and a Print Preview. Yogi also uses my xlui pack Click effect on all of the navigation Buttons. The Report section allows you view the Bookings as a list and includes options to filter by Date Range

Features include:
- * Admin, Setup Sheet with optional Password Protection via a PIN
- * Rollover Date Calendar for choosing Booking Weeks and Days to view
- * Msg Dialog SOftware is used for all of the Dialog Messages for Yogi and includes a Prompt Dialog for the PIN Number entry
- * Click animations on all of the Buttons
- * Filterable Calenday Booking Grid with configurable Break/Blocked Slots (ie. Block a Dinner Break, an Afternoon Break, a full Afternoon or a Full Day)
- * Begin the Calendar on any Day of the Week and choose how many Days to view at a time
- * Flexible Time Slots - choose an interval, ie. 15, 20, 30 or 60 minutes to make Bookings. You can also enter numbers larger than 60, ie. 120 for a 2 Hour Booking Slot
- * Choose the Time Slots to use to make Bookings in 15mins, 20mins, 30mins or 60mins, a full Hour Slot. With a slight modification you can book in 1 minute or 5 minute intervals if really required
- * Configure Checkboxes or Slicers to use to Filter your Booking Calendar
- * Configure the 3 main Drop-down Combo Boxes used to make a Booking in different Colours and Font
- * Make Bookings for the Day or a series of Days
- * Configure the Booking Form to use different Objects, 5 Drop-down Combo Boxes, 5 Free Text Boxes, 3 Checkboxes and 2 Radiobutton Groups
- * Edit single Bookings
- * Delete a Booking or series of Bookings
- * Print or Print Preview Bookings and Reports
- * Configurable Report List. Report on Block Bookings or Daily Bookings. Sort Ascending or Descending. Run Reports on the Calendar Day, Calendar Week, Selected Day, Selected Week, Current Week, Next Week, Current Month, Next Month or Date Ranges
- * Report Progress Icons indicate whether a Booking is in the Past or in the Future
- * Fully featured Reporting Section
- * Adjust the Dates to be Language-specific ie. French, Korean or English UK etc.
- * Adjust the Names of all of the used Buttons
- * Yogi features ISO Week Numbers 1-53 when the Calendar is started on a Monday
- * Yogi features a configurable 4-digit PIN number to secure the Admin Worksheet
Getting Started #back to top
The download File
Yogi_v1.XLSM ships with a blank Database and Slicers for Filtering. It is recommended that you resave the File as an .XLSB (Binary File) to help compress the data for large Databases. The 3 Yoga images are Copyright protected for Commercial use and as such, not supplied with the Software. Instead, Yogi will come with 3 Image Placeholders for you to replace with your own Company Images. If you want the Yoga image, you can download it here. Alternatively, you may, if you wish, simply Delete the 3 Images in Yogi. In the following sections we are going to create a Booking System to book Yoga and other Excercises against Trainers and identify if Payment has been made. We will then make some Bookings and create a Weekly Report to view the Bookings
Setup Consideration
It is wise to begin by configuring the Calendar and Booking Grid. The most important thing to consider is how you want to use the system when Booking Date/Time Slots and how you will populate the 3 main Property's that drive your system (good to pick all 3, but picking 2 is fine). For example you may want to Book 'Rooms' out for specific 'Locations' within a 'Building'. You may want to Book 'IT Equipment', for 'Teachers' by a 'Classroom'. I suggest you take a Backup of the Software and then spend some time planning how you wil use the system to best suit your requirements - then you can start Booking and Reporting. Also, you should consider how you want to Filter your Booking System, by Checkboxes or by Slicers. A good guide is that if you have more then 6 or 7 things that would like to book against more than 6 or 7 other things then you should use Slicers as opposed to Checkboxes for Filtering. Slicers make the Filtering of Bookings very quick as selecting each Slicer button is fast and you can use multi-select too. Okay, now follow my Steps below to setup Yogi
Step1 - Configure Yogi #back to top
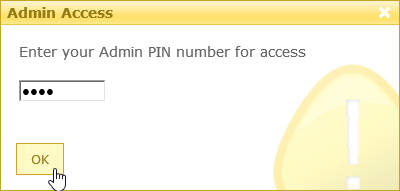
Here I will cover off the most important Settings (other Settings are available for you to tweak post-setup). Open Yogi.XLSM and press on the small Admin link on the Booking Calender Sheet. Enter the default 4-digit PIN number of '1234' to take you to the Admin Sheet (press the OK Button). I would suggest you change the PIN number to something more secure at this point (the last user attempt to enter a PIN is shown below the PIN Number for your reference). Editable Settings are shown in a Grey Box and non-editable Settings are shown in a Blue Box

Worksheet Tabs:
You can choose whether Yogi Worksheet Tabs are displayed. By default they are and each Tab is displayed as and when it is navigated to. If you want to hide them all of the time, Tick the 'Hide Worksheet Tabs on Opening' Setting
Booking System Name:
Enter a Name for your Booing System for the 'Booking System Name' Setting. The default Name is Yogi Ltd
Language:
Select your 'Date Language' Setting. The default is English (U.K.) but you can change this to any of the Drop-down Options. The Language Setting is used for Weekdays & Months ie. French, Korean etc.
Calendar Start Day:
Select the Calendar Start Day from the Drop-down Combo Box. Picking 1 will mean that the Calendar starts on a Sunday, picking 2 will mean that the Calendar starts on Monday
Booking Calendar Working Days:
Select the number of working Days that you want the Calendar to display to allow you to make Bookings from the Drop-down Combo Box. You can pick from 1-7 Days with the default being 7 Days. This Setting will briefly display the Calendar so that you can see the change
Booking Calendar Start Time:
Enter the Booking Calendar Start Time from the Drop-down Combo Box. You can pick from 0-12, ie. picking 8 will mean 8AM
Booking Calendar End Time:
Enter the Booking Calendar End Time from the Drop-down Combo Box. You can pick from 13-24, ie. picking 15 will mean 3PM
Booking Calendar Time Slot Interval:
Enter an interval for the Booking Calendar. Typical values are 15, 20, 30 or 60 minutes. Entering 120 would make each Time Slot a 2 Hour Slot
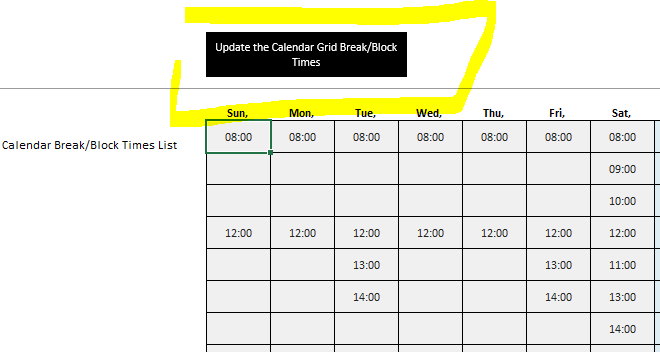
Calendar Break/Block Times List:
Scroll right a little and enter the Times that you would like to have Breaks or Block off the Calendar from being Booked. Times must be entered like this '09:00' meaning Block 9AM. Below are the default Setup for Breaks/Blockings and one that I will adopt for my Yoga Booking System as an example. Press the 'Update the Calendar Grid Break/Block Times' Button when you are finished. This Setting will briefly display the Calendar so that you can see the change. Ignore the Grouped Time Slot Settings in Blue - these are used by the System and are non-editable
Booking Form Settings:
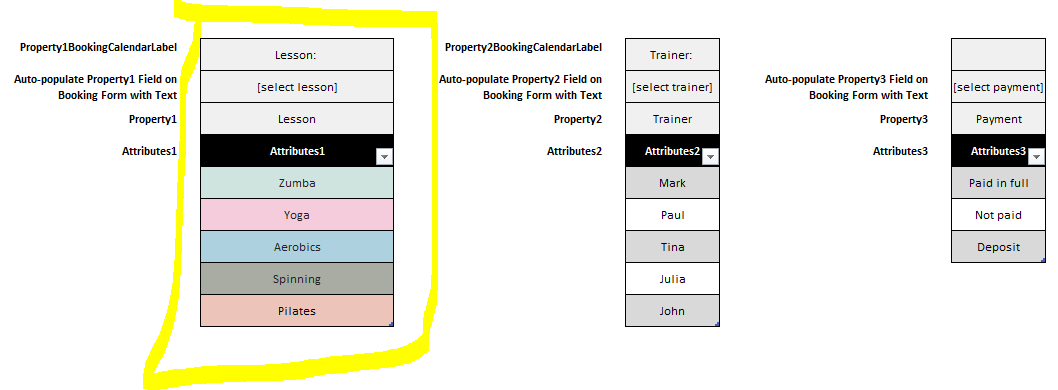
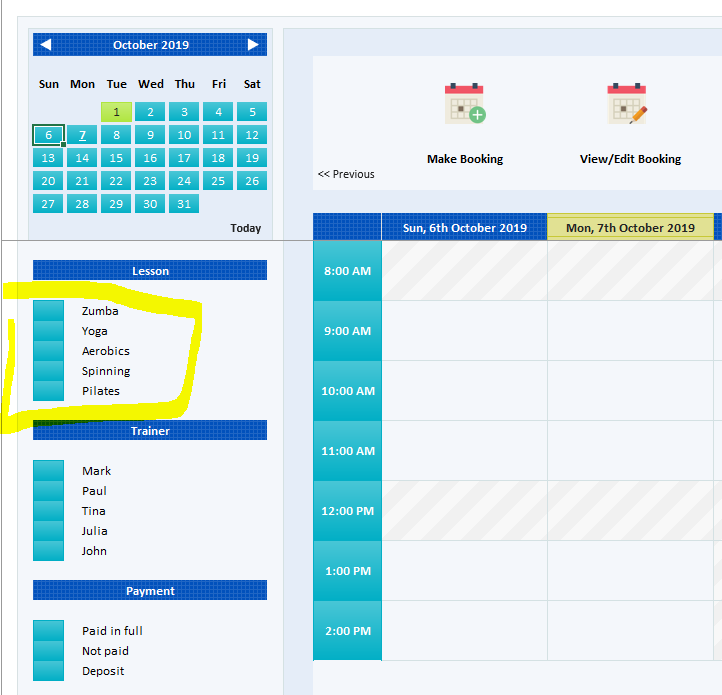
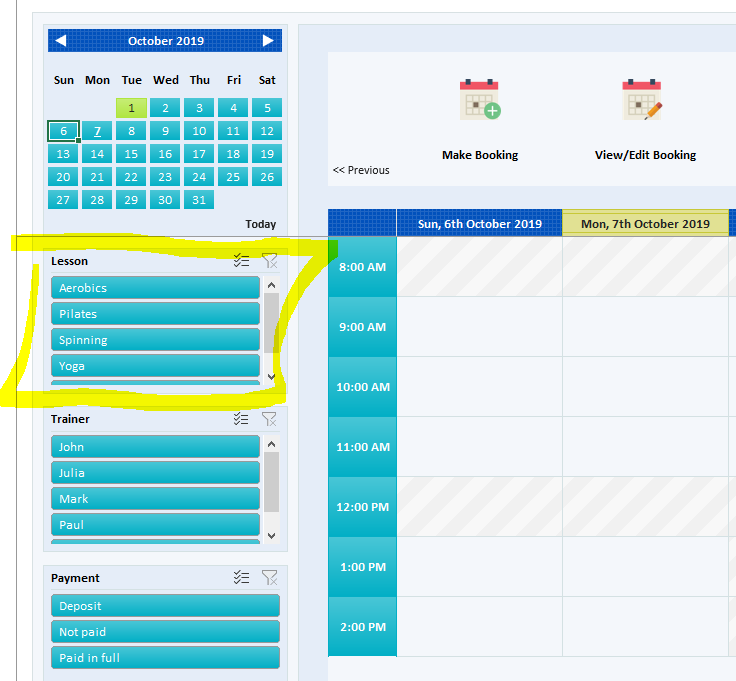
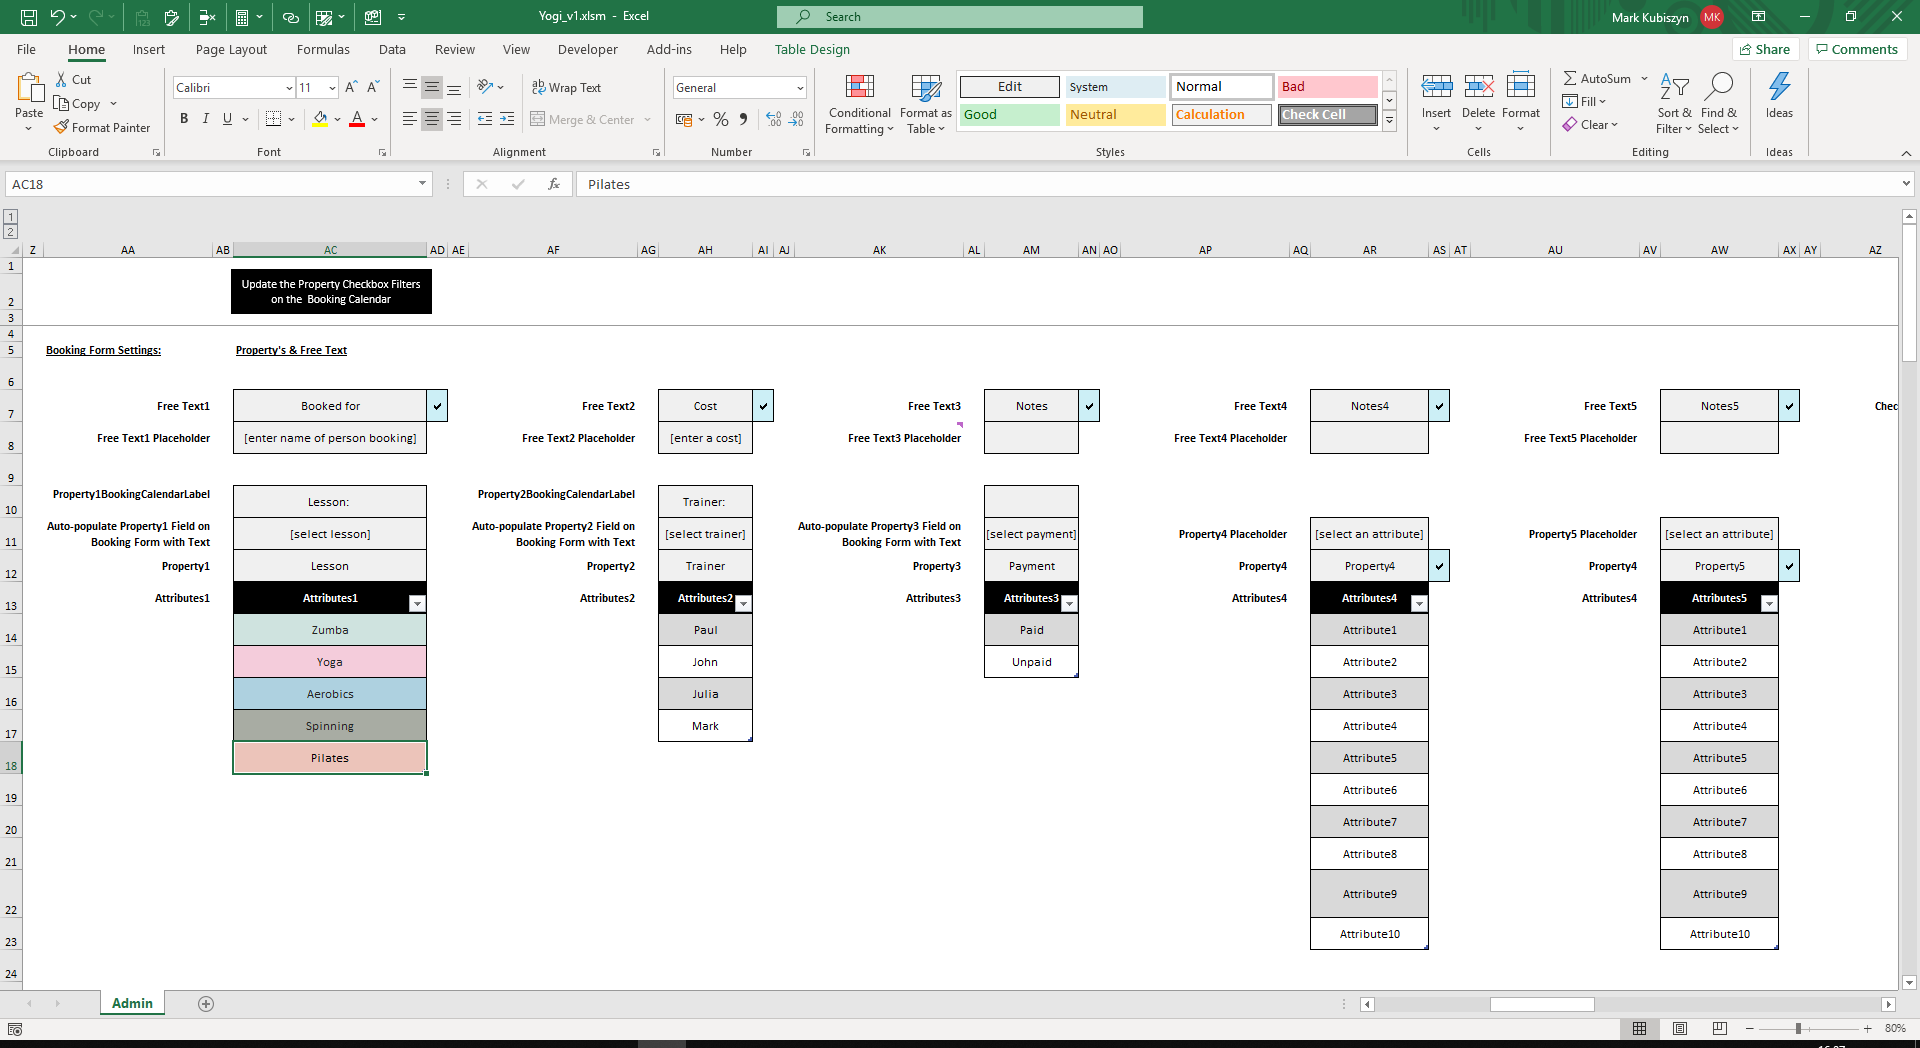
You need to configure the 3 Main Property's used by Yogi. This is the part where you choose to Book 'Something' for 'Someone' at 'Someplace'. As I am going to make a Yoga Booking System I am going to choose 'Something' as 'Lesson', 'Someone' as 'Trainer' and 'Someplace' as 'Payment'. Enter the word Lesson next to the 'Property1' Text. Enter the word Trainer next to the 'Property2' Text and enter the word Payment next to the 'Property3' Text. For the Lessons, enter the following Lessons into the Table (Attributes1) pressing Tab if more entries are required, Zumba, Yoga, Aerobics, Spinning and Pilates. For the Trainer, enter the following Trainer Names into the Table (Attributes2), pressing Tab if more entries are required, Mark, Paul, Tina, Julia and John. For the Payment, enter the following Payment Types into the Table (Attributes3), pressing Tab if more entries are required, Paid in full, Not Paid and Deposit. Now enter some Text for the 'Property1BookingCalendarLabel', enter 'Lesson: ' with a space after the colon. Enter 'Trainer: ' for the 'Property2BookingCalendarLabel'. Enter '[select lesson]' for the 'Auto-populate Property1 Field on Booking Form with Text'. Enter '[select trainer]' for the 'Auto-populate Property2 Field on Booking Form with Text' and enter '[select payment]' for the 'Auto-populate Property3 Field on Booking Form with Text'. Your Setting should look like this:
Free Text Settings:
Okay so now let's setup the Booking Form Free Text Settings. In the 'Free Text1' Object enter 'Booked for'. In the 'Free Text2' Object enter 'Cost'. In the 'Free Text3' Object enter 'Notes'. In the 'Free Text1 Placeholder' enter '[enter name of person booking]'. In the 'Free Text2 Placeholder' enter '[enter a cost]'. The Settings should look like this:

Checkbox Settings:
For the Checkbox Settings we will use one Checkbox, so enter 'Own Equipment' next to the 'Checkbox1' Text. The Checkbox Settings should look like this:

Radionbutton Group Settings:
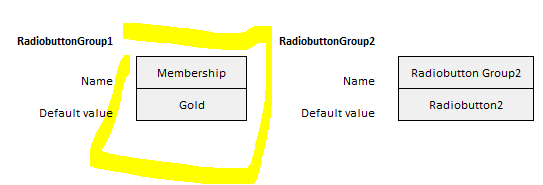
For the Radionbutton Group Settings we will use one Radiobutton Group, so enter 'Membership' for the Name of the 'RadiobuttonGroup1'. Enter 'Gold' fpr the default value (the value that will be set automatically when the Booking Form is displayed). The Radiobutton Group Settings should look like this:
Checkboxes or Slicers for Filters:
The last part of the Settings to adjust depends on wether you want to use Checkboxes or Slicers for the Filtering of your Booking System. If you want to use Checkboxes (probably if you have between 6 to 10 elements for each of your 3 Main Property's then Checkboxes will be okay. If you want Checkboxes then press the 'Update the Property Checkbox Filters on the Booking Calendar' Button to change the Booking Calendar to Checkboxes. You can choose whether to add Checkboxes 2 and 3, but the first Checkbox is always required - the same applies to the Slicers (Untick each Checkbox next to the Main Property's if you don't want to use 2 and 3). Here are the results going on the Settings adjusted so far:
Otherwise press the 'Update the Property Slicer Filters on the Booking Calendar' Button to refresh the Pivot Tables and add the Slicers to the Booking Calendar. Here are the results:
Step2 - Making Bookings in Yogi #back to top
If you are still in the Admin Sheet, scroll left and press the 'Go Back to the Booking Calendar' Button to return to the Booking Calendar Sheet
Make a Booking:
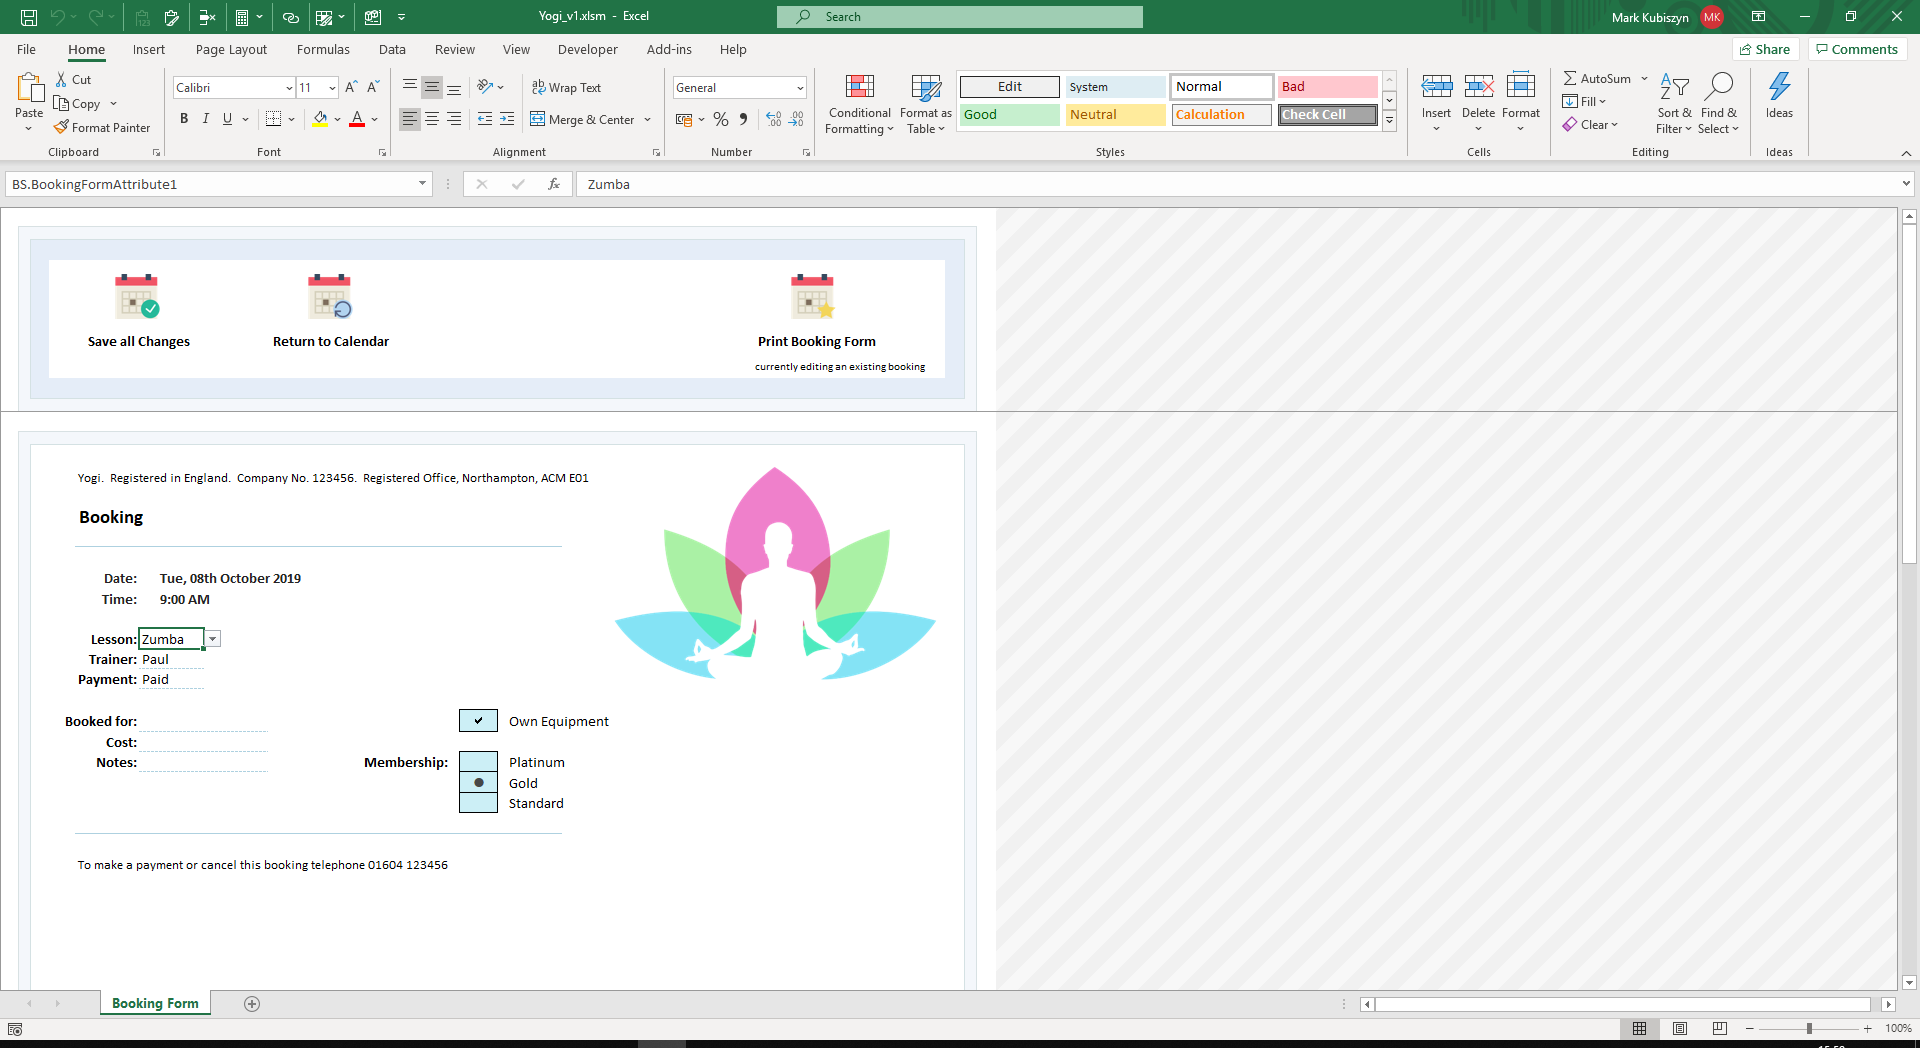
Click on the Calendar and select a Date. Click on an empty Slot at 9AM and press the 'Make Booking' Button to enter into the Booking Form. Here is what the Booking Form should look like (you will notice that at the top right, som small Text specify's 'currently making a new booking'):
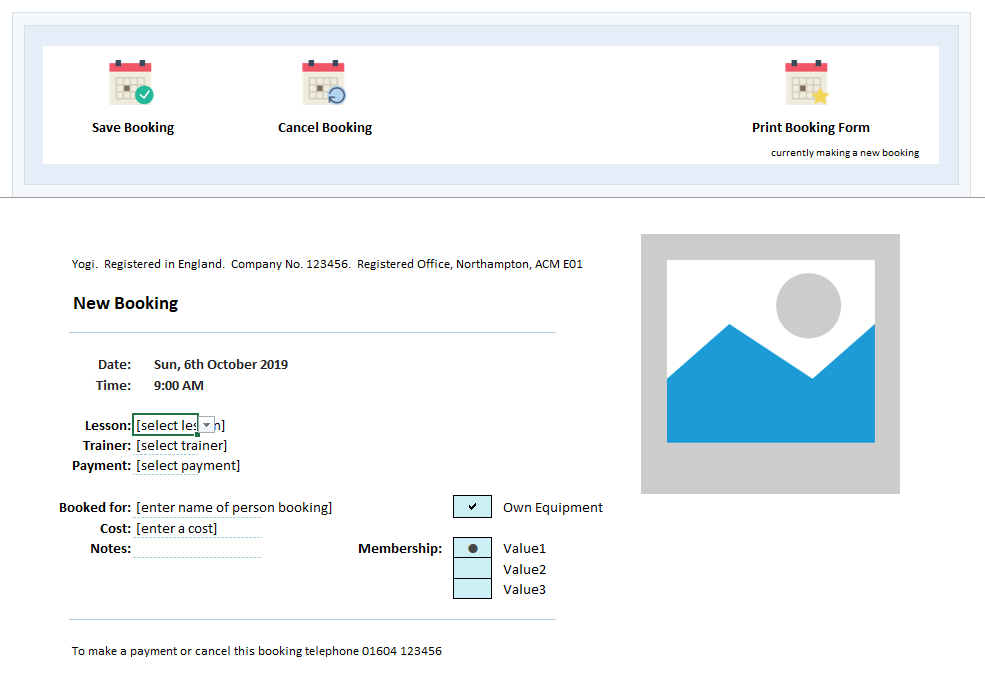
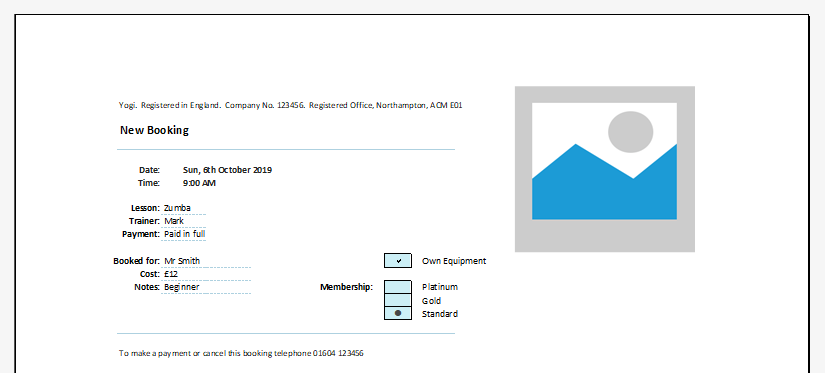
You should be put on the default Cell ready to choose a 'Lesson'. Pick 'Zumba' from the Lesson Drop-down Combo Box. Then pick 'Mark' for the Trainer and 'Paid in full' for the Payment. You will notice that where we added Placeholders for the Property's and the Free Text, that these are displayed here, for you to enter a value or type some Text. Enter Mr Smith for the 'Booked for' Free Text, '£12' for the 'Cost' Free Text and 'Beginner' for the 'Notes' Free Text. Leave the 'Own Equipment' as Ticked. Now we need to add the 'Membership' Radiobutton Group values here as these are not set on the Admin Sheet (gives you the freedom of adding many Buttons should you wish). Overwrite the 'Value1', 'Value2' and 'Value3' Text with 'Platinum', 'Gold' and 'Standard' and select 'Standard'.Now test out the Print Preview for the Booking you are about to Save. Click the 'Print Booking Form' Button to bring up the Preview (Print Preview is the default Setting but you can set to Print automatically without a Preview). This is what you should see:
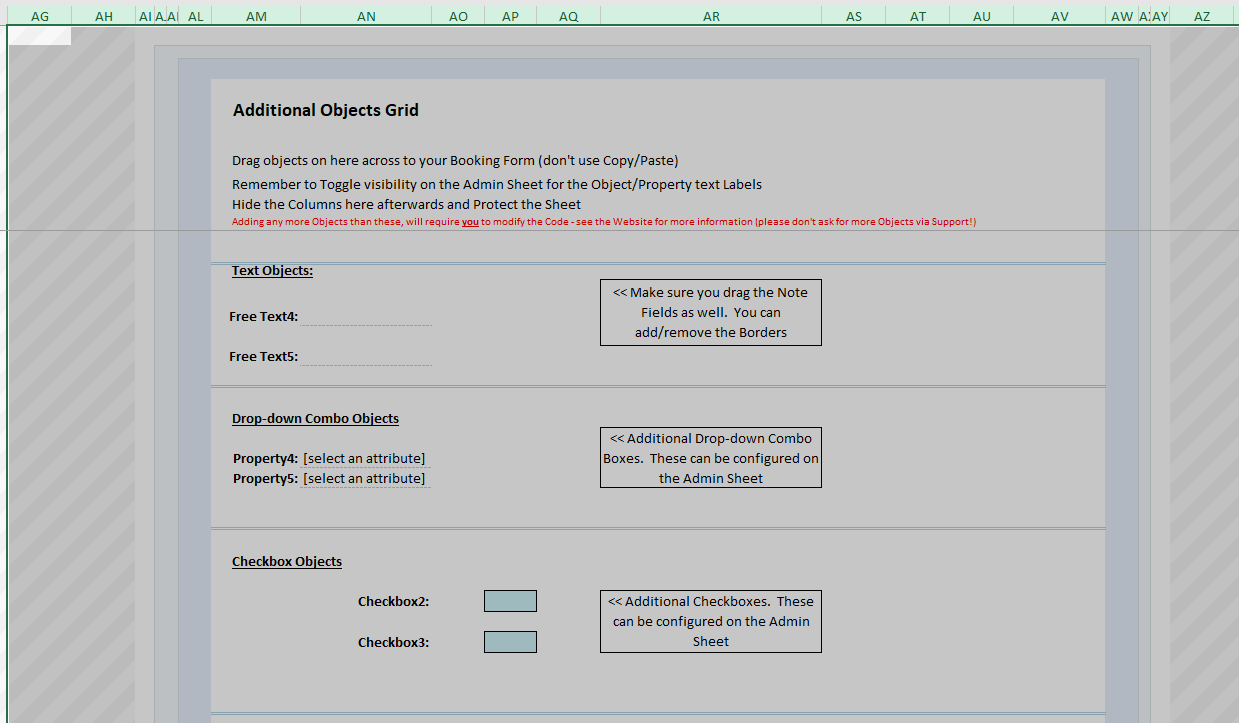
Close the Print Preview. At this point you can choose to Cancel the Booking or Save the Booking. Before we do this I need to show you the other Objects that you can add to your Booking Form should you so wish. Scroll right a little and turn on the Headers on the 'Show' Group of the 'View' Tab in Excel. Unhide Columns "AG:BA". Here you will see 2 more Free Text Boxes, 2 more Property Objects, 2 more Checkboxes and 1 more Radiobutton Group to use. Simply select the entire Object and drag to your Booking Form. Configure the Font or Borders as you wish. These Objects are setup on the Admin Sheet except the Radiobutton Values. Should you need more Objects, then you will need to add these to the Code and configure the VBA (not covered here!). These are the extra Objects:
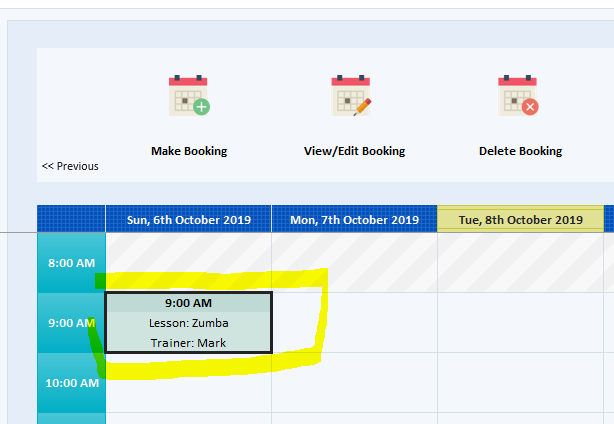
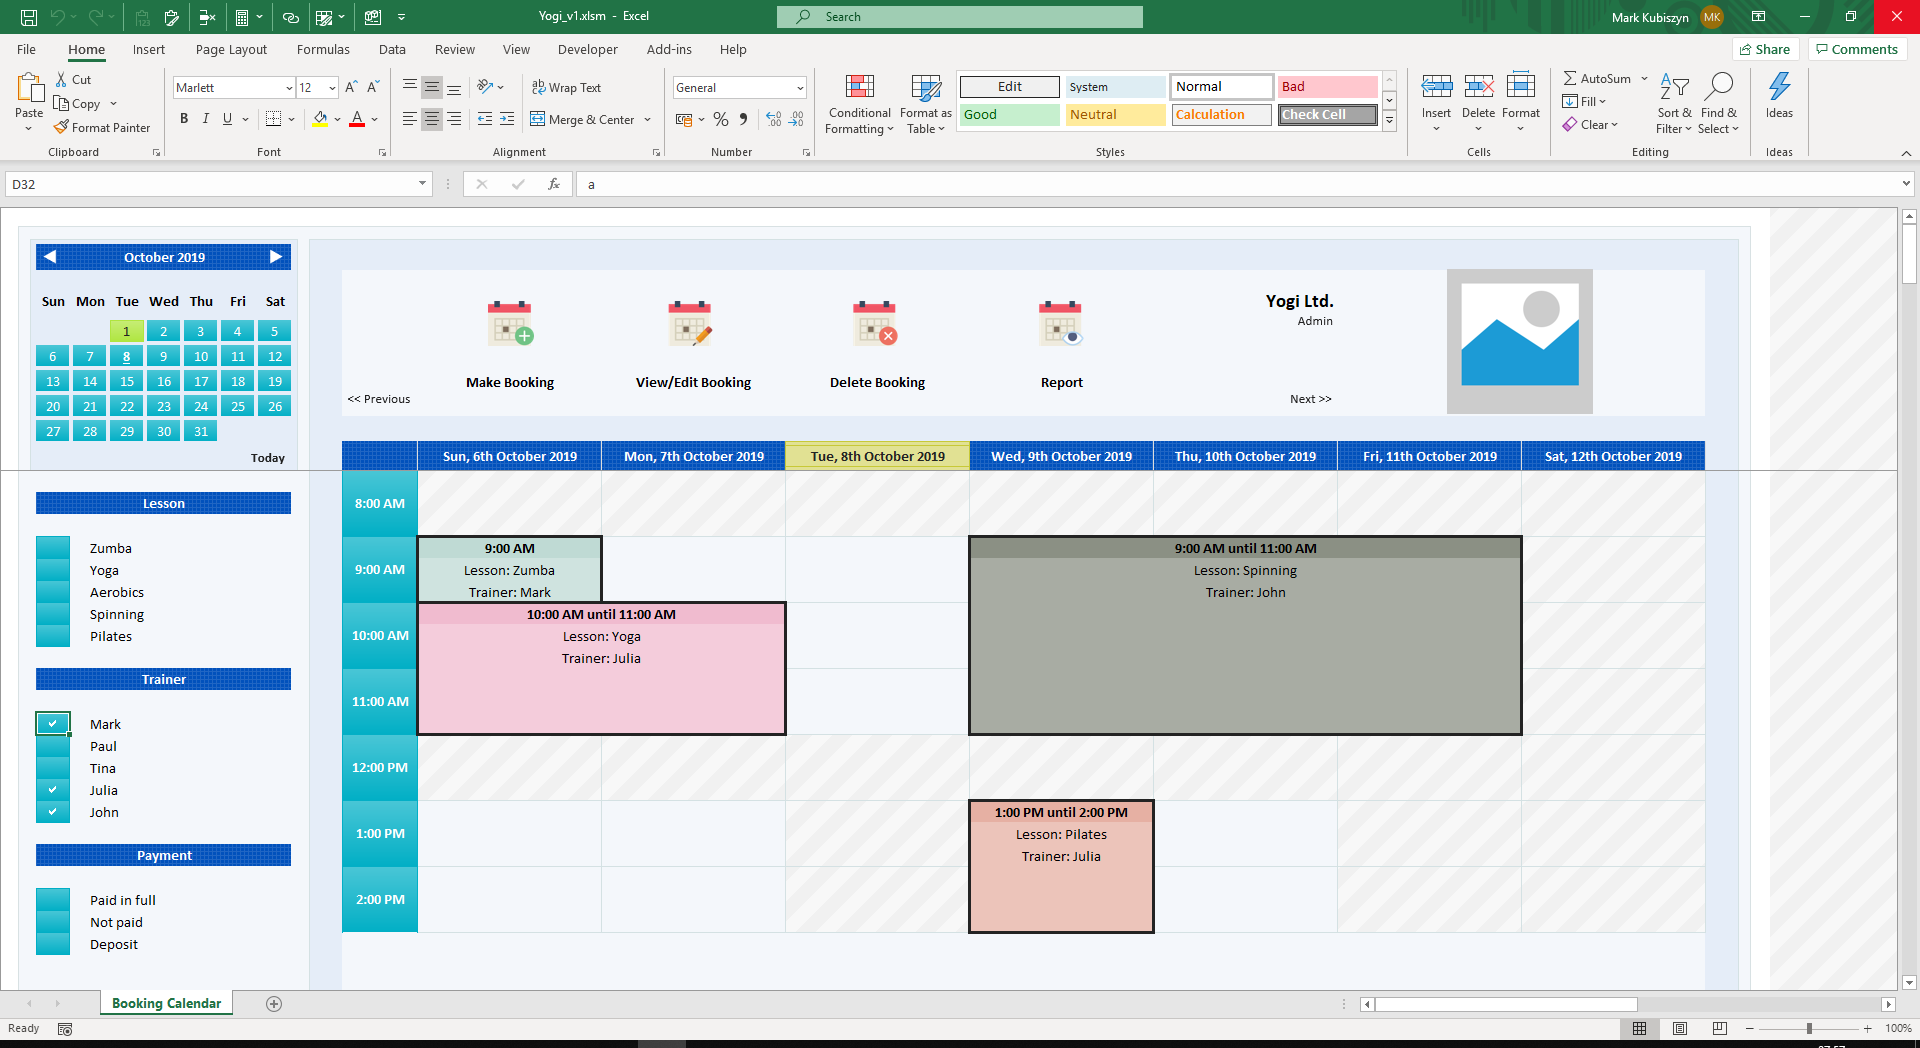
Hide the Columns and turn off the Headers. Press the 'Save Booking' Button. You will notice that all of the Buttons have my Click Animation on them. If you don't want this, to speed up Button navigation, you can turn this off in the Admin Sheet. Here is what you should now see - a new Booking Time Slot has been filled. It is populated with the Time of the Booking, the Text 'Lesson: Zumba' and the Text 'Trainer: Mark' due to the way we added the Auto-Populate Text Settings on the Admin Sheet used for display in the Calendar Grid. The Booking Slot will be rendered with a Thick Border - this must persist due to the way Grid Selections can be made, so you should not change this in the Code:
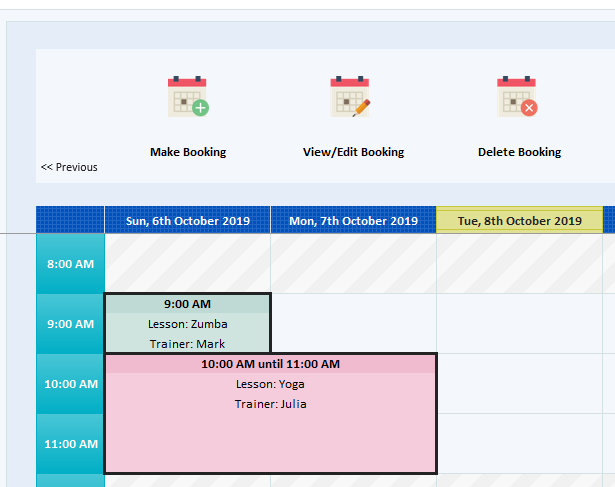
Let's make one more Booking, this time over 2 Days. So select Cells from 10Am until 11AM across 2 Days (you don't have to select all of the Cells, just ensure you select a couple of Cells that are within the Range). Press the 'Make Booking' Button and enter some of your own Settings - enter a different Lesson Type, like 'Yoga', a different Trainer, like 'Julia' and a different Payment, ike 'Not paid'. Press the 'Save Booking' Button to return to the Booking Calendar. Here is my extra Booking made across 2 Days (you can Make Bookings across the Booking Calendar as long as there are no Break/Blocked Time Slots):
Step3 - Filtering Bookings in Yogi #back to top
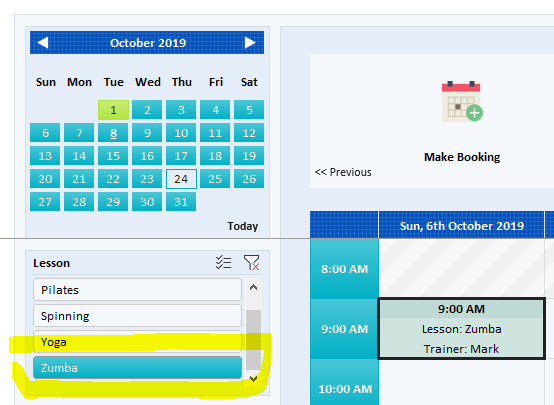
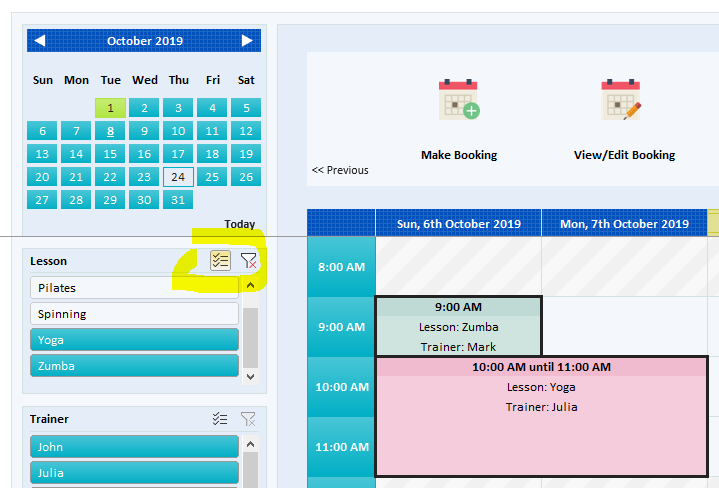
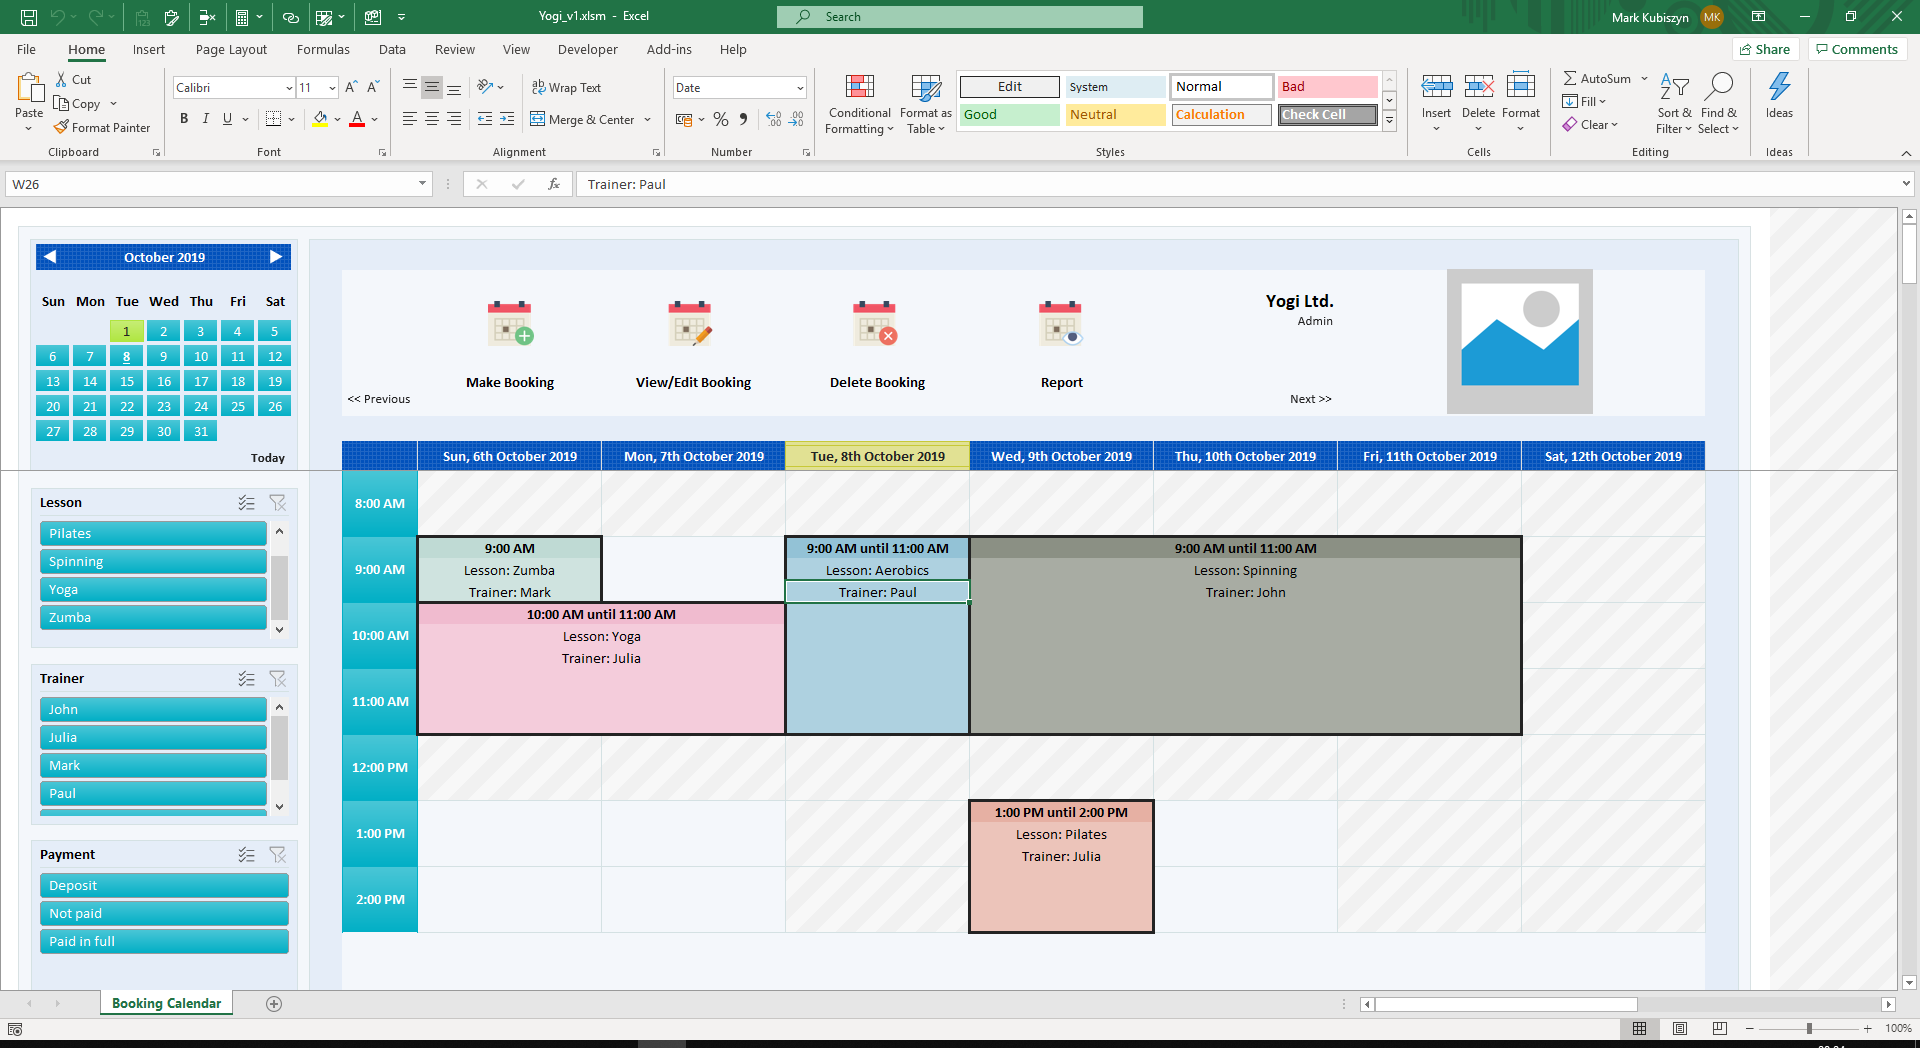
We picked Slicers for our Booking System, so test out the Filtering. Select 'Zumba' on the Lesson Slicer. You should see the extra Yoga Booking dissapear from the Calendar Grid
Unfilter the Lesson Slicer. Test the Trainer Slicer by pressing 'Julia'. You should now see the first Booking dissapear and the extra Booking you made across 2 Days should persist. Lastly test the Payment Slicer for the 'Paid in full' Field we chose. All of the Slicers have the Multi-Select Box visible, meaning that you can Slice out the Values that you don't want to see, leaving just the Values that you do want to see on the Calendar Grid as is seen below:
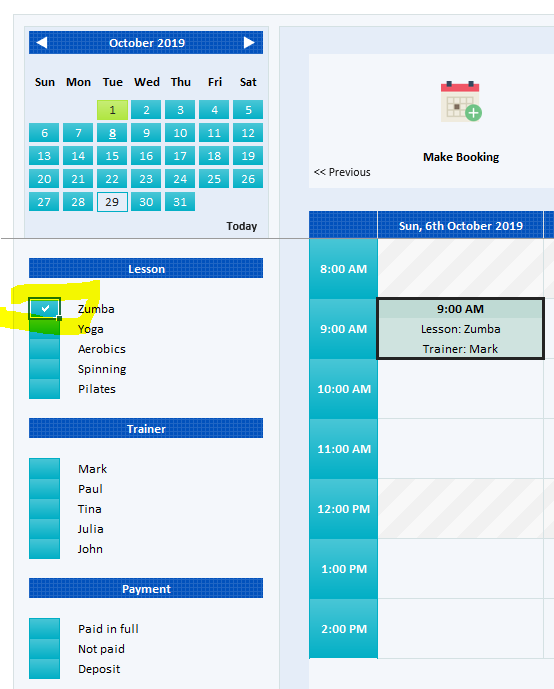
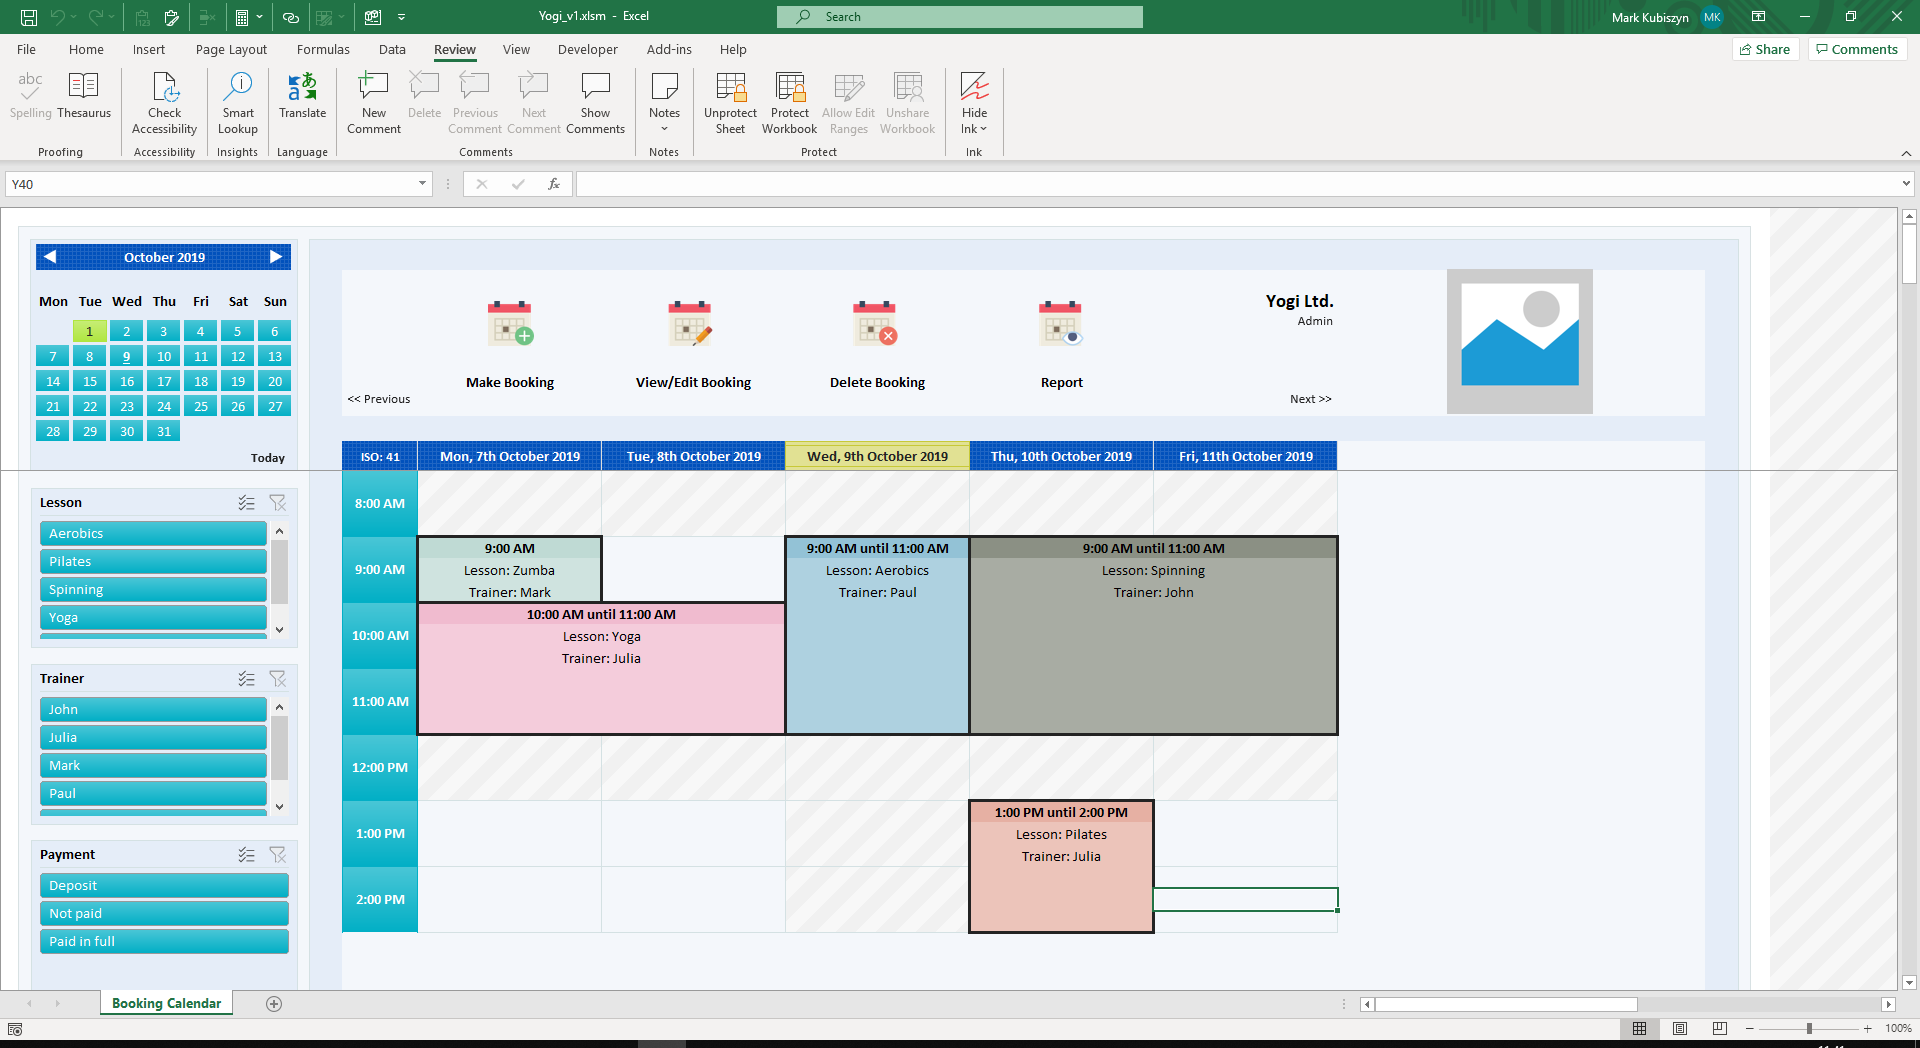
If you decided to use Checkboxes for Filtering, then you can Tick or Untick the relevant Checkboxes to Filter your Bookings. Here, I quickly swapped from Slicers to Checkboxes by going back into the Admin Sheet and pressing the 'Update the Property Checkbox Filters on the Booking Calendar' Button:
Step4 - View/Edit Bookings in Yogi #back to top
Click on the 'Zumba' Booking we made earlier and press the 'View/Edit Booking' Button. You should see all of the data we added earlier and you can now choose to Print Preview the data or Edit the Data accordingly. You will also notice that at the top of the Booking Form the Text has changed to 'currently editing an existing booking'. Change the Text next to 'Booked for' to Mr Johnson and press the 'Return to Calendar' Button. You will be prompted by a Msg Dialog informing you that the Data has changed like the image below:
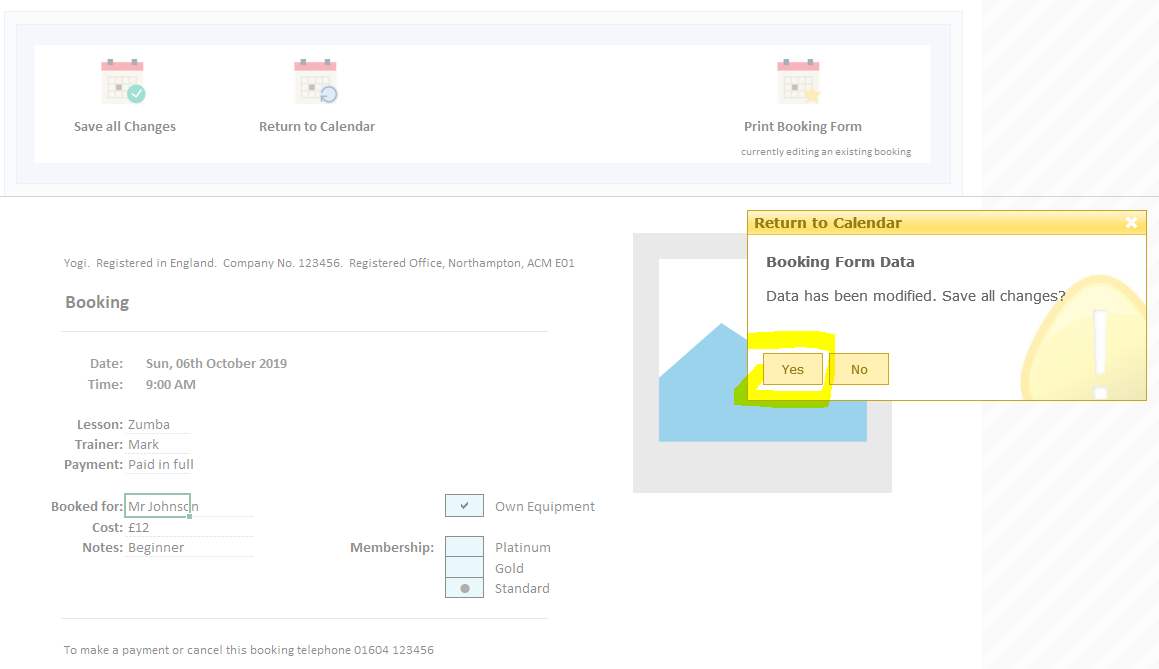
Click the 'Yes' Button to Save changes and return to the Booking Calendar. Clicking 'No' will leave you back on the View/Edit Booking Form. The data on the Calendar Grid for the current Bookings should remain unchanged unless you also changed the Lesson or Trainer
Step5 - Deleting Bookings in Yogi #back to top
Create some more Bookings. Then Select one or more of these Bookings - you can select any number of Cells in the Calendar Grid as long as you are inside the Grid and don't overlap or select Break/Blocked Time Slots. Press the 'Delete Booking' Button. You should see a Msg Dialog informing you of the action you are about to undertake like the image below:
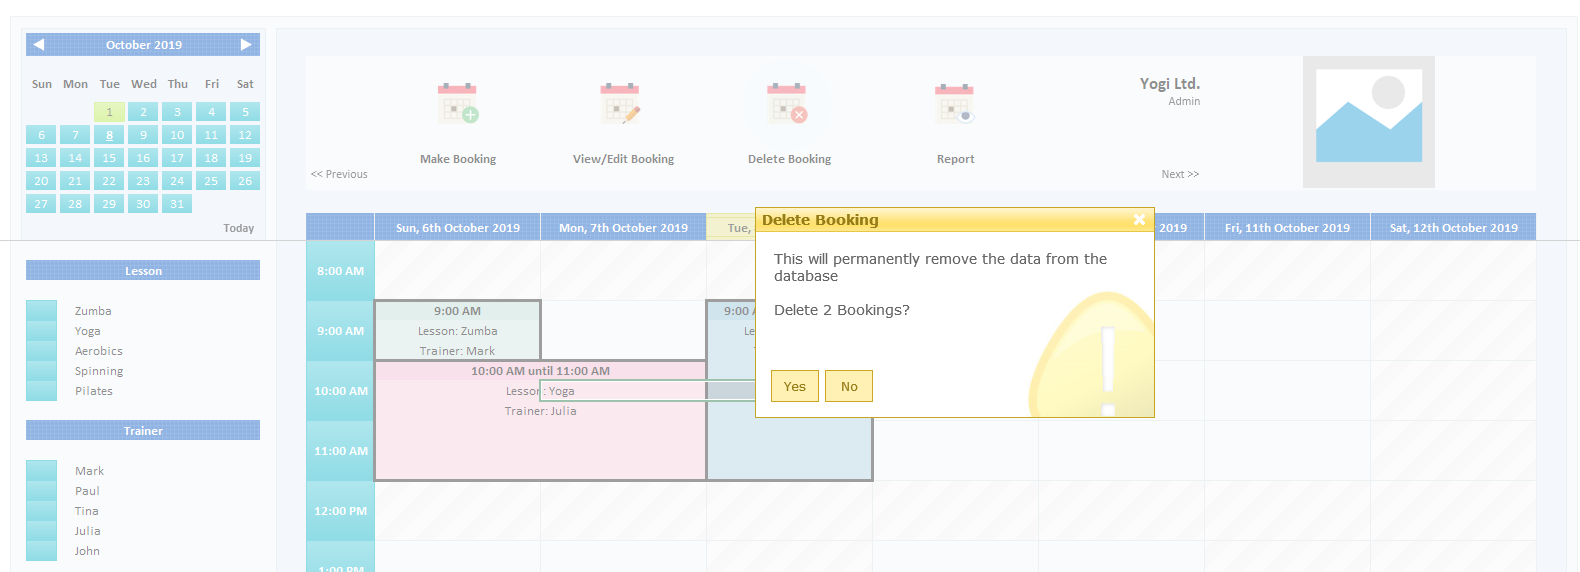
I selected 2 Bookings and was asked if I wished to delete these Bookings. Pressing 'Yes' will delete the Bookings from the Database. Pressing 'No' will exit the process
Step6 - Running a Report in Yogi #back to top
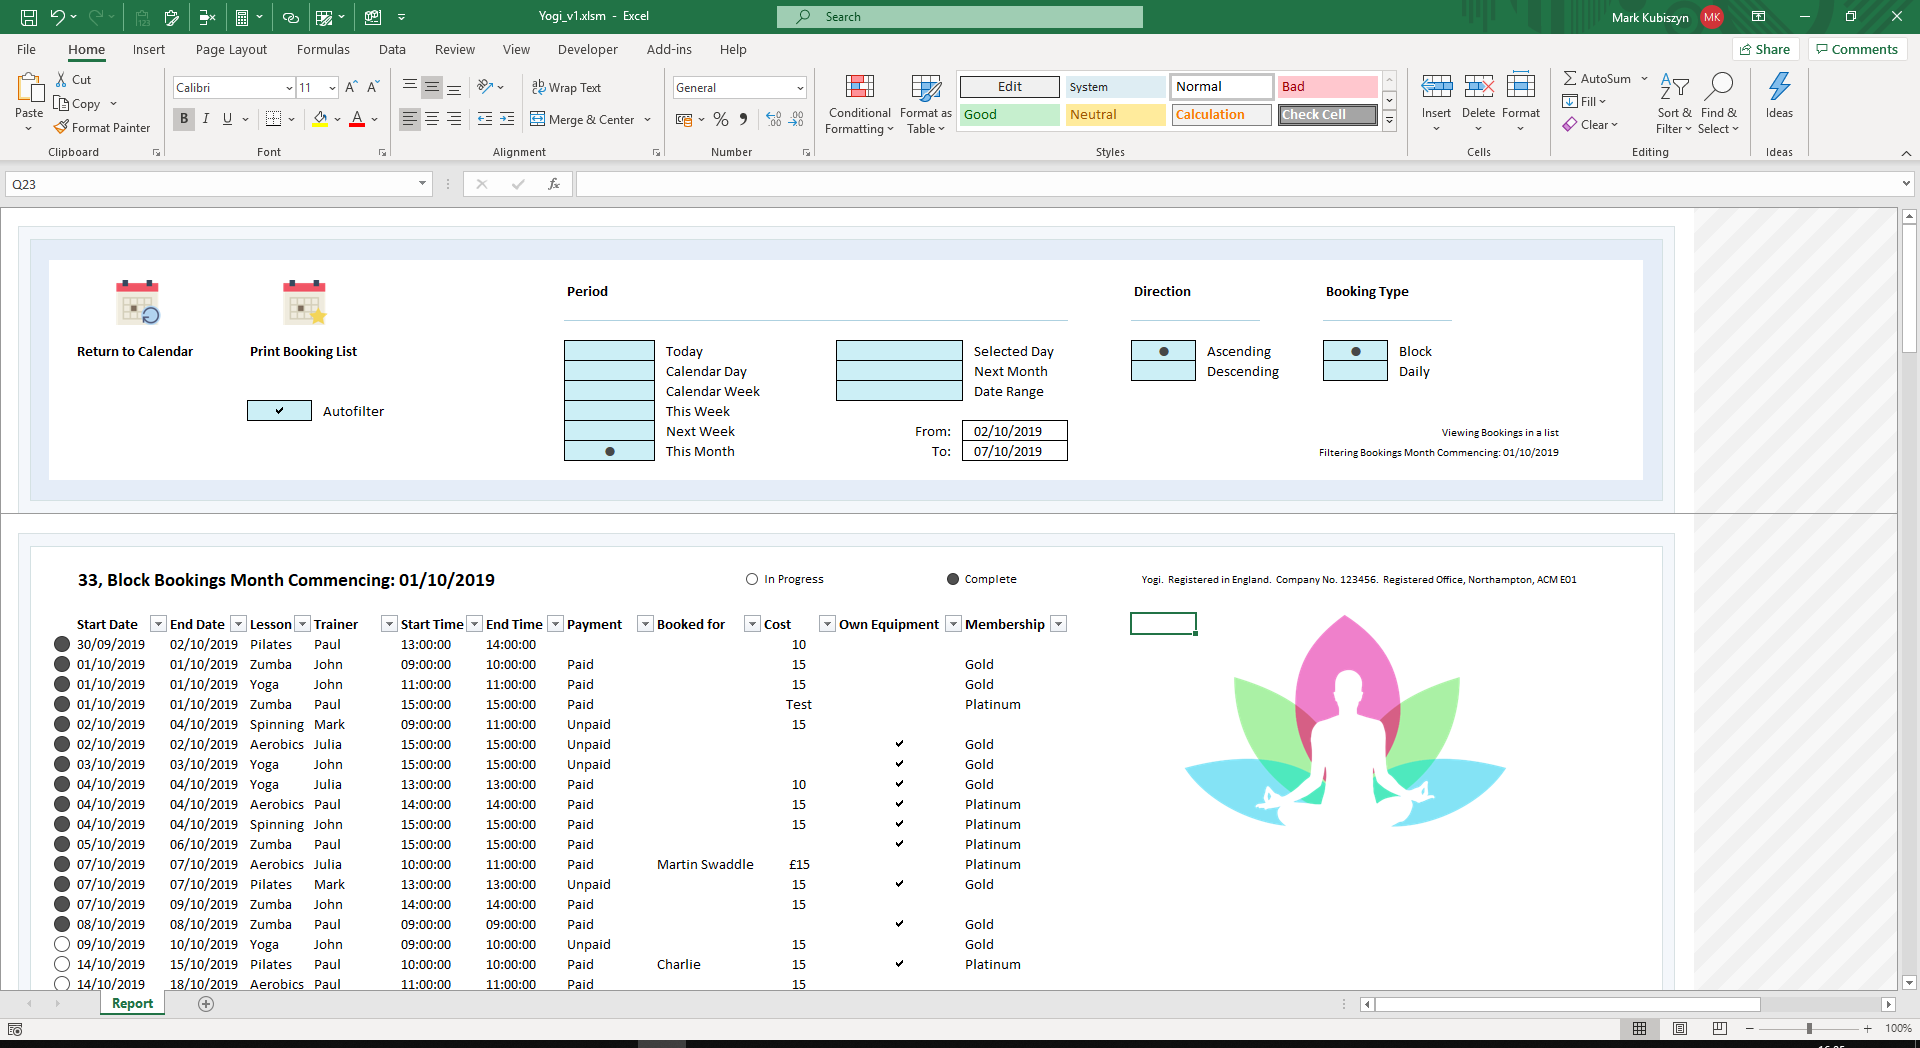
Okay so by now you should have at least 3 Bookings in the Calendar Grid. Press the 'Report' Button to enter the Report Form. By default I have left it on the Calendar Week. You can see from the Image below that I have made 3 Bookings so far for the Calendar Week commencing 06/10/2019. The List is Sorted Ascending and is showing the Bookings as 'Block' Bookings meaning that the Start and End Dates run for each Booking on the Gid even if they transpose multiple Days and Time Slots ie. the Yoga Booking runs from '06/10/2019' until '07/10/2019' - it is a Block Booking. I also have the Autofilter on by default. The Progress Icons indicate whether a Booking is in the past or in the future - you can see that the Booking on the '08/10/2019' is still to be progressed (I ran the Report on the 08/10/2019:
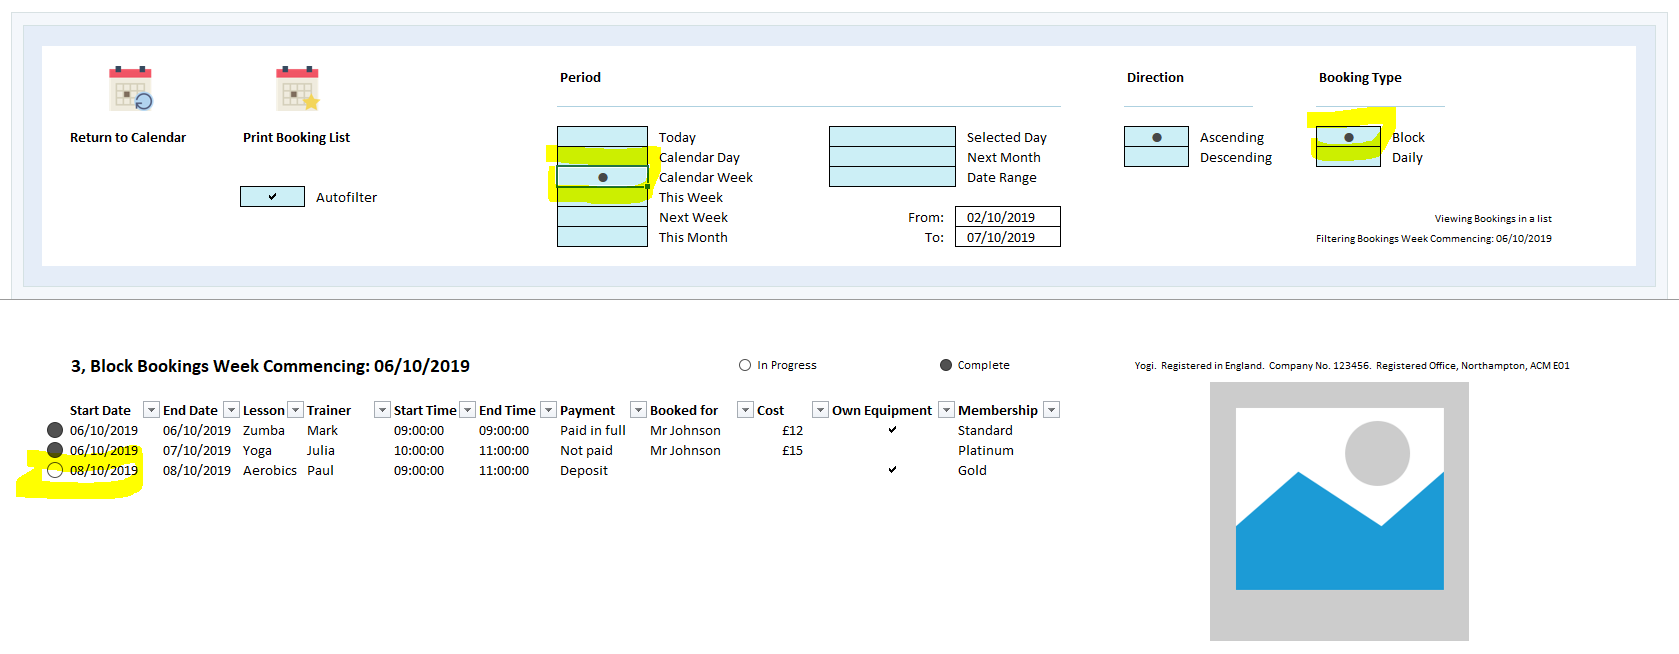
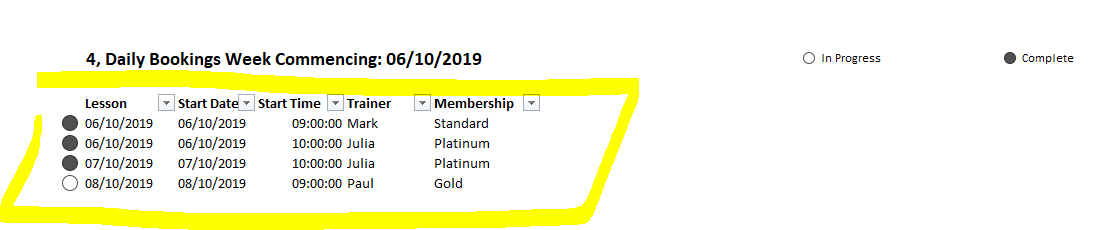
You can choose what Date Ranges you want to Report on, Today, Calendar Day (the Day currently selected in the Rollover Calendar), Calendar Week (the Week currently selected in the Rollover Calendar), This Week, Next Week, This Month, Next Month, Selected Day (the Cell Selected in the Calendar Grid) and Date Range (manually entered Dates). Press the 'Daily' Radiobutton to change the List to Daily Bookings. Daily Bookings are the individual Bookings broken down by Day including Block Bookings across multiple Days. So the Block Yoga Booking now becomes 2 separate Bookings - these are the Daily Bookings:

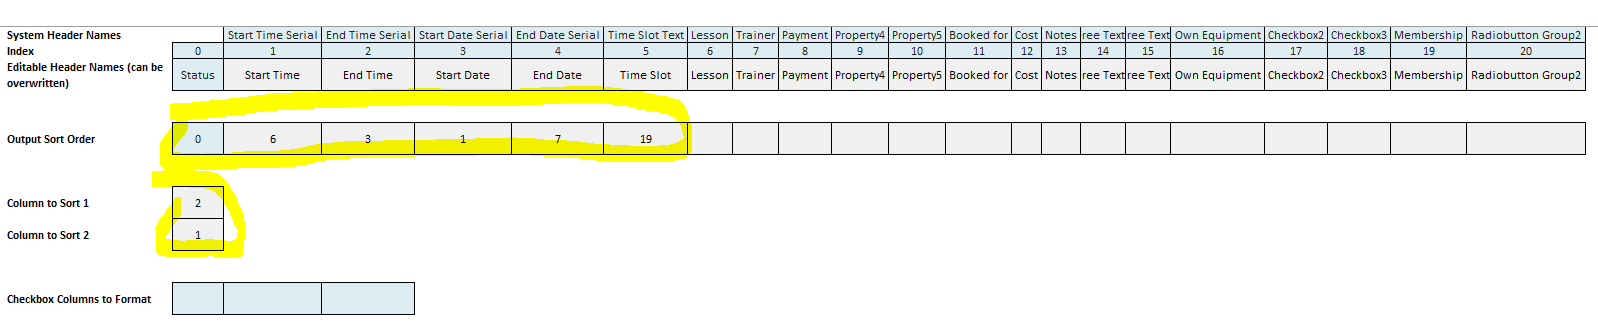
All of the Data you see here is automatically selected by the Settings in the Admin Sheet and is highly-configurable. Press the 'Return to Calendar' Button. Then press the 'Admin' link to go to the Admin Sheet. Scroll right until the last block of information. Here you will find all of the Settings that you can tweak to Report on. Let's change the Report Output. you can Edit the Header Names and overwrite any Formula there should you wish. I will use the given Headers but change how I want them Output. The Sort Order pertains to the Index shown above the headers - you must only use this. So I changed the 'Output Sort Order' to be '6, 3, 1, 7, 19' and I chose to Sort Columns '2, 1' which means Sort Column 3, then 6 from the 'Output Sort Order' meaning Sort by '3' Start Date, then by '6' Lesson. Here are the changes I made:
And going back to the Report, here are the changes in situ:
Please Note: I had to alter the Column Widths slightly and the Date/Time Formats for the Columns are not maintained by the Code, so it is up to YOU to change the Format. This means you should select the entire Range and change it to how you wish to see the Format. These will then persist
Unprotecting the Worksheets #back to top
Yogi has Protection added by default whenever a Button is pressed. This is to protect the images and Contents but allow Code to run. If you need to change anything on a Worksheet you can simply Unprotect each Sheet as you need to. On the 'REVIEW' Tab of the Ribbon, select 'Unprotect Sheet' from the 'Changes' or 'Protect' Group depending on the Excel version that you are using. A note: remember that when you are designing the Booking Form, to Right-click and on the Protection Tab, uncheck the 'Locked' Checkbox to allow users to enter Text into the Cells. For Checkboxes and Radiobuttons I prefer to Check both the 'Locked' and the 'Hidden' Checkboxes - this then prevents the 'a' symbol and the '|' symbol from being displayed in the Formulabar
Protecting the Worksheets #back to top
This is best done by default whenever you press a Button - just press one of the Buttons and everything will work fine after any changes to the Worksheet. Remember to use the Protection Tab via Right-click Format Cells to Lock or Hide the Cell Contents. If you really must protect a Sheet manually, on the 'REVIEW' Tab of the Ribbon, select 'Protect Sheet' from the 'Changes' or 'Protect Group
Database Storage #back to top
Data is Sliced in and out of the Database Worksheet in single Arrays. Evaluate functionality is used to locate the UID's that are used to store each Booking. The UID is made up of the Time and Date like this '0.375|43745' meaning the Booking was made for 9AM on Monday 7th October and across 5 Days (see the Start Date Serial and End Date Serial). All Other information for every Object available is also stored for the Booking. Bookings are stored by each entry regardless of the Days Booked (Block Bookings). For Reporting these are then further broken down into the respective Days (Daily Bookings). Here is how the Data is stored in the Database Sheet:

Here is the actual Booking I made - the data is raw as this is how Yogi ships, with a Blank Database and non of the Property's or Attributes setup - that's down to you. You can follow the Steps in this Online Help to setup Yogi for a Yoga Lesson Booking Database to get a feel of what it looks like and can do

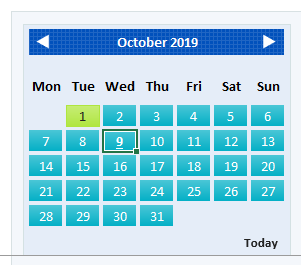
The Rollover Calendar #back to top
The Rollover Calendar used in Yogi is the next generation Calendar based upon my Rollover Sidebar Calendar. The Calendar can be started on any Day of the Week. The Cells are highlighted and the Borders change whenever the Mouse is ran over them. The Calendar Day selected then fires a Timer event to run Code. This is used due to the way the Rollover technique works in that some Code cannot simply be ran after a Rollover. The Month can be incremented or decremented accordingly by pressing on the tiny left and right Arrows. My Click animation is used to briefly display a fading animation over the Buttons. You can just make out the fading cirle in the second Image below:
Screen Shots #back to top
Yogi using Checkboxes for Filtering Bookings, 7 Day Calendar starting on Sunday
Yogi showing Slicers for Filtering Bookings, 7 Day Calendar starting on Sunday
Yogi 5 Day Calendar starting on Monday
Yogi Edit Booking - showing the Booking Form
Yogi Reporting - showing the Report Sheet
Yogi Admin - showing the main Property's being edited
FAQ #back to top
How do I change the Logos?
Select the Sheet containing a Logo. On the 'Protect' Group on the 'Review' Tab of the Ribbon, select 'Unprotect Sheet'. Right-click on a logo and select the 'Picture Format' Context Tab that appears. Select 'Change Picture->From a File' and Browse to a new Image. Select the Image - yo may need to resize the Image. Select 'Protect Sheet' from the 'Protect' Group on the 'Review' Tab of the Ribbon and accept the defaults. Press any Button to Protect the Icons and Logos
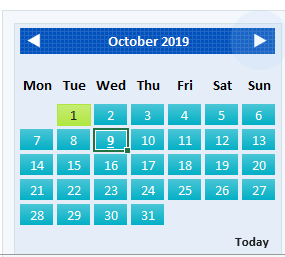
How do I know Todays Date on the Rollover Calendar?
It is shown by an Underline. The Date Selected is shown as a Yellow Header in the Booking Calendar
Videos #back to top
Video of the Yogi Booking System
Here I run through some of the settings, filtering Bookings, making Bookings, editing Bookings, deleting Bookings and making a Report
Support #back to top
Please remember you have purchased very affordable Software and you have not paid for a full-time Software design agency - I am but one man. Occasionally I may help with small tweaks, but these requests will be put on a much lower priority due to their nature. You have not PAID for Support, Support is 100% optional and I provide it for your convenience, so please be patient, polite and respectful
Support (limited) for my Software includes:
* Responding to questions or problems regarding the Software and its features* Fixing valid (replicated) bugs and reported issues for the VERSION I HAVE WRITTEN
Software support does not include:
* Customization and installation services* Support for third party software or ANY kind of development whatsoever
Before seeking support, please...
* Make sure your question is a valid Software Issue and not a customization request* Make sure you have read through the documentation and any related video guides before asking support on how to accomplish a task
* Make sure to double check the Software FAQs or online documentation
* Ensure that you access to the VBOM is allowed and that Macros can run in Excel
* Make sure to provide 'proof of purchase' and state the name / version of the Software that you are having issues with when requesting support by Email or via Facebook
How to get Support
Contact Mark Kubiszyn on the Email address provided when you purchased the Software, including the Order NumberContact Kubiszyn.co.uk via our Facebook Page - remember to be patient, if there has been an issue with your download, I will always respond within 48 hours and will Email you the File directly if neccessary or via Messanger. For other issues the response time may be considerably longer and I may choose to respond to specific questions only (as is my right), depending on what has been asked
Version History (Changelog) #back to top
You can find the version history in the Code Module for any Macro-enabled Software or read more information below. The latest Version is always shown first
Changelog
09.10.2019 - (Version 10) release of Yogi Booking System