
Introduction
Introducing Pretty Buttons
Pretty Buttons - Pretty Buttons designed in Affinity that can be Pressed/Depressed for Excel with Tooltips
Pretty Buttons came about as an inspiration for a project in Excel where I wanted some nice looking label buttons in a variety of 'wet chalk' colours with an Icon on the left-hand side, that could be pressed/depressed with Tooltips with the ability to capture the state. I wanted rectangular Buttons with one of the buttons remaining transparent so that I could use any 'Fill' colour for the background. I wanted a 'Normal' and a 'Pressed' or 'Depressed' state in a 3D style, so that they would look even better when a drop-shadow was added in Excel. I also wanted to design a Toolbar and then create some smaller buttons in a variety of sizes. Pretty Buttons was the outcome of this work - I hope you like it!
In subsequent releases I have added different transparent Buttons, including a Rounded Corner Transparent Button (not made in Affinity, but from my Awesome Buttons Software) and a Sheet which includes some Toggle Buttons designed in Affinity which have two Icons, a Plus and a Minus that switch around when pressed. These can be used to toggle Columns or Rows on or off. Check the Changelog for updates
Update: I have performed a deep-dive excercise looking at the Hyperlink Tooltip and considering also the '=HYPERLINK()' Function used with the Rollover technique. You can read all about what I discovered (and what I didn't) Here · Hyperlink Tooltip (deep-dive)
Did you know that I have discovered many different ways to run macros following Rollovers? I have now discovered and improved a robust method for allowing a Proper Tooltip and a Rollover. If you want to read about these different techniques and purchase my latest Hyperlink Rollovers Project then you can do so Here · Hyperlink Rollovers for Excel


If you like this Project you may also enjoy
Hyperlink Rollovers · Pretty Rollovers · Burger Menu · Flat UI · Awesome Buttons · Small Toggle Buttons · Menubar · Toggle Buttons · xlui · Burger Buttons · Popup Burger Buttons
Prerequisites
- Excel 2016 (32bit or 64bit)
- Basic to moderate Excel Skills and some VBA skills to copy Shapes and then link a Subroutine to a Shape or a Graphic object
- Windows PC · NOT a Mac!
- No support is provided for customization of this Software
Features
- A nifty Excel Workbook with a Flower background and helpful links/advice
- Documented Code separating out the different Buttons being used
- Transparent Button so that the Fill Colour can be changed for the Normal and Depressed states. In version 1.1 I added a light grey transparent Button which looks a little more pronounced on a pure white or off-white background
- Change the foreground colour of the Text and the Fill colour of the Icons
- Dynamically shange the Tooltip using Code
- Use the tiny Transparent Toggle Button designed in Affinity to expand and collapse Columns or Rows plus change the Tooltip on the fly using VBA Code
- No ActiveX Labels, all Shapes and Images/Pictures/Icons ie. *.PNG
- Affinity Button Files are included with this Project
- 3D Buttons are all included in this Project in *.PNG format to Insert into Excel and already added to Excel for the Example Sheets
- Buttons look great in all Zoom levels
- 4 Example Sheets in Green, Yellow, Pink and Blue Wet Chalk colours
- A Toolbar Example Sheet
- A Transparent Button Example Sheet
- Capture the Button State using a named Range or Defined Name
- Code to Lock the Drawing Objects so that they are not accidently selected by a user
- Version 1.3 now includes a Transparent Rounded Corner Button

Installation
Right-click and extract all of the files in the Zip Archive to your PC. Open the PrettyButtons.xlsm File and test out all of the Examples to see how they operate and update any Defined Names (Named Ranges) with their respective values. In order to select any of the Shapes or Graphic Objects you must first Unprotect the Sheet. Please read all of the info on the individual Sheets and in this online documentation before you begin to edit and create your own Pretty Buttons or before turning to Support
Usage
PrettyButtons.xlsm
Test out all of the Demos
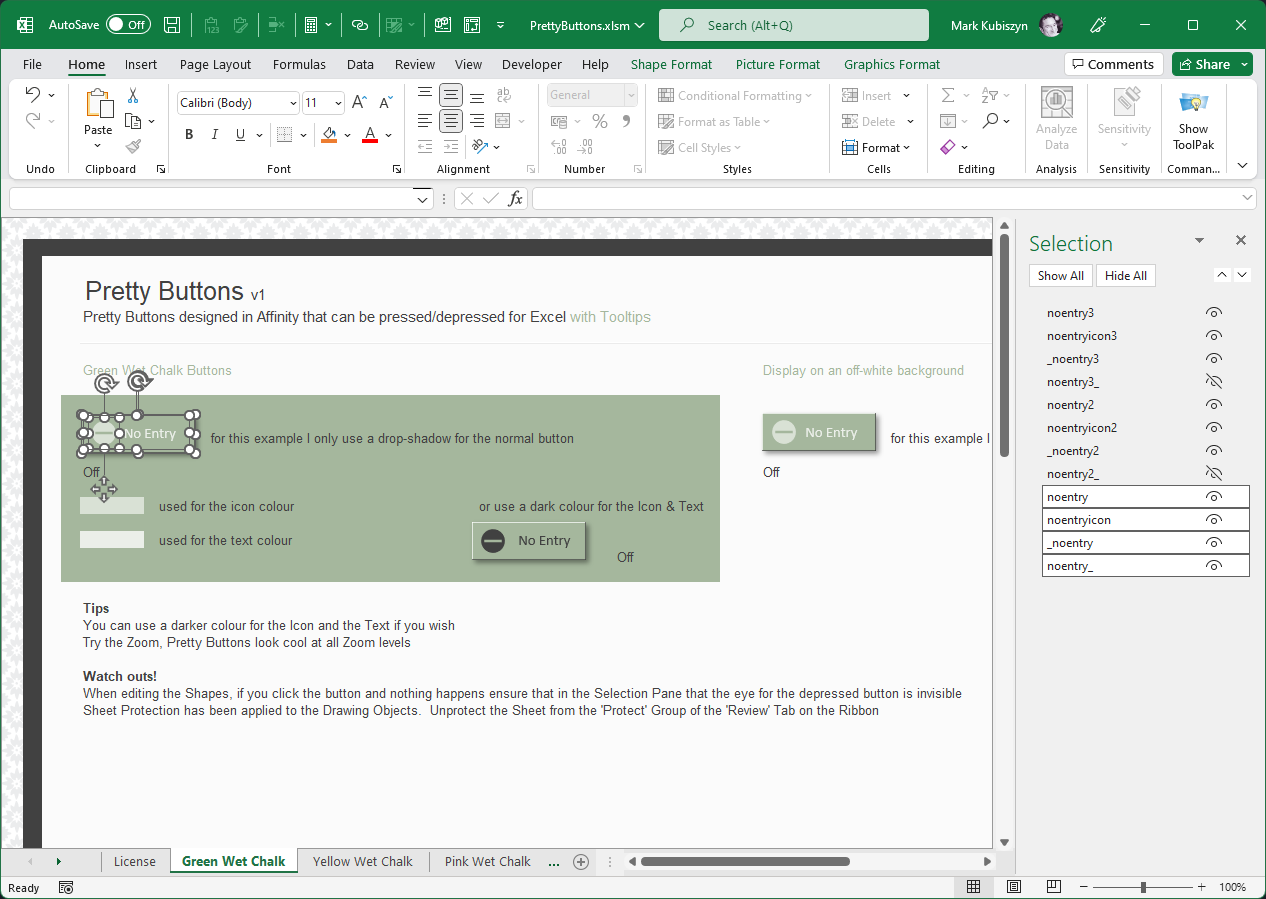
Before you start editing and trying to create your own Pretty Buttons, take some time to look at all of the Examples in all of the Sheets. The License Sheet contains some links to licensing and the 4 main colours used for Pretty Buttons. The four 'Wet Chalk' Sheets demonstrate each Button using their respective colour and each has 3 examples of a Pretty Button that you can press or hover over to view the Tooltips. A button is shown on both the button colour and on an off-white colour background or 'Fill' so that you get some idea of how they look when placed ontop of different colour backgrounds. On each Sheet I have included the Icon and Font colours used for the Text or Label and the Icon. Each colour Sheet has a specific Icon theme ie. 'No Entry' or 'Success' and I have chosen an Icon that best represents this theme. I also show the Pretty Button using a darker Font colour and Icon colour to give some contrast. There are 3 Named Ranges that hold the values for each of the buttons, their button state, indicating whether they are in a 'Normal' state or a 'Depressed' state, shown on the Sheet as 'Off' and 'On'. I have added a subtle drop-shadow to the 'Normal' button state with the Pretty Button displayed on the off-white background having a drop-shadow on both of its states. Try hovering on each button and pressing it in turn. The Toolbar Sheet demonstrates having 3 buttons in a row or placed next to each other with their toggled states actually running VBA Code. They toggle the Headings, unhide and hide a range of licensing information and toggle the Ribbon On and Off. The Pretty Button that toggles the Ribbon also has Code that changes the Tooltip dynamically to read differently depending on its button state - try hovering over it and pressing it. The Transparent Button Sheet demonstrates the main Pretty Button that you should use in your own Projects if you want to change the background Fill of the buttons and/or want the button to be invisible and let the background colour of the Sheet show through. Try pressing each button on here - the first Button changes its background Fill colour when pressed and the second one, the transparent one, shows the 'Zebra' stripe pattern of the background through the button indicating its transparent look and feel. Either of these can be used to create new buttons for your own Projects, just change the 'Fire' Icon to an Icon of your choice and overtype the Label Shape Text to a Text of your own choice

Editing the Pretty Button Shapes (Selections and Formatting Panes)
Each Pretty Button consists of 4 elements or objects, a Label Shape for the Text (Shape Format), an Icon (Graphic Format), a Normal Button (Picture Format) and a Pressed/Depressed Button (Picture Format) - we will call these elements objects. Each Pretty Button therefore has 4 objects that are named differently or segmentated (see the next section for the naming conventions). In order to select any of the Shape objects, Graphic objects and Picture objects you must first Unprotect the Sheet as Code protection is added to the Project by default to protect the interface (protects the Shapes from user interference, either on purpose or accidently) - do this from the Review Tab on the Ribbon. Click the 'Green Wet Chalk' Sheet and Unprotect the interface. Right-click one of the Pretty Button objects. Now, use the Selection Pane on the Editing Group of the Home Tab of the Ribbon to make Selections easier and make viewing of the Names of each object easier. To format an object you can hover near the Selection and use right-click Format and then change the formatting using the formatting Pane or use the options on the context Ribbon that will pop up for each object selection. I like to toggle on a Shape between the Format Pane and the Selection Pane. Here I have the Selection Pane visible and have selected the 'noentry3' object used for the Label:

The Object Naming Conventions and why they are this way!
The objects have a specific naming convention that should be adhered to in order for the VBA code to run properly. I will use the 'No Entry' Pretty Button to lay out the definitions thus:
1. the Label object, named 'noentry'
2. the Icon object, named 'noentryicon'
3. the Normal button object, named '_noentry'
4. the Pressed/Depressed button object, named 'noentry_'
Notice on the Selection Pane how the last object is always shown as invisible (see the little eye with a cross through it). For multiple buttons of a similar name you should always add a numeric digit to ensure that they are unique or it will not end well! So for example, for a second noentry button use, 'noentry2', 'noentryicon2', '_noentry2' and 'noentry2_'. The last 2 object names are the most important as they are used by the 'ToggleButton' VBA Code Function to quickly switch object states and must have a '_' prefix and '_' suffix accordingly; these are the button objects. Here is the VBA Code that toggles the buttons. It uses a String for the Name and makes a simple switch decision depending on the Name passed and returns True or False, so you can also use this in your Code if required:
' called like this
ToggleButton ("button2")

' or like this
Dim ButtonState as Boolean
ButtonState = ToggleButton ("button2")

' ToggleButton, the one and only Toggle Button Function
Public Function ToggleButton(ByRef ActiveShape As String) As Boolean
   If ActiveSheet.Shapes(CStr(ActiveShape & "_")).Visible = msoFalse Then
      ActiveSheet.Shapes(CStr("_" & ActiveShape)).Visible = msoFalse
      ActiveSheet.Shapes(CStr(ActiveShape) & "_").Visible = msoCTrue
      ToggleButton = True
   ElseIf ActiveSheet.Shapes(CStr("_" & ActiveShape)).Visible = msoFalse Then
      ActiveSheet.Shapes(CStr(ActiveShape) & "_").Visible = msoFalse
      ActiveSheet.Shapes(CStr("_" & ActiveShape)).Visible = msoCTrue
      ToggleButton = False
   End If
End Function
Adding a Pretty Button to your own Projects
To add a Pretty Button into your own Project follow the steps below (here I will add a Green Wet Chalk, No Entry Button to another Workbook):
1. Open my PrettyButtons File and your own File or a new Workbook. Click on the 'Green Wet Chalk' Sheet
2. Using the Selection Pane, select all of the Shapes associated with the NoEntry Button and press CTRL+C
Click in any Cell in your Project or a new Workbook and press CTRL+V to Paste the Shapes
3. Turn on the Selection Pane and deselect all of the Shapes. Select all of the Shapes again except the Icon and on the Ribbon align the Shapes for their Middles and Centers (little Icon top right)

4. Now select the Icon Shape and moe it into its position as you would like it
5. Switch back to my File and go into the VBA Editor ALT+F11. Drag the 'mdPrettyButtons' Code Module into your own Project or a new Workbook
6. Scroll down in the Code Module to the AddFakeHyperlink1() Subroutine and configure this. The Shape Name should be 'noentry' ie. Set objShape = ActiveSheet.Shapes("noentry"). The Hyperlink Address should be 'test' ie. Address:="#" & "test" & "()" and the ScreenTip should be what you want as the Tooltip ie. "My lovely Tooltip". Run the Subroutine - your 'noentry' Shape is now a live Hyperlink to the 'test' Macro that will also run the 'Testing' Macro using the Timer
7. Before you rejoice or test anything ensure you do the next step! Click anywhere in your Project or new Workbook and in the Named Ranges Box enter [noentryvalue] without the brackets like this:

8. Last step before you press that Pretty Button. In the Selection Pane tick the little eye next to the 'noentry_' Shape (RHS) so it makes it invisible. Now you are good to go, press that little critter! Sit back, pat yourself on the back and click it repeatedly to admire your work! In the image below I tweaked my Icon across and left the default Screentip message from my File. You can see the Named Range will populate with the On/Off Text. If you don't add this bit before pressing that Button the Code may crash and you will have an unhappy face ;)

Misc
If a Pretty Button appears not to work correctly, view all of the Shapes using the Selection Pane. Check that you have hidden the Shape with the underscore (_) at the end 'noentry_' and then press the Button
The Transparent Button
The transparent Button alllows you to give the Button any background colour or Fill that you want in Excel. Here are the two Buttons for the Normal and Depressed/Pressed state
This should be your go to Button if you want to use your own Button Colours
In version 1.1 I added a Grey Transparent Button so that the left and Top Borders are more pronounced when used on a pure white or off-white background
Toggle Buttons
In version 1.2, I include another Sheet called Toggle Buttons to show you a tiny Button designed in Affinity that you can use to toggle Columns or Rows in the Workbook. As the Buttons are clicked they use another Icon for the Minus sign, so Unhidden a Plus is displayed and then when hidden a Minus is displayed. You can see this in the images below


The Fake Hyperlink
Pretty Buttons use a method of adding a Fake hyperlink to the first Shape in the Group of Shapes that make up each Button, the Shape that is used for the Label or Text of the Pretty Button. Here is the Code I use in Pretty Buttons without the <> markers of course:
' -¬ AddFakeHyperlink, allows a ToolTip and a Macro Name to run for a Shape
'    - change the name of the Shape for your Shape, the Macro Name for your Subroutine and the ScreenTip to your Text.  run the Code
Private Sub AddFakeHyperlink()
   Dim objShape As Shape
   Set objShape = ActiveSheet.Shapes("<Shape Name>")
   ActiveSheet.Hyperlinks.Add Anchor:=objShape, Address:="#" & "<MacroName>" & "()", ScreenTip:="How about using a darker Font colour for the Button and Icon?"
   Set objShape = Nothing
End Sub
Of course you can alter/shorten this Code further if you like and use the '.Parent' object of the Shape, leaving out the 'Anchor' part. You also don't need to add the extra '& "()"' on for the Macro Name as in the snippet above. Oh and did you also know that you can pass in multiple Macro Names as Functions?! Do it like this without the <> markers of course and if you only want one Macro remove the ', <MacroName2()>':
' AddTooltip, used to add a Hyperlink and Tooltip to our Burger Menu Shape.  ran once and then this does not need to be ever ran again unless you want to change the Tooltip
Private Sub AddTooltip()
   ActiveSheet.Shapes("Menu").Parent.Hyperlinks.Add ActiveSheet.Shapes("<Shape Name>"), "", "<MacroName1()>, <MacroName2()>", ScreenTip:="Click for menu"
End Sub
Hyperlink Tooltip (deep-dive)
You can download the file that follows this article and includes all of the tests with full Code examples Here · Hyperlink Tooltip (deep-dive).xlsm
Did you know that I have discovered many different ways to run macros following Rollovers? This deep-dive is more around Shapes and the Hyperlink Tooltip. If you want to read about these techniques and purchase my latest Hyperlink Rollovers Project then you can do so Here · Hyperlink Rollovers for Excel
Let's look at the Hyperlink used to create a Tooltip for a Shape (I will refer to this as the Hyperlink Tooltip), that allows us to run a Macro at the same time and see if we can unlock some of its behaviour. I understand that a Function should be used instead of a Subroutine. I know that the Function should always use 'Set <Something> = Selection' to return an 'Object' or 'Range' that has some influences on its behaviour in terms of what can be ran using Code once it has been applied. The first thing I found out is that you can add a Hyperlink Tooltip to an Object like a Shape that can then run one or more Functions by using a comma-delimited list of Macro Names, to get 2 messages, "foo" and "bar", like this:
' AddTooltip1, used to add a Hyperlink and Tooltip to our Shape
' - ran once and then this does not need to be ever ran again unless you want to change the Shape or Tooltip
Private Sub AddTooltip1()
   ActiveSheet.Shapes("Icon1").Parent.Hyperlinks.Add ActiveSheet.Shapes("Icon1"), "", "TestA(),  TestB()", ScreenTip:="This is a Hyperlink Tooltip deep-dive"
End Sub

Public Function TestA() As Variant
 Set TestA = Selection
 MsgBox "foo"
End Function
Public Function TestB() As Variant
 Set TestB = Selection
 MsgBox "bar"
End Function
The next thing that I found was that you could use the first Function (or Macro) called to call another Function, to get a single Message "foobar", like this:
' AddTooltip2, used to add a Hyperlink and Tooltip to our Shape
' - ran once and then this does not need to be ever ran again unless you want to change the Shape or Tooltip
Private Sub AddTooltip2()
   ActiveSheet.Shapes("Icon2").Parent.Hyperlinks.Add ActiveSheet.Shapes("Icon2"), "", "TestC()", ScreenTip:="This is a Hyperlink Tooltip deep-dive"
End Sub

Public Function TestC() As Object
  Set TestC = Application.Run("TestD")
End Function
Public Function TestD() As Variant
  Set TestD = Selection
  MsgBox "foobar"
End Function
Realising that the retun value could be an Object or a Range, I then explored changing the return value as a Range to enable us to select another Sheet via the Hyperlink Tooltip and found that this worked to Select Sheet2 for Cell "A1". You can use the '[]' square brackets as well to do this Range select (see the commented out Code below). I alo noticed that if you now add a MsgBox to the below routine (I added this and it is commented out below) that the Message is sent to the Screen first and then the Range is selected for Sheet2, which makes sense as the Range is the Object returned to the hyperlink:
' AddTooltip3, used to add a Hyperlink and Tooltip to our Shape
' - ran once and then this does not need to be ever ran again unless you want to change the Shape or Tooltip
Private Sub AddTooltip3()
   ActiveSheet.Shapes("Icon3").Parent.Hyperlinks.Add ActiveSheet.Shapes("Icon3"), "", "TestE()", ScreenTip:="This is a Hyperlink Tooltip deep-dive"
End Sub

Public Function TestE() As Range
  Set TestE = Sheet2.Range("A1")
  'Set TestE = Sheet2.[A15]
  'MsgBox "foobar"
End Function
One more test I wanted to check was whether I could pass a variable from inside the Hyperlink Tooltip. Well it turns out that you can, but it will only store a value at the moment that you set the Hyperlink, which makes sense I guess, meaning it doesn't query a variable again to find out its current value or property. I tried storing the Headings state of the ActiveWindow in a local variable to see if the variable changed whether the hyperlink Tooltip would pass the updated state but it only updates when the hyperlink is applied again. In example 6 I show a method to pass a variable into another Function via the first Function
Option Explicit

Private HeadingsState As Boolean

' AddTooltip4, used to add a Hyperlink and Tooltip to our Shape
' - ran once and then this does not need to be ever ran again unless you want to change the Shape or Tooltip
Private Sub AddTooltip4()
   ActiveSheet.Shapes("Icon4").Parent.Hyperlinks.Add ActiveSheet.Shapes("Icon4"), "", "TestF(" & HeadingsState & ")", ScreenTip:="This is a Hyperlink Tooltip deep-dive"
End Sub

' Headings only changes if you run the AddTooltip4 Macro again, meaning it doesn't update in real time, which makes sense but is annoying ;)
Public Function TestF(ByVal Headings As Boolean) As Range
  Set TestF = Selection
  MsgBox Headings
End Function
Public Sub SetHeadingsState()
   HeadingsState = True 'False
End Sub
Okay, let's take a time out. So what have we learnt so far? Well we know we can run multiple Functions using the technique which may or may not be of any use at this point. We know that we can call another Function from the main Function using Application.Run - that's useful, we return an Object that is another Function (or Macro Name) that gets ran via the technique. We also know that we can select another Sheet by changing the return value to a Range and using the 'Set <FunctionName> = Sheet2.Range("A1")' or 'Set <FunctionName> = Sheet2.[A15]' - something that I have been unable to do in the past, hence the Timer technique whereby I fire a Timer thread to run another Subroutine and then kill it immediately, before continuing to run my Code. So can what we have learnt be put to use to negate the use of a Timer. Well that's my next Test. I will take one of my Pretty Buttons Toolbar Buttons and see if I can use these findings to make a workaround so that I don't use any API's, onwards...
Well it appears that trying a simple Task of Toggling the headings On/Off or adding a Sheet does not work using this technique. A workaround is to set a Cell which then fires the 'Worksheet_SelectionChange' event in a Worksheet Code Module, which to me is not a solution - I would rather use the Timer technique (SetTimer() can callback a regular function when fired) as you cannot re-fire the Code without deselecting or selecting another Cell in the Sheet. I demonstrate this in the fifth deep-dive test here:
' In a Worksheet Code Module
Private Sub Worksheet_SelectionChange(ByVal Target As Range)
   If Target.Address = "$A$1" Then
      ActiveWindow.DisplayHeadings = Not ActiveWindow.DisplayHeadings
   End If
End Sub

' in a standard Code Module
' AddTooltip5, used to add a Hyperlink and Tooltip to our Shape
' - ran once and then this does not need to be ever ran again unless you want to change the Shape or Tooltip
Private Sub AddTooltip5()
   ActiveSheet.Shapes("Icon5").Parent.Hyperlinks.Add ActiveSheet.Shapes("Icon5"), "", "TestG()", ScreenTip:="This is a Hyperlink Tooltip deep-dive"
End Sub

' By selecting a Cell the Worksheet_SelectionChange event handler fires in the Worksheet Code Module to toggle the headings
Public Function TestG() As Range
  Set TestG = Sheet1.Range("A1")
End Function
I found that you can pass a variable form one Function into another Function like this (but this still doen't help us to execute the toggle headings code):
' AddTooltip6, used to add a Hyperlink and Tooltip to our Shape
' - ran once and then this does not need to be ever ran again unless you want to change the Shape or Tooltip
Private Sub AddTooltip6()
   ActiveSheet.Shapes("Icon6").Parent.Hyperlinks.Add ActiveSheet.Shapes("Icon6"), "", "TestH()", ScreenTip:="This is a Hyperlink Tooltip deep-dive"
End Sub

' you can pass variables into another Function
Public Function TestH() As Range
   Set TestH = Application.Run("TestI", True)
End Function
Public Function TestI(ByVal Headings As Boolean) As Variant
  Set TestI = Selection
  MsgBox Headings
End Function
Let's now look at some other possibilities using Windows API. The first one I examine is the 'CallWindowProc' API passing the Procedure name into the API and we get our "foo" message but it still doesn't do much else, for example it fails on Sheet selection and toggling the headings:
Option Explicit

Private Declare PtrSafe Function CallWindowProc Lib "user32" Alias "CallWindowProcA" (ByVal lpPrevWndFunc As LongPtr, ByVal hWnd As LongPtr, ByVal Msg As Long, ByVal wParam As LongPtr, ByVal lParam As LongPtr) As LongPtr


' AddTooltip7, used to add a Hyperlink and Tooltip to our Shape
' - ran once and then this does not need to be ever ran again unless you want to change the Shape or Tooltip
Private Sub AddTooltip7()
   ActiveSheet.Shapes("Icon7").Parent.Hyperlinks.Add ActiveSheet.Shapes("Icon7"), "", "TestJ()", ScreenTip:="This is a Hyperlink Tooltip deep-dive"
End Sub

' you can use the CallWindowProc API to call another Procedure but it still doesn't let you select or toggle the headings
' however you can use a Sub and you don't have to Set the Selection
Public Function TestJ() As Range
   Set TestJ = Selection
   CallWindowProc AddressOf TestK, Application.hWnd, 0&, 0&, 0&
End Function
Public Sub TestK()
   MsgBox "foo"
   Sheet2.Select
   ActiveWindow.DisplayHeadings = Not ActiveWindow.DisplayHeadings
End Sub
Okay, now let's look at a techique I found ages ago when writing my Booking System for Excel, that does actually work. I use the 'SetTimer' API to fire a Timer which I then instantly Kill when my Procedure runs. This allows me to do anything following a Hyperlink Tooltip or a '=Hyperlink()' Function Cell Rollover, like this (now we can Select other Sheets, toggle the headings, have a MsgBox etc. and still return the Selection for the Range Object):
Option Explicit

#If VBA7 And Win64 Then
   Private Declare PtrSafe Function SetTimer Lib "user32" (ByVal hWnd As LongPtr, ByVal nIDEvent As LongPtr, ByVal uElapse As Long, ByVal lpTimerFunc As LongPtr) As LongPtr
   Private Declare PtrSafe Function KillTimer Lib "user32" (ByVal hWnd As LongPtr, ByVal nIDEvent As LongPtr) As Long
   Private TimerEvent As LongPtr
#Else
   Private Declare Function SetTimer Lib "user32" (ByVal hwnd As Long, ByVal nIDEvent As Long, ByVal uElapse As Long, ByVal lpTimerFunc As Long) As Long
   Private Declare Function KillTimer Lib "user32" (ByVal hwnd As Long, ByVal nIDEvent As Long) As Long
   Private TimerEvent As Long
#End If

' AddTooltip8, used to add a Hyperlink and Tooltip to our Shape
' - ran once and then this does not need to be ever ran again unless you want to change the Shape or Tooltip
Private Sub AddTooltip8()
   ActiveSheet.Shapes("Icon8").Parent.Hyperlinks.Add ActiveSheet.Shapes("Icon8"), "", "TestL()", ScreenTip:="This is a Hyperlink Tooltip deep-dive"
End Sub

' using my Timer technique you can do almost anything following a Hyperlink Tooltip or a '=Hyperlink()' Function Cell Rollover
Public Function TestL() As Range
   Set TestL = Selection
   If TimerEvent <> 0 Then KillTimer 0&, TimerEvent
   TimerEvent = SetTimer(0&, 0&, 0, AddressOf TestM)
End Function
Public Sub TestM()
   KillTimer 0&, TimerEvent
   TimerEvent = 0
   MsgBox "foo"
   Sheet2.Select
   ActiveWindow.DisplayHeadings = Not ActiveWindow.DisplayHeadings
End Sub
So what about precedent? I mean what if you have a Hyperlink Tooltip in a Cell and a Rollover in the same Cell, what happens? Well I tested this here and found that the Hyperlink Tooltip will take precedent over the '=HYPERLINK' Rolover Function. Here is the Code that I used and all of this is included in the File that you can download, which will make more sense when you see it:
' i added the Hyperlink Tooltip to Cell "B37"
Private Sub AddRangeTooltip()
   ActiveSheet.Range("B37").Hyperlinks.Add ActiveSheet.Range("B37"), "", "TestN()", ScreenTip:="This is a Hyperlink Tooltip deep-dive"
End Sub

' I added the Rollover Hyperlink to Cells "B33" and "B37", '=IFERROR(HYPERLINK(Rollover(D33)),"#D33")', '=IFERROR(HYPERLINK(Rollover(D37)),"#D37")'
Public Function Rollover(ByVal RolloverCell As Range) As Range
   RolloverCell.Value2 = Rnd(999)
End Function

Public Function TestN() As Range
   Set TestN = Sheet2.Range("A1")
End Function
Conclusion
In conclusion I have made a few discoveries, but nothing comes close to using a Timer to allow a Macro, Function, Procedure (call them what you will) to run and do anything following a Hyperlink Tooltip or a '=Hyperlink()' Function Cell Rollover. Therefore until some other methodolgy is found I will continue with my method. I hope you like this deep-dive and found some useful concepts around the Hyperlink Tooltip when applied to Shapes
You can download the file that follows this article and includes all of the tests with full Code examples Here · Hyperlink Tooltip (deep-dive).xlsm
Did you know that I have discovered many different ways to run macros following Rollovers? This deep-dive is more around Shapes and the Hyperlink Tooltip. If you want to read about these techniques and purchase my latest Hyperlink Rollovers Project then you can do so Here · Hyperlink Rollovers for Excel
Screen Shots
Pretty Buttons created in Affinity Designer in Green Chalk with Tooltips for Excel
Pretty Buttons in Blue Chalk with Tooltips, hovered over a Button with a darker Icon and Font colour
Pretty Buttons created in Affinity Designer in Yellow Chalk with Tooltips for Excel

Pretty Buttons in Pink Chalk with Tooltips

Pretty Buttons Toolbar in Blue Chalk with Tooltips

The Transparent Button allowing you to use any Fill Colour for the Button Background
Use the tiny Transparent Toggle Button designed in Affinity to expand and collapse Columns or Rows. Change the Tooltip on the fly using VBA Code. In the Screen Shots I move across to the left-hand side of the Button so that the Screen Grab picks up the Tooltip as it changes its Text
FAQ
* There are no frequently asked questions for Pretty Buttons
Videos
This is a video of the Pretty Buttons in action. In this demonstration, I go through the examples in the File. Music is 'Born a Rockstar (Instrumental) - NEFFEX' · view the Pretty Buttons video on YouTube
Support
Please remember you have purchased very affordable Software and you have not paid for a full-time Software design agency - I am but one man. Occasionally I may help with small tweaks, but these requests will be put on a much lower priority due to their nature. You have not PAID for Support, Support is 100% optional and I provide it for your convenience, so please be patient, polite and respectful
Support (limited) for my Software includes
- Responding to questions or problems regarding the Software and its features
- Fixing valid (replicated) bugs and reported issues for the VERSION I HAVE WRITTEN
Software support does not include
- Customization and installation services
- Support for third party software or ANY kind of development whatsoever
Before seeking support
- Make sure your question is a valid Software Issue and not a customization request
- Make sure you have read through the FAQ's, online documentation and any related video guides before asking support on how to accomplish a task
- Ensure that you access to the VBOM is allowed and that Macros can run in Excel
- Make sure to provide 'proof of purchase' and state the name / version of the Software that you are having issues with when requesting support by Email or via Facebook
How to get Support
Contact Mark Kubiszyn on the Email address provided when you purchased the Software, including the Order Number
...or Contact Mark Kubiszyn via our Facebook Page - remember to be patient, if there has been an issue with your download, Mark will always respond within 48 hours and will Email you the File directly if neccessary or via Messenger. For other issues the response time may be considerably longer and I may choose to respond to specific questions only (as is my right), depending on what has been asked
Future Builds
Update: I have now found a method that no longer requires a Timer for firing for Selections following a hyperlink or a Rollover! I will be releasing this method with this Project for the next release
Bug Fixes
* There are currently no bugs identified
Changelog
You can find the version history in the Code Module for any Macro-enabled Software or read more information on the status of each release
- the latest Version including a description of any changes made is always shown first
14.10.2022 - (Version 1.3)
Added a Rounded Corner Transparent Button I made originally for my Aewsome Buttons Software
13.10.2022 - (Version 1.2)
Added a tiny Toggle Button designed in Affinity to create nice Toggle Buttons to Expand and Collapse Columns and Rows
12.10.2022 - (Version 1.1)
Added an additional transparent Button in a Grey Border which looks nice on pure White or Off-white backgrounds in Excel
11.10.2022 - (Version 1)
General release of Pretty Buttons