Introduction
Introducing Dark Excel (feat. Dark Zombie & Fishbone)
Dark Excel & Carbon are a perfect match - create sleek projects in a dark mode for Excel
Enhance your Projects, adding Blood-soaked Zombie alerts and a Fishbone Nanoscopic, Statusbar, Progressbar
Dark Excel pairs many different individual elements of Excel including Fill Colours, Font Colours, Borders, 3D Boxes, 3D Lines, Tables, Pivot Table Buttons, Checkboxes, Radiobuttons etc. with a Modal Carbon Dialog interface, Dark Zombie Alerts and Dark Fishbone, a Nanoscopic Titlebar / Progressbar, producing a really sleek Dark Mode alternative for Excel that can be used to build simple .XLSX Spreadsheets through to complex .XLSM / .XLSB, VBA projects requiring user-interaction. Looking at spreadsheets for hours on end isn't easy on the eyes, therefore I have designed Dark Excel and all of its companion Workbooks with this in mind including the dark colours and larger Font sizes
It's dark and sexy as hell, it's Dark Excel..!
ENHANCE YOUR PROJECTS: Dark Excel includes a special edition of Dark Zombie alerts as a separate File - create some disgusting, blood-soaked alerts for your Dark Excel themes. It also incudes Dark Fishbone, a nanoscopic Titlebar and Statusbar Scrollbar/Progressbar - check them out below or take a look at the Videos (Click and Scroll down to view Dark Zombie and Dark Fishbone)
Prerequisites
- Excel 2010, 2013 & 2016 (32bit or 64bit, Version 16)
- Basic to moderate Excel Skills
- Windows PC · NOT a Mac!
- No support is provided for customization of this Software
Features
- 2 CORE Files, a separate Carbon Interface File (Carbon is also included in the .XLSM File) and a Blank Template. A single .XLSX File containing the Dark Excel element examples and a similar, single .XLSM File that contains anything additional requiring VBA Code, such as the Carbon Modal Dialog
- Including a Fully loaded Carbon Dialog Interface with examples -- check it out here. If you want more than just the preloaded Extreme Dark Build of Carbon then you can purchase Carbon separately here via FastSpring
- Dark Zombie allows you to create popup alerts at the edges of the Excel Window with a Dark Lightbox
- Dark Fishbone allows you to create a Scrollbar / Progressbar underneath the Titlebar or ontop of the Statusbar in Excel whilst running some process with full Callback capability, meaning that you can abort a process and stop the animation. Fishbone is designed to work nicely with a Dark Excel theme together and a Dark Lightbox
- Specifically designed to help ease eye strain with its dark Colours and default Font Size
- Check out the many different Rollovers and the Rollover Burger Expandable Sidebar Menu
- Use my latest Shape Toggle Buttons to change an option or setting value
- Fade Text in within a Dark Excel panel whenever you select a Worksheet or from a Button
- Choose from a range of different Chart Widgets that are available to use with Dark Excel
- Only 6 hand-picked Fill and Font Colours are used to create Dark Excel (a couple of standard Colours are also used for specific elements)
- Loads of Macro-enabled Examples, Tickboxes, Checkboxes, Radiobuttons, Buttons, Buttons with Protection, Buttons with Click Effects, Rollover Burger Menu, Fade Text, Handling Hyperlinks, Ultra-fast Rollover Buttons, Rollover Clicks, Adaptive Rollovers, Carbon Modal Dialog Interface, Slicers, Chart Widgets, Treelist T.O.C. etc.
- Code Inspection & Indentation - RubberDucked!
Limitations
- The Theme has 5 main colours that must be used with a dark mode

Installation
DarkExcel.zip is ready to use. Download the File after purchase from the link provided. Right-click on the Zip archive and extract all of the Files
There are 2 main Files, a separate Carbon Interface, Dark Zombie, Dark Fishbone and a Blank File, Dark Excel.xlsx, Dark Excel.xlsm, Carbon_v2.2.xlsm, Dark Zombie_v1.xlsm, Dark Fishbone_v1.xlsm and Dark Excel (blank).xlsx. Open each of the main Files in turn and click on each Tab to view the Elements, Boxes and Panels, Carbon Interface, Tables etc. Familiarise yourself with the different Formats and layouts. Then read the information below to find out how to start using the individual Elements in your own Projects
The Blank File is a File that is ready to use to start one of your own Projects but you can also use either of the main Files or simply Copy & Paste the Elements and / or Code
Usage
Dark Excel
This is the first of the main Files and it is not macro-enabled, meaning that there is no Code in this Workbook. Open the File. There are 5 Tabs. We will look at each Tab in turn
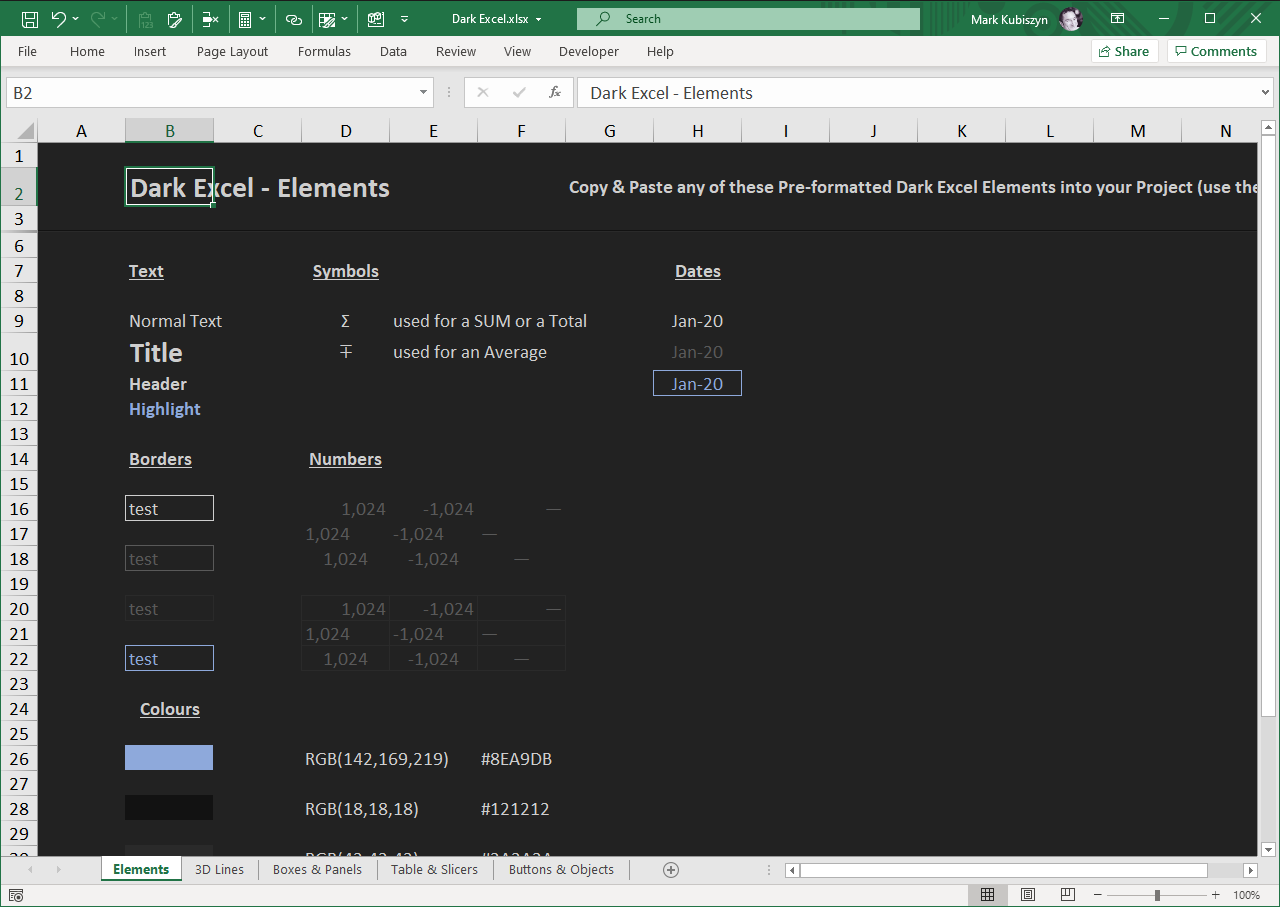
Elements Tab
These are Pre-formatted, Text, Symbols, Dates, Borders, Numbers & Colours that you can Copy directly into your own Projects. All of these have been designed specifically for Dark Excel. There are some different sized and coloured Text formats with and without Borders. There are a couple of symbols that you can use for SUM/Total and Average Cell Headers. There are some Date formats in different Font Colours. There are also some Number formats that are aligned and will display a wide bar if a zero is present - these are nicely laid out in a grid format with Borders. There are some Fill Colours with the respective RGB and HTML Codes. Select any of the Cells and Copy & Paste into your Workbook
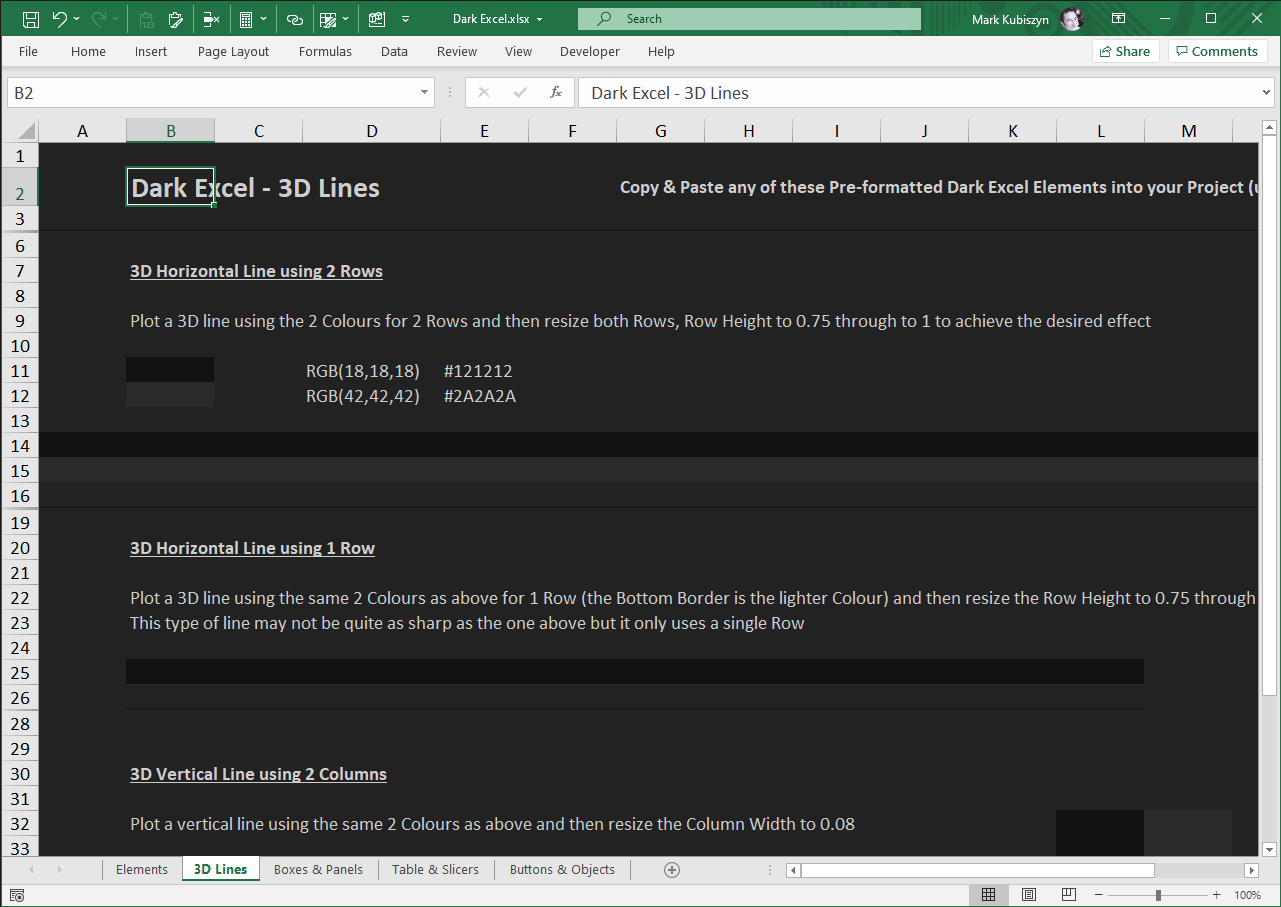
3D Lines Tab
This Sheet details methods of creating Horizontal and Vertical 3D lines. Only 2 Colours are ever used however you can use just 1 Row / 1 Column or 2 Rows and 2 Columns to create 2 different 3D lines according to your preference. The Colours also detail their respective RGB and HTML Codes. The concept is that you either put the dark and light Colours side-by-side and then resize both the Rows or Columns to create the 3D effect, or you shade one side of a dark Cell with a light Border and just resize 1 Row or 1 Column
Boxes & Panels Tab
This Sheet details methods of creating a 3D sunken Box and a 3D raised Panel. There are 4 Corners and 4 Straight pieces that you can 'glue' together to form either a 3D sunken Box or a 3D raised Panel. You can Copy & Paste each of the Corners and Straights directly into your Projects or the Blank Template accompanying the zip File you recieve when Dark Excel is purchased. If you want to write text inside these Boxes and Panels as opposed to say a Chart, then you can resize the Column that holds the Corner piece to bring the Text closer to the edge of the Box or Panel

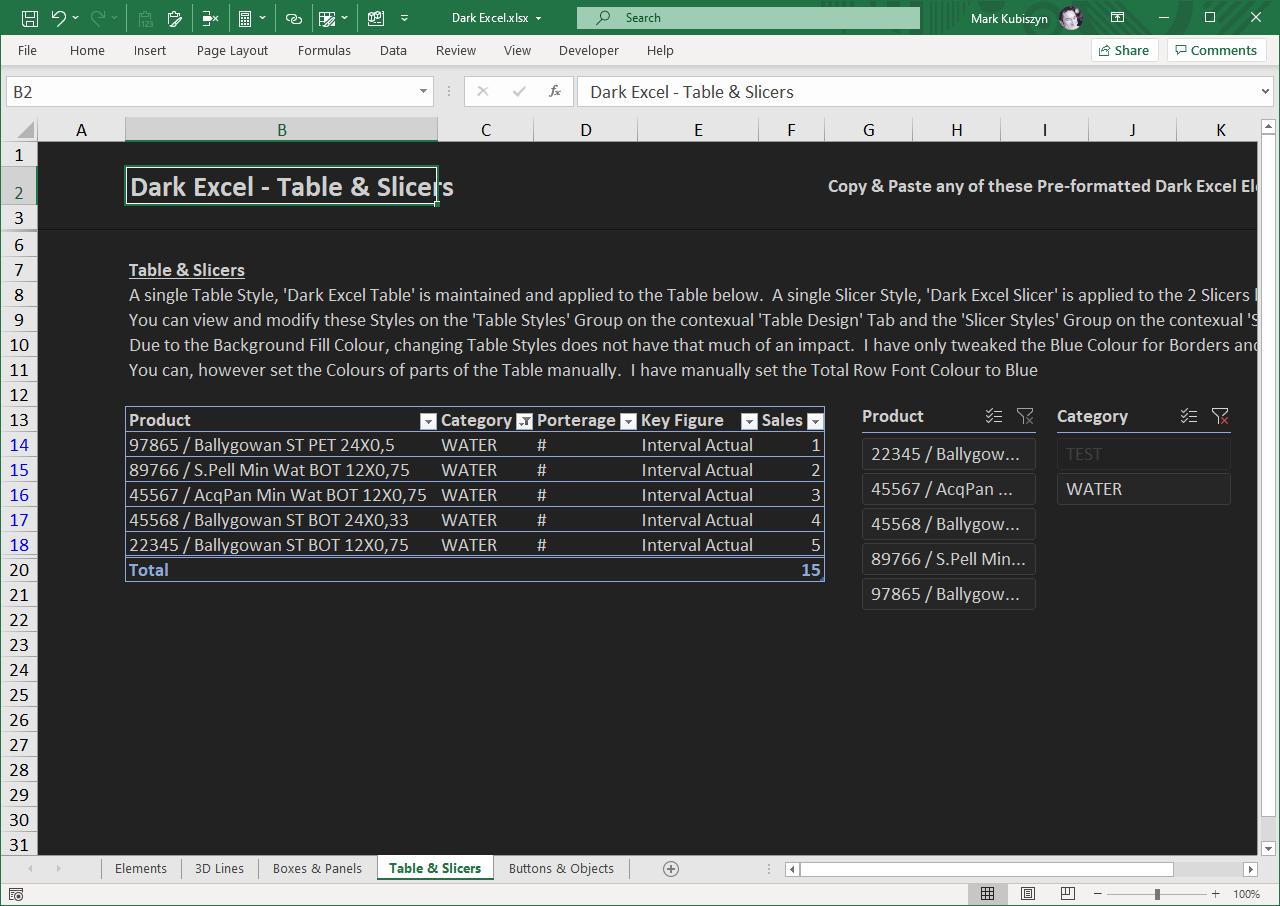
Table & Slicers Tab
This Sheet has a single Table and 2 Slicers. The Table has a Style 'Dark Excel Table'. This can be found on the 'Table Styles' Group on the contexual 'Table Design' Tab of the Ribbon. Due to the Background Fill Colour, changing Table Styles does not have that much of an impact. I have only tweaked the Blue Colour for Borders and the Total Row. You can, however set the Colours of parts of the Table manually. I have manually set the Total Row Font Colour to Blue. The SLicers have a Style 'Dark Excel Slicer'. This can be found on the 'Slicer Styles' Group on the contexual 'Slicer' Tab of the Ribbon. The first Slicer, Product has the 'hide items with no data' ticked. To change this, right-click on the Slicer and choose 'Slicer Settings…'. The second Slicer does not have this setting ticked and you can just see the darker items that are not currently selected. Both Slicers are locked and do not Move or Size with Cells. To change this right-click on the Slicer and choose 'Size and Properties…'. Try scrolling up and down the Slicers and Slicing the Table
Buttons & Objects Tab
This Sheet does not have anything on it as all of these Elements, for example, Checkboxes, Radiobuttons, Shapes, Rollovers and Pivot Table Buttons require VBA Code to capture the Clicks and are therefore only available in the Dark Excel.xlsm File
Dark Excel.xlsm
This is the second of the main Files and it is macro-enabled, meaning that elements in this Workbook may require VBA Code in order to work. It also includes the Carbon Dialog Interface. Open the File. There are 5 Tabs (as per the .XLSX File) and then many more for this Macro-enabled File. Let's look at all of the additional Tabs to see what's available
Rollover Burger Menu Tab
This Sheet domonstrates a nice expandable Sidebar Burger Menu with a Rollover Menu. Rollover the Navigation Menu and Click to Navigate to parts of the Dark Excel Workbook. I have deliberately moved this Sheet here so that you can use it to naviagte to some of my favourite Example Sheets
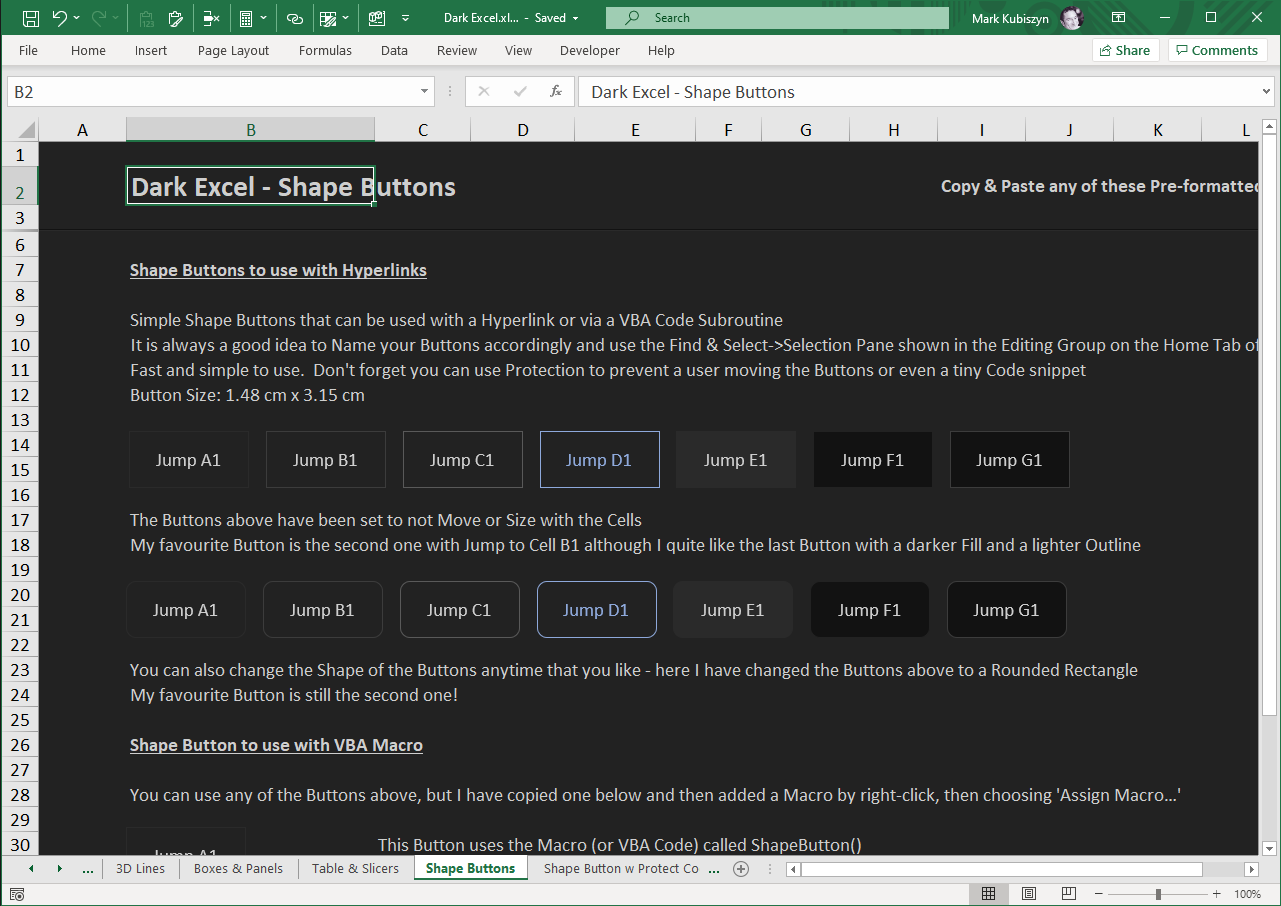
Shape Buttons Tab
This Sheet contains Rows of Shape Buttons that you can use with Hyperlinks to Jump to Cells, navigate to other Worksheets or go to links externally like Webpages and Emails. It is always a good idea to Name your Buttons accordingly and use the Find & Select->Selection Pane shown in the Editing Group on the Home Tab of the Ribbon. The Button Height and Width are 1.48 cm x 3.15 cm. There is also an example of assigning a Macro (or VBA Code) to a Button by right-click, then choosing 'Assign Macro…'. The example Button uses the Macro (or VBA Code) called ShapeButton(). Remember to remove any previously added links after assigning your Macro!
Shape Button w Protect Code Tab
This Sheet demonstrates using a Button with Code protection. So this is a user-interface only Worksheet protection, or a VBA Macro-enabled protection for the Button. Nothing else on the Worksheet is protected in terms of editing Cells, Inserting Columns or Deleting Rows etc. To enable this protection the button must be clicked once after you have set it up. Once clicked this Button will remain protected ie. the user will not simply be able to right-click it. To be able to select the Button again for editing, Click Unprotect Sheet on the Protect Group on the Review Tab of the Ribbon
Shape Button w Click Effect Tab
This Sheet demonstrates using a Button with a Click Effect. THere are 5 examples in Total. Each example has a slightly different effect when clicked. Try clicking them all to see the effects or watch the video below. To add one of these to your own Project, Unprotect the Sheet and Copy the Button to your Workbook. Give it a unique Name in the Excel Name Box. Copy the Code snippet that you like from the Worksheet Code Module for the Tab and assign it to the Button. Press the Button to see the effect. Adjust the Code for Size, Speed, Growth and Colour
Ultra Fast Rollover Buttons Tab
This Sheet demonstrates my technique of creating a Button or Buttons that have a changable Fill Colour using one or more Rollovers. The Rollover is added to a Cell and a Shape placed ontop of the Rollover. When a user hovers over the Shape the VBA Code can change the Fill Colour of the Button or the Border etc. to give a nice Rollover effect. The Code fires a TimerProc Subroutine which is extremely fast and efficient meaning the effect is almost instantaneous. The only drawback is that you need to add a Code Module to your Project and link that to the Buttons. THe Code is stored in the 'mdUltraFastRollovers' Code Module. Also they are a little tricky to setup, but once done the Code is very robust. You can view how it works by looking in the Immediate Window and seeing how the routines fire (just uncomment the 3 Debug.Print statements)
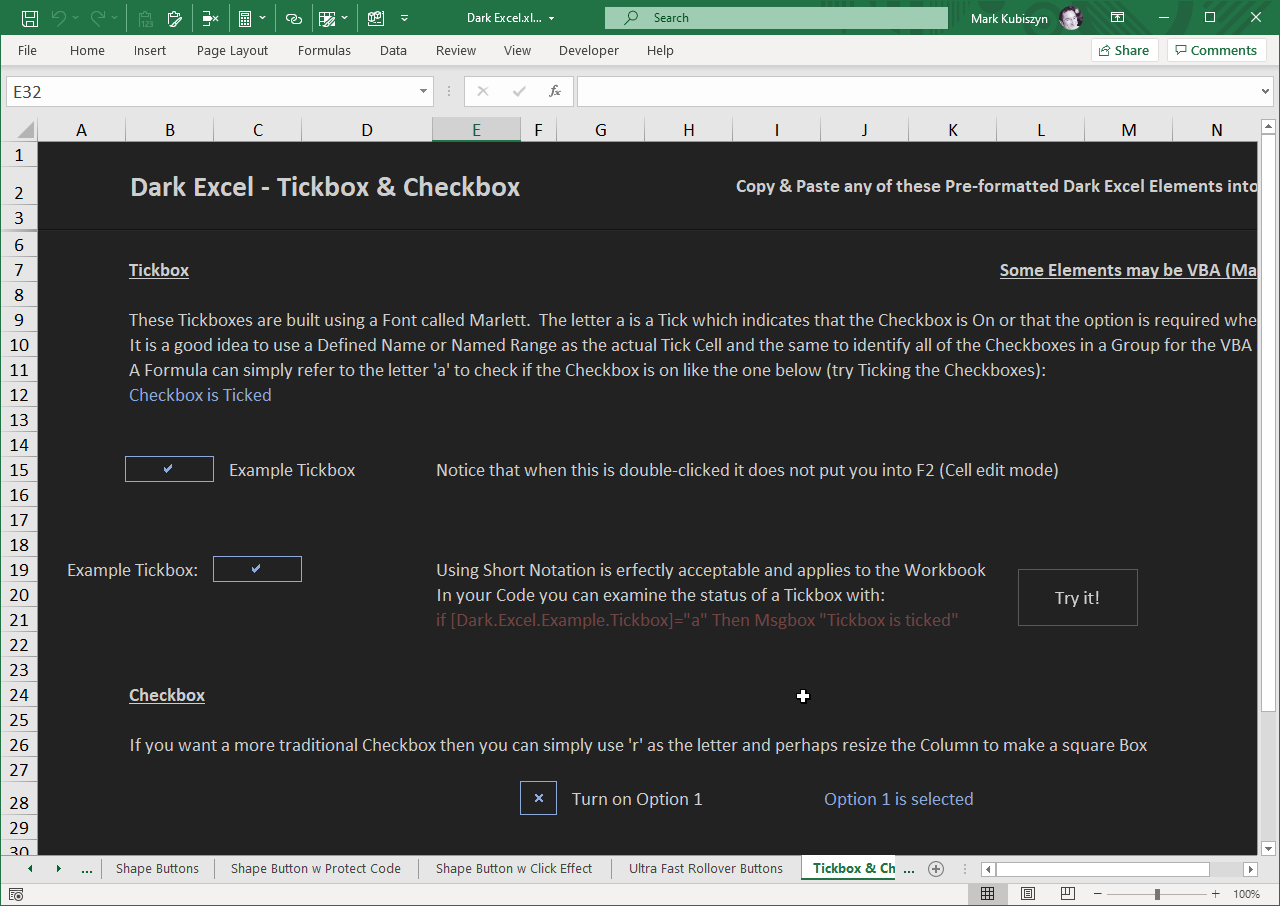
Tickbox & Checkbox Tab
This Sheet shows you how to create simple but effective Tickboxes and Checkboxes using a Marlett Font and a small piece of VBA. When a Tickbox or Checkbox is double-clicked the Tick or Cross will appear. When it is double-clicked again, the Tick or Cross will disappear. You can use a Formula to detect whether the Tickbox or Checkbox is turned on or use VBA (A Formula can simply refer to the letter 'a' or 'r' to check if the Checkbox is on). It is a good idea to use a Defined Name or Named Range as the actual Tick Cell and the same to identify all of the Checkboxes in a Group for the VBA Code. Notice that when a Tickbox or Checkbox is double-clicked it does not put you into F2 (Cell edit mode). I like to Style these elements in a Blue Font with a Blue Border. For the VBA Code, using Short Notation is perfectly acceptable when referring to the Defined Name or Named Range and applies to the Workbook. You can use Code like this to check if a Tickbox or Checkbox is turned on: if [Dark.Excel.Example.Tickbox]="a" Then Msgbox "Tickbox is ticked". Stacked Checkboxes look pretty nice but I prefer to use single Tickboxes in my Projects, capturing the option if it is on or off via VBA Code where required. If I needed lots of Tickboxes I would iterate through the Defined Name or Named Range to identify what is turned on or turned off
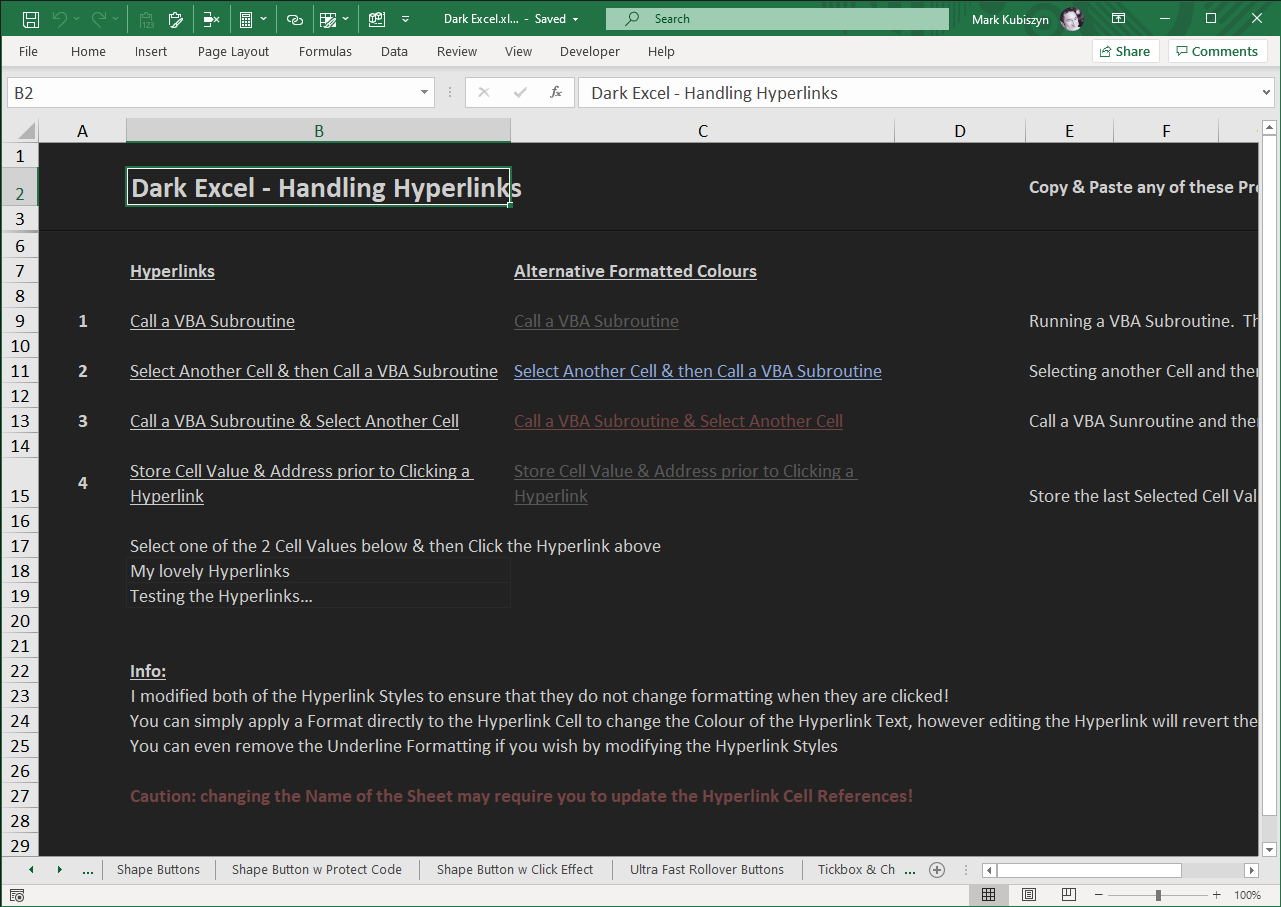
Handling Hyperlinks Tab
There are lots of ways that you can handle Hyperlinks in Excel. This Sheet demonstrates 4 ways. Method 1, Running a VBA Subroutine from a Hyperlink. The Hyperlink will stay on the Cell it is Clicked on. The Hyperlink should be set to the same Cell as the Hyperlink Text. Method 2, Selecting another Cell and then running a VBA Subroutine. The Hyperlink will fire first and then the VBA Subroutine afterwards. Method 3, Call a VBA Sunroutine and then Select a Cell. The VBA will select the Cell. Hyperlink should be set to the same Cell as the Hyperlink Text. Method 4, Store the last Selected Cell Value and Address prior to Cicking a Hyperlink and then respond using a VBA Subroutine. All of the Subroutines used here are in the Worksheet Code Module. Add the Hyperlink first to your own Project or Copy in one of the Hyperlinks shown and then add the Code. You will need to adjust the Code Ranges for the PreventEditModeRange = "B5,B7,B9" which stops a user from entering Cell Edit when they double-click a Cell and for Method 4, you will need to adjust the Range Range("B18:B19") to a Range of your choice
Treelist T.O.C. Tab
This Sheet is a Treelist T.O.C. Sheet, meaning you can use it to design a Table of Contents for your Excel Project. It was designed using my Treelist Software. You can expand and collapse the Nodes to view the hidden information. You can Delete or Insert additional Rows. You can expand or collapse all of the Nodes using the 2 Nodes at the top of the Sheet. To add this to your own Project Copy the Sheet across - all of the Code is maintained within the Worksheet Code Module

Rollovers1 (Hyperlinks Jumps) Tab
This Sheet is the first of many Rollover examples. I present some useful, very quick and easy to implement Rollovers, some with quite unusual properties! They all mostly modify the Cells Background and Foreground Interior Colours to create the Rollover effect
Method 1, pass Ranges by String, this Rollover maintains a Range that should be highlighted when a Mouse rolls over any of the Cells. It also requires you to supply the current Cell and then a Cell to Jump to ie. =IFERROR(HYPERLINK(@Rollover("B13:B15","B12")),"#a1"). Because this Rollover method uses the Jump to Reference as its Error for the Rollover, you can right-click, 'Format Cells…' using a Custom Format to give it new Text ie. ;;;"Option 1"
Method 2, pass by Range using Inverse Intersect, is similar to the first method, but you just pass the Ranges instead. You pass a locked Range and the Active Cell. THen you pass the Jump to as the Error. Once setup you can just drag the Cell down or across any Range and then Rollovers will be instantly set. One downside of this method, is that you need an additional Function as part of the VBA Code but I am sure you can live with that. Another downside of this method though, is that you cannot set the Text using right-click, 'Format Cells…' using ;;;"Option 1" which is annoying! This Rollover with a slight tweak to the Formula and the Function using Rollover3(), means that we can build a Rollover 'Volume-style' Button, where you can lower or raise a bar to select a level. An example of this is demonstrated for Method 2
Next we have some Classic examples based on the original Rollover Technique discovered by Jordan Goldmier. These examples do not require a Custom Cell Format - the Text is passed in the Friendly URL and the Error wrap. The first example use a passed Range reference as the Address to then 'Jump to' ie. =IFERROR(HYPERLINK(ClassicRollover1(B44),"Click me!"), "Click me!") means that the Code will Jump to Cell B44. The second example uses the Inverse Intesect function to allow the Rollover Foreground and Background Colours to be changed as well as the Jump to ie. =IFERROR(HYPERLINK(ClassicRollover2(B$57:B$60,B57,B44),"Click me!"), "Click me!") means Colour the Range B$57:B$60 in a dark Colour, Colour the Range B57 Red and then Jump to Cel B44, neat eh?
But what if you don't want anything to be Coloured as you Roll off the Items? Well you can just surround the Rollovers with another Rollover that resets the Range ie. =IFERROR(HYPERLINK(ClassicRollover2Reset($B$66:$B$69,C66),""), "") means reset the Range $B$66:$B$69 - we still pass the Jump to Cell but do not use the Range. Once the Mouse Rolls over these Cells the Range will be reset. The Firendly URL and the Error wrap Text are set to double quotes as we do not want any Text to be displayed
Now what if you want to retain the Selected or Clicked Option? How could you do this? Well it is a little more complex, but you just need to add a Conditional Format to the Range ie. =$G75=1 and then Format it accordingly. Next you have to use the ClassicRollover3(ByRef RolloverRange As Range, ByRef RolloverCell As Range, ByRef JumpToCell As Range) function for the Rollovers and then the ClassicRollover3Reset(ByRef ResetRange As Range, ByRef JumpToCell As Range) function to Clear the Range. Now when you Select or Click a Rollover then the default Cell will remain Selected and the Jump to will still work, cool eh?
Right then, so now, you may have noticed that you cannot simply use a Webpage or Email to Jump to. Well, a slight modification to the Formula and the Code will also us to do just that. Pass the Address as the Error wrap ie. "#a1". Also we now unfortunately have to use the CellCustom Format again to change the Text of each Cell but it's worth it
Lastly I demonstrate a variation on the Rollovers just shown in the form of a simple Menu with different Colours for the Rollover and the Selected Cell - again thes Rollovers can Jump to or navigate to send Emails to an Email Address or link to a Webpage
Rollovers2 (Adaptive Buttons) Tab
This Sheet demonstrates my Adaptive Rollover technique for Buttons. This technique uses a Defined Name to track the hit on a Rollover Button Cell. It also uses a Conditional Format to set the Fill on Rolling or Mouse Over. MouseOver Formula surround the Button to turn off the effect when you move away from the Cell. The upside is that once one Button is prepared, you can simply Copy & Paste the Buttons all over your Worksheet! Only downside is that if you move sharply across the screen, then sometimes, the Rolled Over Format will persist but in most instances and general user interaction it is a really nice effect. I demonstrate a single Button and a Grid of Buttons. I also demonstrate a Button navigating to a Cell after capturing the Click with a MsgBox
Rollovers3 (Capturing Clicks1) Tab
This Sheet demonstrates various methods of capturing a Click on a Rollover. Method 1 captures the Click but will fire repeatedly if you leave the Cell Selected or you move the Cursor into a Selected Cell and then Rollover it. Method 2 captures the Click without Jumping but still fires repeatedly if the Cell is left Selected and Rolled over again - try it, clikc a Cell once and then Rollover that Cell again! Method 3 uses a separate Event to capture the Click. We use the Worksheet_SelectionChange() Event in the Worksheet Code Module to intercept the Click and a couple of API's to capture the Arrows and Trigger a TimerFire() Callback. Capturing the Arrow Keys means that we can not fire the Rollover if a use moves the Cursor over the Rollover Cells. Using the Trigger and TimerFire() Callback means that we can do just about anything following a Click on a Rollover - sometimes Rollovers have limitations on Selecting or Navigating if the Range Address is not passed through and the TimerFire() is used to force Excel to carry on with any kind of processing following a Rollover Click
Rollovers4 (Adaptive Clicks) Tab
This Sheet demonstrates some of my older Rollover techniques to capture Clicks. It allows Multiple Rollovers on Multiple Worksheets - just Copy the Sheet and everything replicates as new Defined Names and Rollovers. 1 UDF (highlights and can select default Rolling). 1 Formula ("A1", drag, copy & paste, move). 1 Conditional Format. Example 1 is a simple Rollover. Example 2 resets the Rollover on exit from the Rollover Cells meaning that the first Cell is always Rolled over. Example 3 clears the Rollover on exit. Example 4 does not clear on exit and leaves the last Rollover highlighted. Example 5 is an Option Select Rollover where the Cells are highlighted in one Colour as you Roll over the Rollover Cells and then highlighted in another Colour when Selected or Clicked. Example 6 demonstrates Hyperlink Jumping using this technique. Example 7 is a Grid of Rollover Cells capturing the Click on Option 2 and Option 6. Example 8 demonstrates using Rollovers in merged Cells and capturing the Clicks. Example 9 demonstrates using Rollovers in a Table to highlight each Row
Accordion Tab
This Sheet demonstrates the use of a simple Accordion to Collapse and Expand Rows whenever a Shape is clicked. There are 3 Shapes or Accordions, each linked to a single Subroutine, Public Sub AccordionUI() in the Worksheet Code Module. To adjust these you can insert more Rows or delte Rows. You then need to go into the Code and adjust the setup variables for each Accordion. For example the first Shape is called DarkExcelAccordion1, which is added to the setup variable like this: Const TOGGLE1 As String = "DarkExcelAccordion1". Then the Rows that will be toggled (displayed or hidden) are added to the setup variable like this: Const TOGGLE1_ROWS As String = "13:20". It's very simple to add more Accordions. Just replicate the Shape and assign to the same Macro. Then simply create more sets of Setup variables and then replicate the CASE Statement for the new Accordions
Slicer Buttons Tab
This Sheet demonstrates how to go about creating a Slicer Button linked to Code that you can click and run a Macro with. There are 4 Steps with instructions. At the end of the Sheet you can download a File that demonstrates how to prevent many Slicer Buttons from being selected in other words only one Button can be clicked at any one time, useful if you want to design a Slicer Button Menu (which isn't difficult using this technique). I will not run through all of the Steps here - that's why you need to purchase the File, it's all in there! Take a peek at the video to see if a Slicer Button is something that you want to create in your own Projects and rememebr the Slicer Button Style is included in the Purchase and can be easily copied into another Workbook just by copying the Slicer Buttons Tab into your Project
Radiobuttons Tab
This Sheet demonstrates how to use Radiobuttons in Dark Excel. Radiobuttons look great in Dark Excel and are a fantastic way to capture user options. They use the WingDings Font to display the Button. Here are 2 simple Radiobuttons. Both have a Defined Name added to their Cells (Optional) and then another Defined Name that covers both Cells for the Group (Required). Lastly a further Defined Name captures the Selected Option (Required). Try Selecting each Radiobutton. View the Code in the Radiobuttons Worksheet Code Module. All of the Radiobuttons are triggered by a single Selection or Click. Only one Radiobutton in any Radiobutton Group will be turned on with each Click
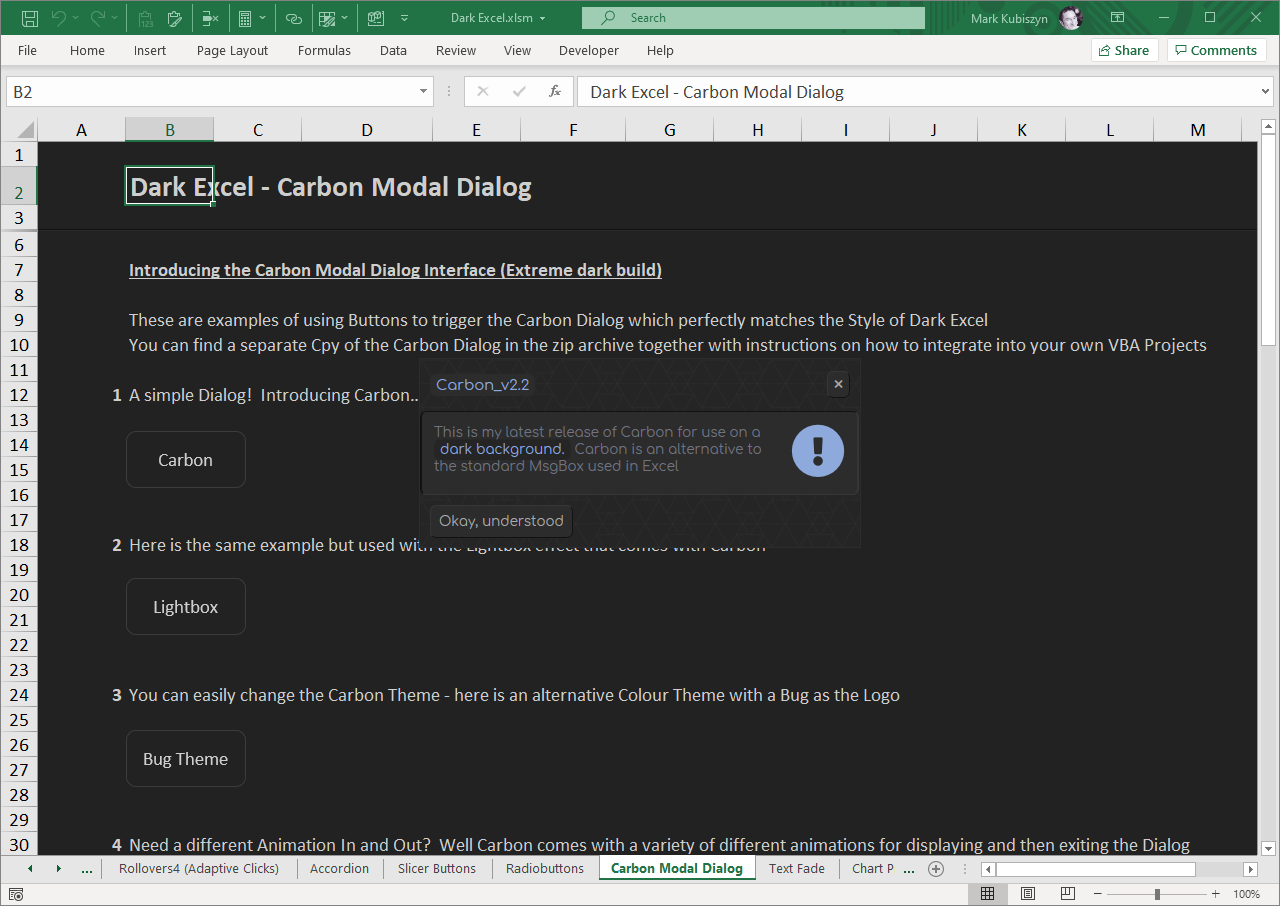
Carbon Modal Dialog Tab
This Sheet demonstrates the fully-featured Carbon v2.2 Modal Dialog Interface that ships with Dark Excel. They are perfectly matched and look fantastic together! There are many examples here, 12 in total demonstrating some lovely Dialogs with and without a Lightbox effect, capturing inputs, displaying Drop-down Combo Boxes etc. Please take your time and watch the Video below to see them all. Instructions are provided for you to Copy Carbon into yur own Projects
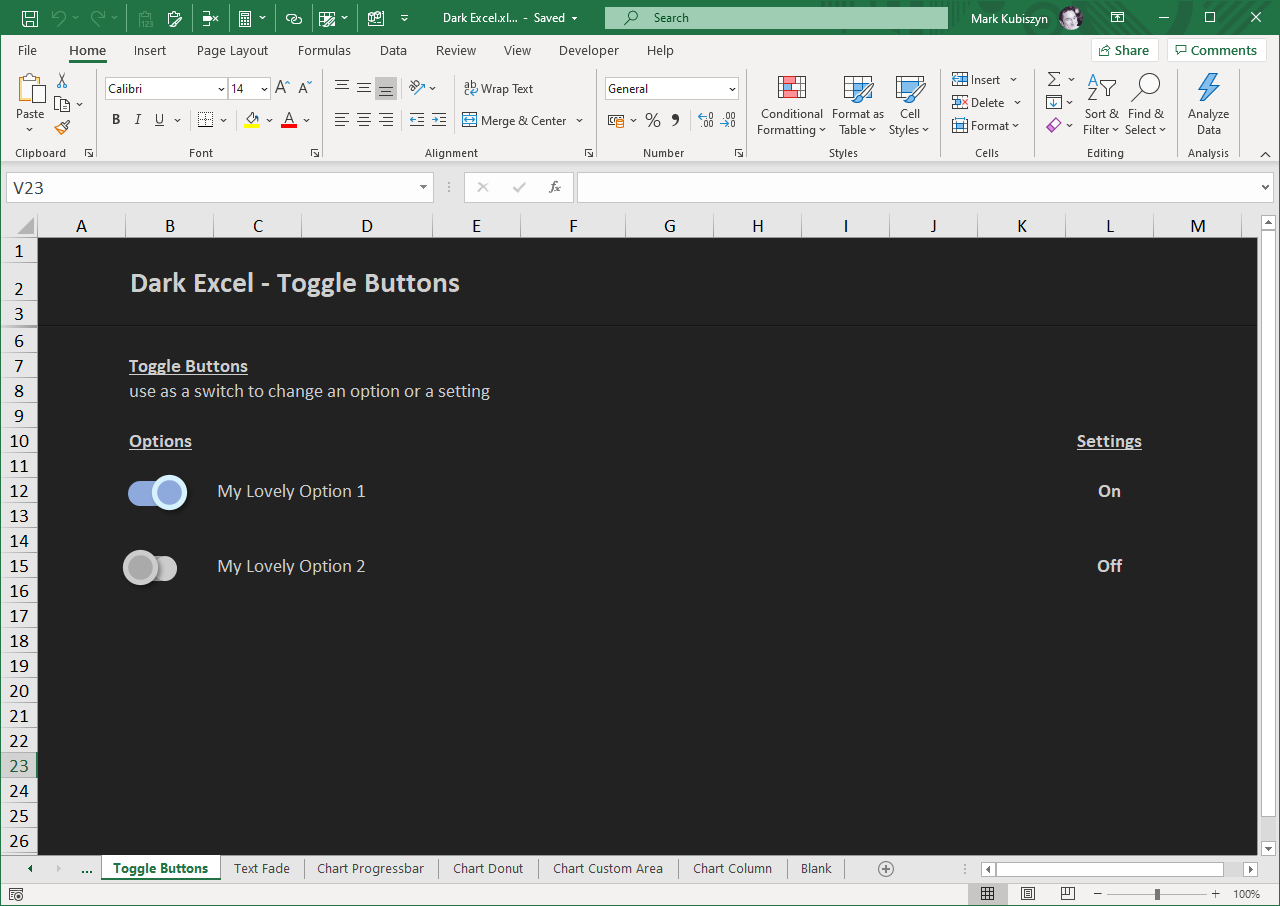
Toggle Buttons Tab
This Sheet demonstrates my Toggle Buttons. I have been meaning to create some of these little beauties for a while now. I have grouped 2 Shapes, a Toggle Button and a Cylinder to make a nifty Toggle Button that can be copied into a Worksheet. After that, you can then add/link the small VBA Code Subroutine to do the toggling work and to store or update the On/Off values. These Buttons are my own design and Code. I took the Colours for the Demo from an image I found by searching on Google. Then I added a nice little easing function for the smooth animation. The easing function is a Robert Penner easing function called 'easeInQuad'...
Using the Toggle Buttons in your own Project
To use the Toggle Buttons in your own Project, first Unprotect the Interface by just doing Unprotect Sheet on the Protect Group of the Review Tab on the Ribbon. Right-click a Shape and use the Selection Pane on the Editing Group of the Home Tab of the Ribbon to make Selections easier. Now, Copy the Shape (it's Grouped) and Paste onto any Worksheet. If you need more than one set of Toggle Buttons then repeatedly Paste more until you have the amount that you need. Now rename the individual additional Shapes using the suffix 2, 3, 4 etc. Remember to use the Selection Pane to do this as it's easier and you can see what you are changing. Now Copy the Code in the Sheet1 Code Module into your own Project Worksheet Code Module. That's it, click one of the Toggle Buttons to protect the Interface
The Toggle or Click Macro
You need to add the Sheet1.Toggle Macro to the ToggleButton Shape only, not the Cylinder or the Group, Toggle Shape. You should use the Find & Select, Selection Pane to highlight the ToggleButton and then right-click on it and assign the Macro. Always use the same Macro for different Toggle Buttons. Please Note: when starting a new Project and Copying over the Buttons, Save the Project when you have finished and added the Macros to the Toggle Buttons and then Close the File! Reopen it and test the Toggle Buttons
Changing the Colours of the Toggle Button and the Cylinder Shapes
Changing the Colour of the Shapes is easy. Go into the Code and in the Toggle Subroutine, scroll down to the bottom of the Code. To change the Colour of the Cylinder, change the RGB values of the Cylinder and to change the Colours of the Toggle Button, change the Fill and Line (Border) RGB values of the Toggle Button. Do this for both RGB values for each Shape Object as per below (you can also use long Colours):
   ' style according to the current direction applied to the Toggle (this is the switched On direction)
   If Direction Then
      Cylinder.Fill.ForeColor.RGB = RGB(77, 182, 172)      ' the Cylinder

      ToggleButton.Fill.ForeColor.RGB = RGB(128, 203, 196) ' the circle of the Toggle Button
      ToggleButton.Line.ForeColor.RGB = RGB(224, 242, 241) ' the outer circle or border of the Toggle Button
Fade Text Tab
This Sheet demonstrates a simple Text Fade when you Select the Worksheet or when you press the Text Fade Button
Chart Progressbar Tab
This Sheet is part of a series of Charts that can be used in Dark Excel. Originally created for Rhino, they look pretty darn neat in Dark Excel too. The Progressbar Chart has a Progress value and a Distance to Go value. Adjust the first value to set the Chart. The Chart Name is 'chart widget ꞉꞉ progress bar'
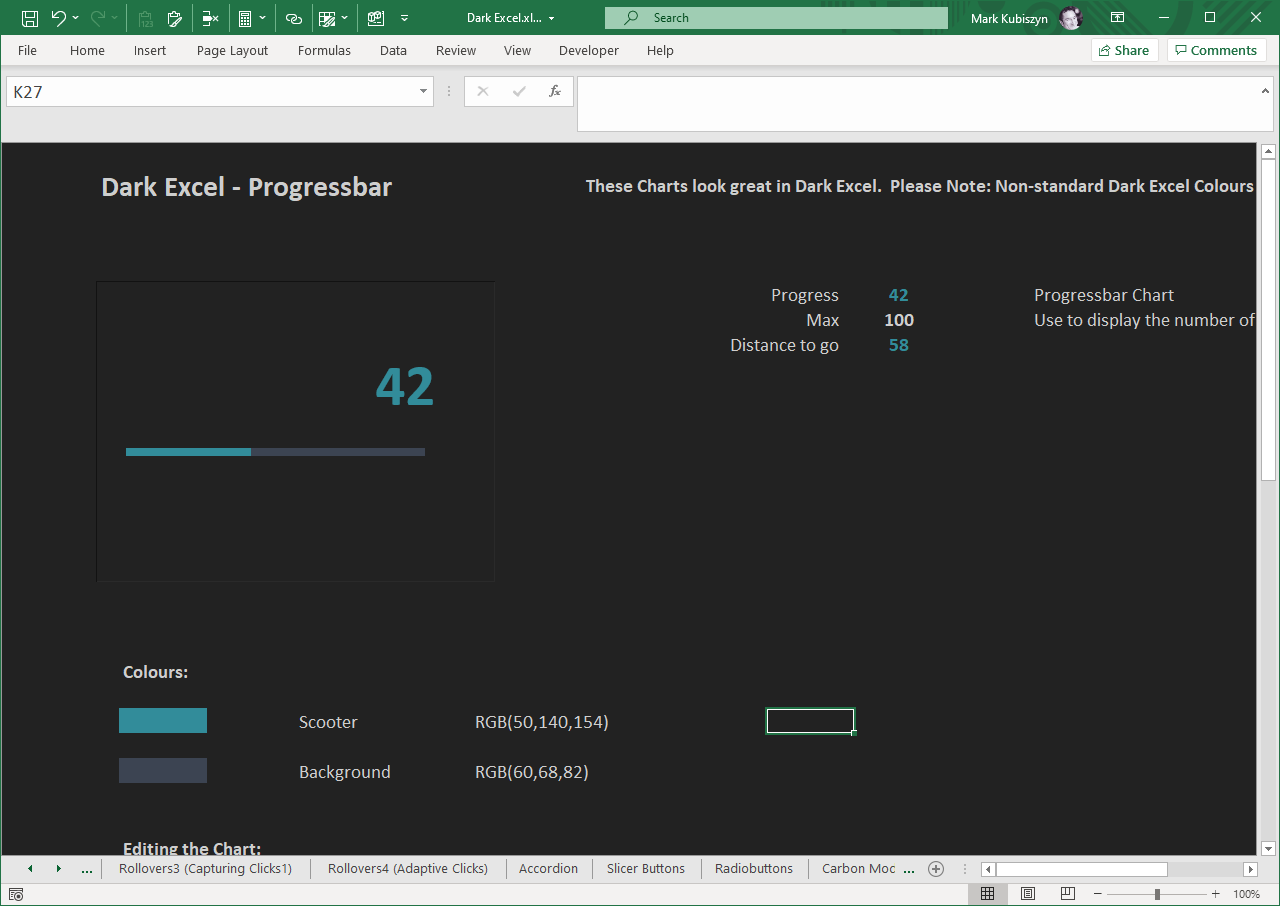
Chart Donut Tab
This Sheet is a Donut Chart Sheet. With a Donut Chart you can use it to display the % complete of some task. Type an Actual value to see the new %
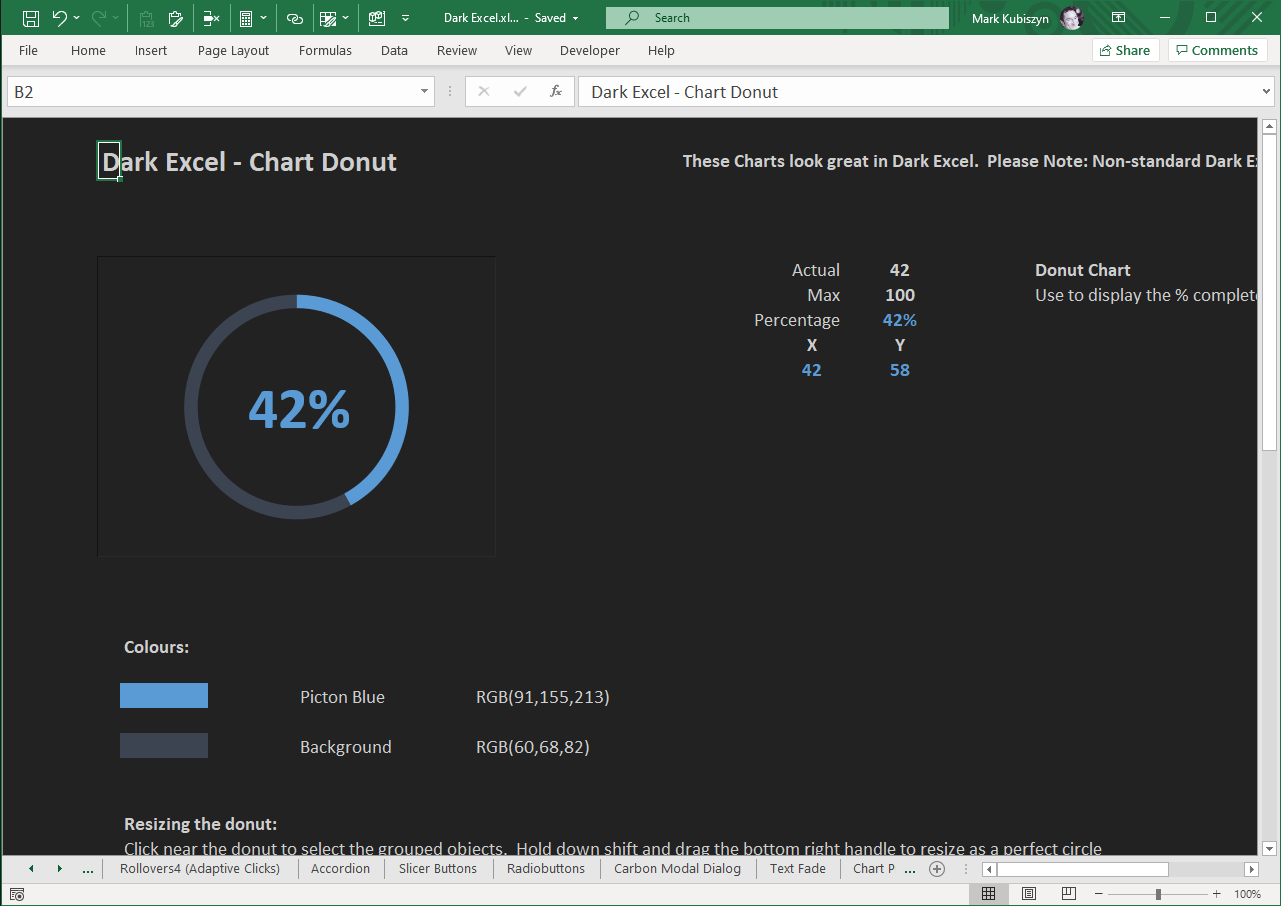
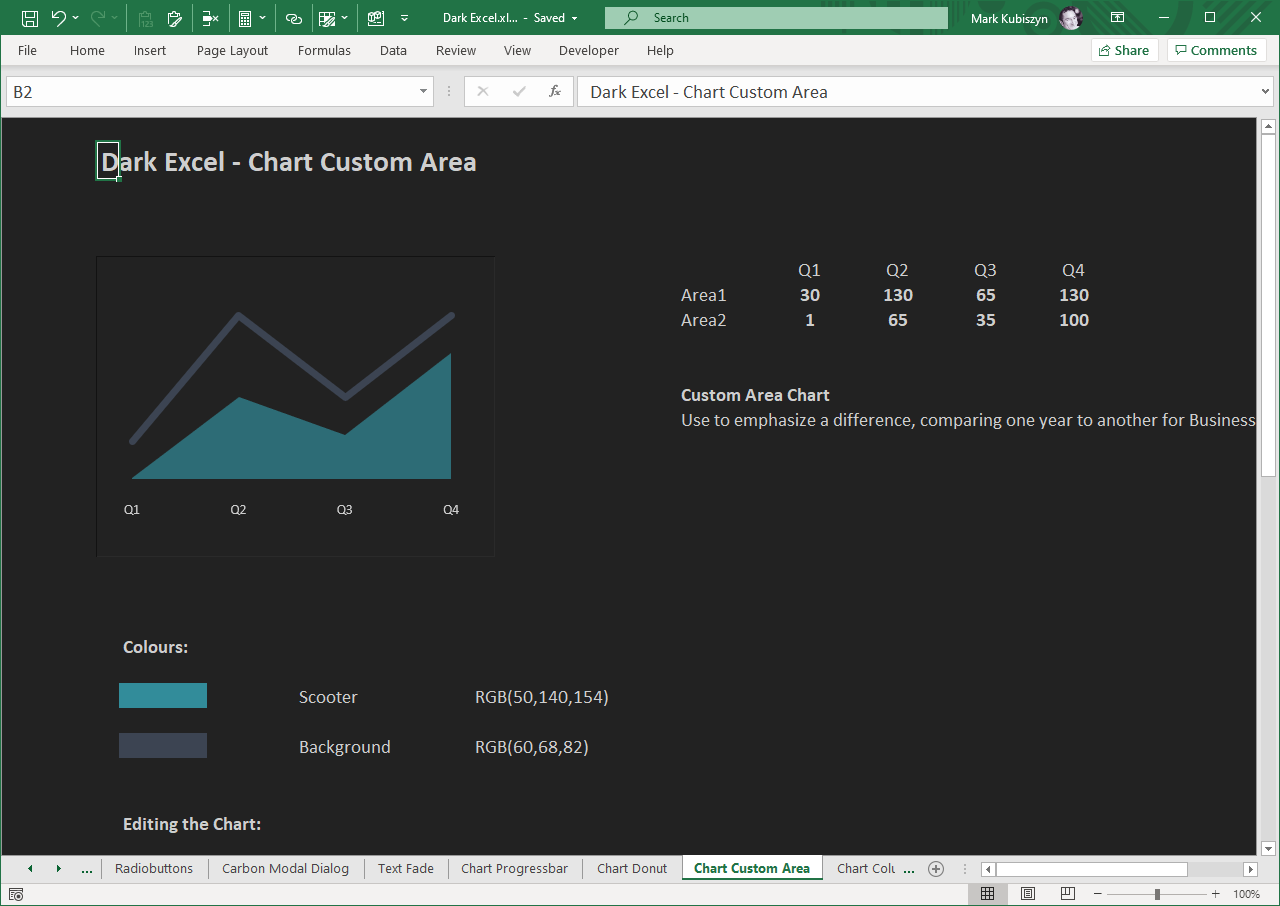
Chart Custom Area Tab
This Sheet is a Custom Area Chart Sheet which is a combination Line and Area Chart. It can be used to emphasize a difference, for example, comparing one year to another for Business Quarters
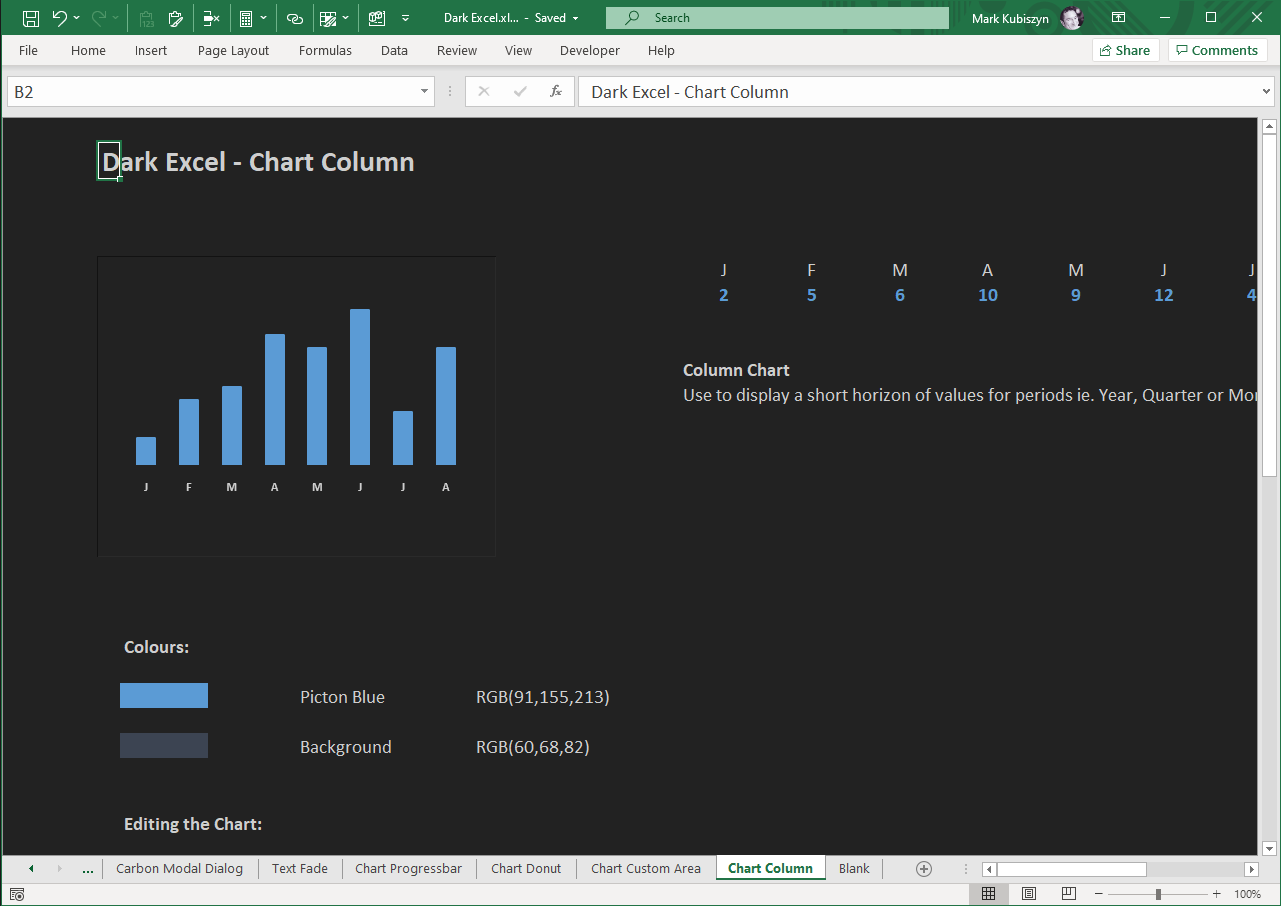
Chart Column Tab
This Sheet is a Column Chart Sheet. It can be used to display a short horizon of values for periods ie. Year, Quarter or Month
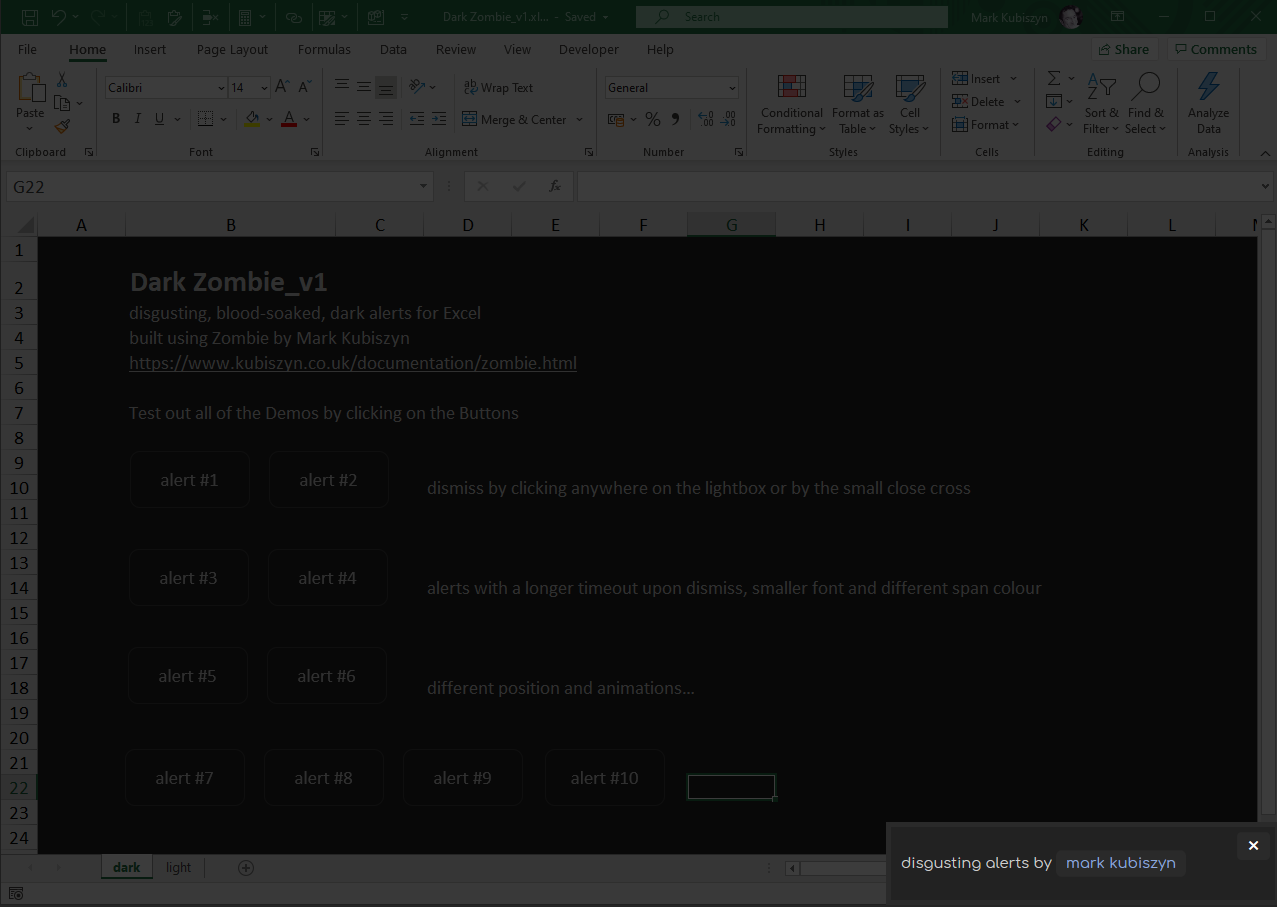
Dark Zombie_v1.xlsm
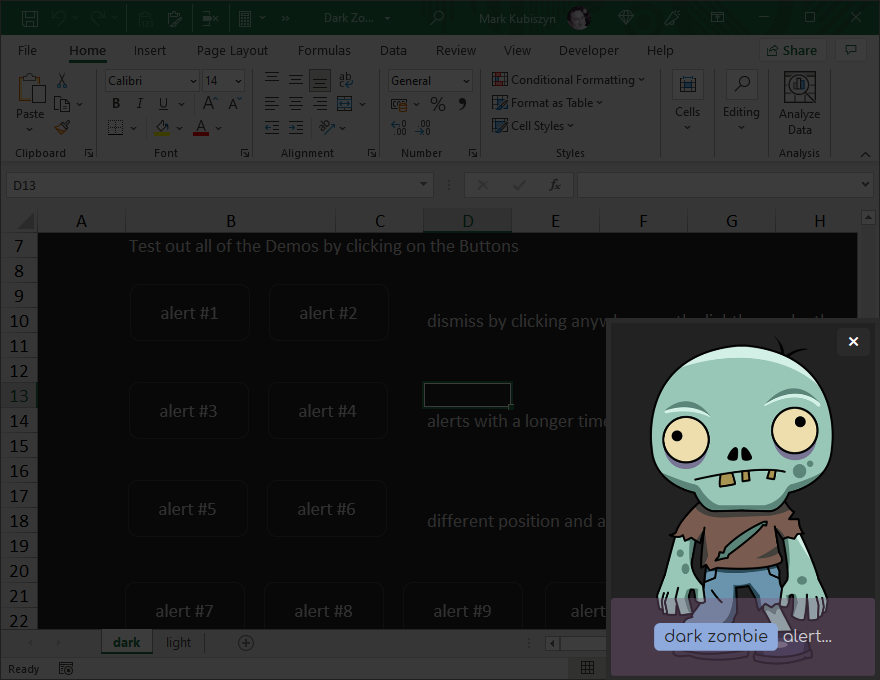
Dark Zombie is a separate Dialog interface for Excel that allows you to create Dark (or light) alerts at the edges of the Excel Window that perfectly match the Dark Excel theme. Built from my original Zombie project this is a feature-rich. powerful Workbook containing 2 Class Modules and the example Code to perform lots of different animations in and out. Open the File and test out all of the Demos to familiarise yourself with the look and feel of Zombie
Adding Zombie alerts into your own Projects
To add Zombie alerts into your own Project you should do the following:
Open your Project and the Dark Zombie File. Go into the VBE (the Visual Basic Editor). Expand the Explorer Window to view the Modules and UserForms in Dark Fishbone. Drag the IRepository and IZombie Class Modules into your Project. Copy and Paste one or all of the Examples from the mdZombies Code Module into your own Project's Code Module (insert a Code Module if you don't already have one) and then run one of the Examples. Well, that's about it...
Dark Fishbone_v1.xlsm
Dark Fishbone is a separate Dialog interface for Excel that allows you to create Dark (or light) alerts at the edges of the Excel Window that perfectly match the Dark Excel theme. Built from my original Pop project and minified, this is powerful additional Workbook with example Code to perform lots of different Scrollbars underneath the Titlebar or ontop of the Statusbar in Excel. Open the File and test out all of the Demos to familiarise yourself with the look and feel of Zombie
Adding Dark Fishbone into your own Projects
To add Dark Fishbone into your own Project you should do the following:
Open your Project and the Dark Fishbone File. Go into the VBE (the Visual Basic Editor). Expand the Explorer Window to view the Modules and UserForms in Dark Fishbone. Drag the frmLightbox and frmPop into your Project. Drag the Pop Code Module into your Project. Copy and Paste one or all of the Examples into your own Project's Code Module (insert a Code Module if you don't already have one) and then run one of the Examples. Remember to include the Demo Callback or link up to your own Code whilst running the Example ie. change the Subroutine referred to here to one of your Subroutines, Callback:="ADummyTask". Please examine what I have done and look at the way that I use the Callback Property's of Pop to integrate this functionality into my dummy routine. You will need to do this in your own routines. If you use my Dummy Subroutine, watch out as it will overwrite data in your ActiveSheet! Well, that's about it...
Dark Excel
Dark Excel Elements

Dark Excel Carbon Dialog Message Box

Dark Excel Tickbox and Checkbox

Dark Excel Progressbar Chart Widget

Dark Excel Custom Are Chart Widget

Dark Zombie Alerts

Dark Zombie Alerts

Dark Zombie Alerts using a Splash Screen
FAQ
Q. Is there a Click Effect with Dark Excel?
A. There sure is! Check out the feature in the Video Section
Dark Excel
This is a video of the Click Effect used in Dark Excel
This is a video of Carbon 2.3 Extreme Build Edition that ships with Dark Excel
This is a video of Dark Zombie v1 that ships with Dark Excel
This is a video of Dark Fishbone v1 that ships with Dark Excel
Support
Support is 100% optional and I provide it for your convenience, so please be patient, polite and respectful
Support for my Software
- Responding to questions or problems regarding the Software and its features
- Fixing valid (replicated) bugs and reported issues for the VERSION I HAVE WRITTEN
Software support does not include
- Customization and installation services
- Support for third party software or ANY kind of development whatsoever
Before seeking support
- Make sure your question is a valid Software Issue and not a customization request
- Make sure you have read through the FAQ's, online documentation and any related video guides before asking support on how to accomplish a task
- Ensure that you access to the VBOM is allowed and that Macros can run in Excel
- Make sure to provide 'proof of purchase' and state the name / version of the Software that you are having issues with when requesting support by Email or via Facebook
How to get Support
Contact Mark Kubiszyn on the Email address provided when you purchased the Software, including the Order Number
Remember to be patient, if there has been an issue with your download, Mark will always respond within 48 hours and will Email you the File directly if neccessary. For other issues the response time may be considerably longer and I may choose to respond to specific questions only (as is my right), depending on what has been asked
Future Builds
* Variations on Theme Colours for Dark Excel
Bug Fixes
* The VBA Window may remain open when running Carbon
As an interim fix, comment out the line in the IModal Class 'Application.VBE.MainWindow.WindowState = 1'. When the next version is released I will comment out the Code
Changelog
You can find the version history in the Code Module for any Macro-enabled Software or read more information on the status of each release
- the latest Version including a description of any changes made is always shown first
16.11.2020 - (Version 1) Released
General release of the first version of Dark Excel